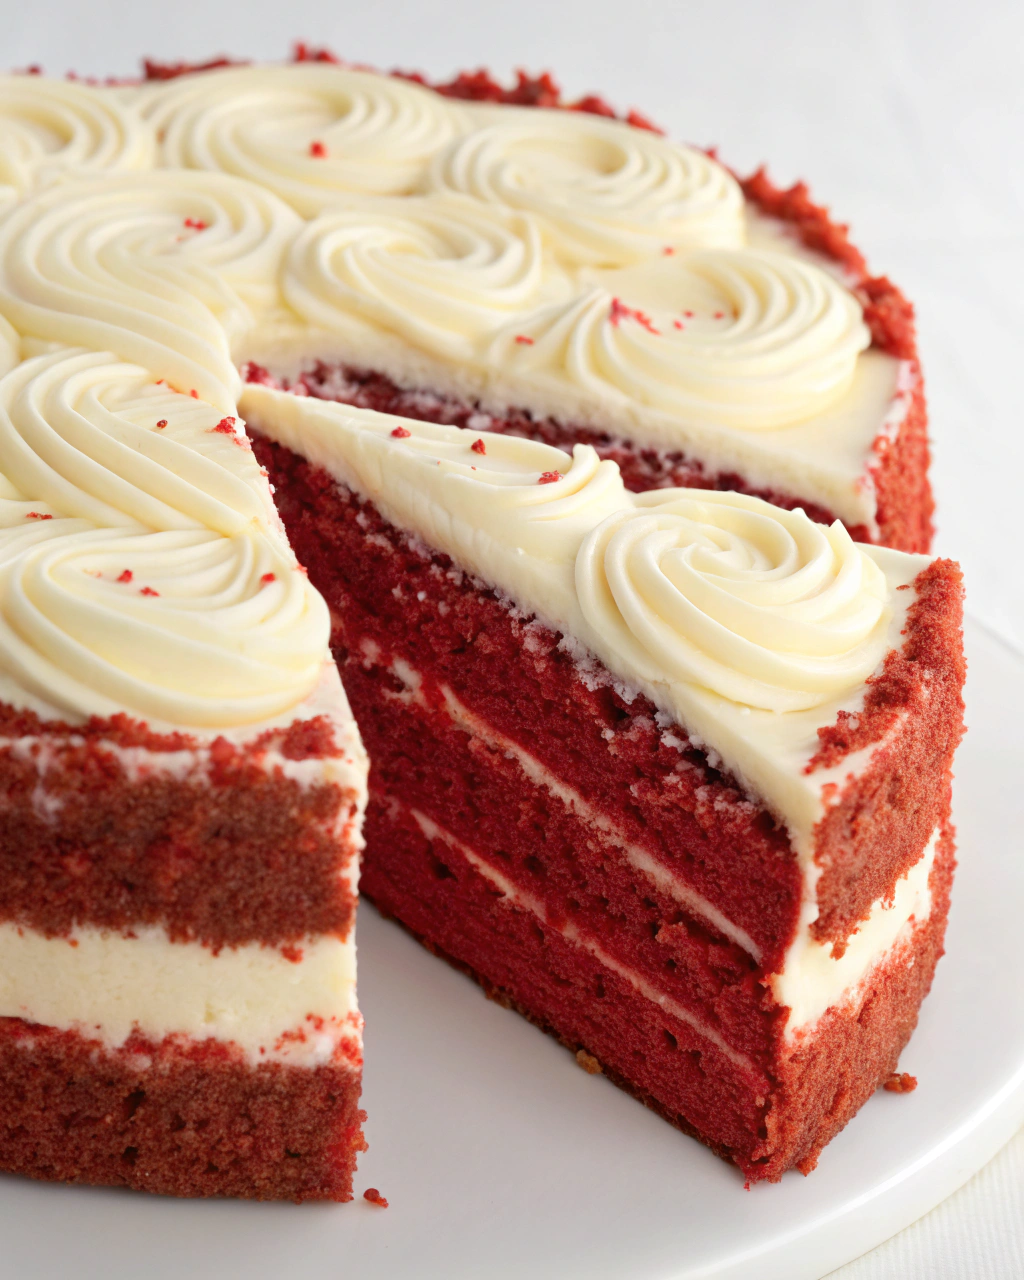
You know that moment when you slice into a cake and the vibrant red layers just make you smile before you even take a bite? That’s exactly the feeling I get every time I make this Red Velvet Cake. It’s like pulling a little slice of celebration right out of the oven—velvety smooth, rich with cocoa, and crowned with luscious cream cheese frosting that’s tangy and sweet all at once. If you’re like me and love a cake that’s as stunning as it is delicious, this recipe will feel like a little kitchen triumph. Let me walk you through it step-by-step—no fancy tricks, just a few insider tips to help your cake turn out perfectly moist and that beautiful ruby red everyone loves.
Quick Facts
Yield: Serves 8–10
Prep Time: 20 minutes
Cook Time: 25–30 minutes
Total Time: 50 minutes
Ingredients
For the Main Dish:
2 ½ cups all-purpose flour
1 ½ cups granulated sugar
1 tsp baking soda
1 tsp fine salt
1 tbsp unsweetened cocoa powder
1 ½ cups vegetable oil
1 cup buttermilk, room temperature
2 large eggs, room temperature
2 tbsp red food coloring
1 tsp pure vanilla extract
1 tsp white vinegar
For the Frosting:
8 oz cream cheese, softened
½ cup unsalted butter, softened
4 cups powdered sugar
1 tsp vanilla extract
How I Make It
Step 1:
Start by preheating your oven to 350°F and greasing two 9-inch round cake pans. I like to line the bottoms with parchment paper for an easy release. In a large bowl, sift together the flour, baking soda, salt, and cocoa powder. This keeps things light and lump-free—definitely don’t skip the cocoa, it’s what gives that subtle chocolate depth without overpowering.
Step 2:
In another bowl, whisk your oil, buttermilk, sugar, eggs, red food coloring, vanilla, and vinegar until smooth and glossy. Red food coloring can be a bit messy, so I recommend dropping your hands in quick after mixing or wearing gloves if you want to keep things neat.
Step 3:
Pour the wet ingredients into your dry mixture and gently fold together using a spatula until just combined. Don’t overmix here—little streaks are okay; they’ll disappear in the oven and keep the texture tender.
Step 4:
Divide the batter evenly between your pans and smooth out the tops. This helps the layers bake evenly. Pop them in the oven for about 25 to 30 minutes, or until a toothpick inserted in the center comes out clean.
Step 5:
When the cakes are done, let them cool in the pans for 10 minutes, then turn them out onto wire racks to cool completely. Cooling fully before frosting is key to avoid melting your frosting later on!
Step 6:
For the frosting, beat together the softened cream cheese and butter until creamy, then gradually add powdered sugar and vanilla. Keep beating until smooth and fluffy. Layer your cake with the frosting between each cake and cover the outside in a thin crumb coat before adding a nice thick final layer. If you want a clean finish, chilling the cake for 15 minutes after the crumb coat helps a lot.
Variations & Tips
Swap regular all-purpose flour for cake flour for an even lighter crumb.
If you want a natural red hue, try beet juice powder instead of red food coloring.
Use buttermilk substitutes like milk + 1 tbsp lemon juice or vinegar if you’re out.
Adding a touch of cream cheese to the batter adds extra moisture.
You can pipe decorative rosettes with the frosting for a show-stopping presentation.
For a twist, sprinkle chopped pecans or walnuts between the layers for extra crunch.
How I Like to Serve It
This cake is perfect for birthday parties, Valentine’s Day, or any cozy winter gathering when you want a dessert that feels special but not fussy. Pair it with a hot cup of coffee or a glass of cold milk. During the holidays, a sprinkle of edible gold dust or a handful of fresh raspberries on top instantly amps up the festive vibes.
Notes
Store leftover cake covered in the fridge for up to 3 days—bring to room temp before serving to soften frosting.
You can freeze unfrosted cake layers wrapped tightly in plastic wrap for up to 2 months.
Closing: This Red Velvet Cake never fails to impress, combining a gorgeous look with that melt-in-your-mouth texture that keeps everyone asking for seconds.
Hi, I’m Lina, the creator of Lina Easy Recipes.Cooking has always been my passion, and I love sharing simple, homemade dishes that anyone can prepare.
Spread the love
Love What You See?
Join me on Pinterest and Facebook for daily cooking inspiration, new recipe ideas, and behind-the-scenes kitchen stories. Let’s cook something wonderful together!