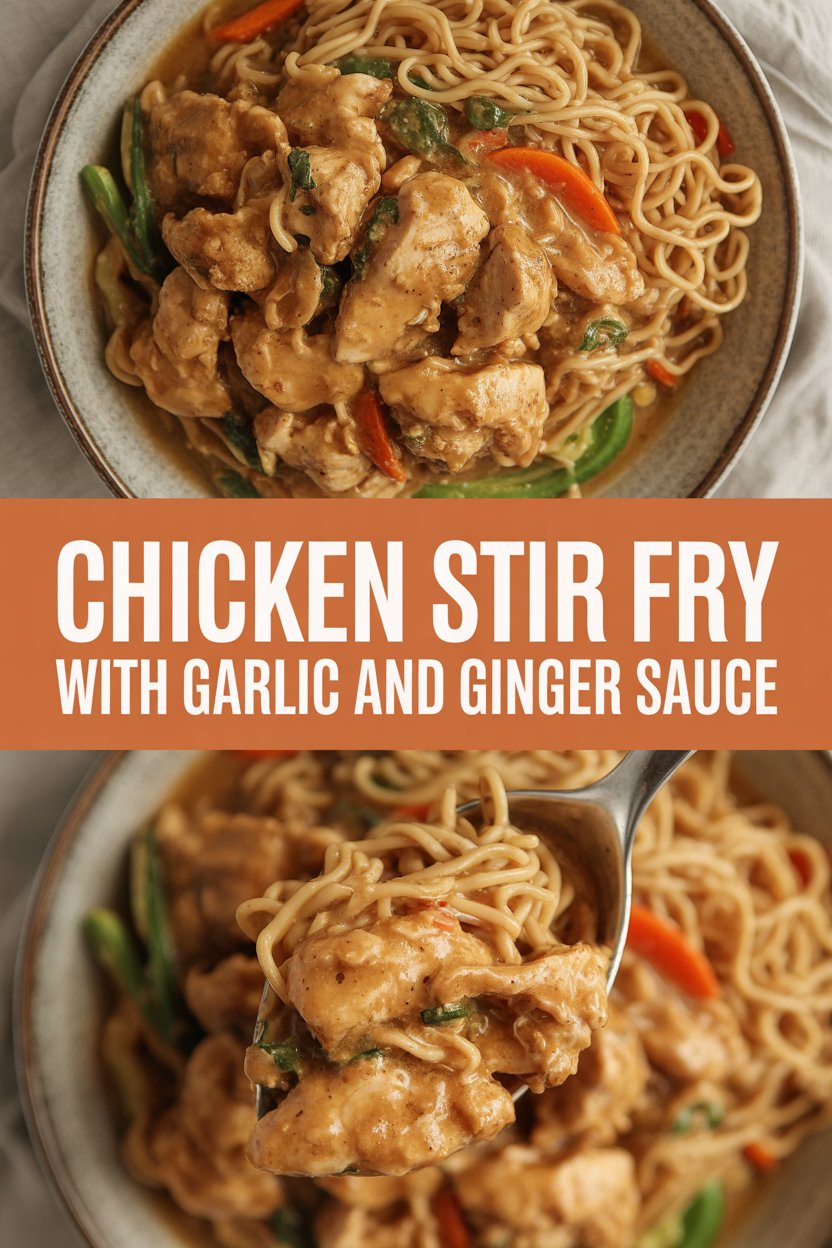
I’m not even joking: the first time I nailed this stir fry, my apartment smelled like a restaurant for an hour. I tell that story because this dish feels fancy but behaves like a weekday warrior — quick, forgiving, and wildly satisfying. My version leans hard into bright **garlic** and zingy **ginger**, with a glossy sauce that clings to every bite of tender chicken and crisp-tender veggies. You’ll hear sizzles, see golden edges, and taste a little sweet, a little salty, and a whole lot of comfort. If you’ve ever been intimidated by a wok or worried about rubbery chicken, stick with me — I’ll walk you through the easy swaps, timers, and tiny tricks that make this feel effortless.
Quick Facts
Yield: Serves 4
Prep Time:15 minutes
Cook Time:10 minutes
Total Time:25 minutes
Why This Recipe is Awesome
This recipe delivers crunchy vegetables, juicy chicken, and a sticky, garlicky-ginger sauce in under 30 minutes. It tastes like something you’d order out but smells like home — full of toasted sesame and caramelized soy. It’s quick, forgiving, and versatile. Who doesn’t love crispy edges on chicken and a sauce that clings like a hug? Plus, it’s so easy even your takeout-app will feel neglected.
Ingredients
For the Main Dish:
1 lb boneless skinless chicken breast, thinly sliced against the grain (about 3/4–1 inch thick before slicing)
2 tbsp cornstarch (for a light coating)
2 tbsp vegetable oil (or any high-heat oil)
1 red bell pepper, thinly sliced
1 medium carrot, thinly sliced on the bias or shredded
1 small head broccoli (about 2 cups florets) or 8 oz snap peas
3 green onions, sliced on the diagonal
2 cloves garlic, finely minced (or 1 tbsp jarred)
1 tbsp fresh ginger, grated or minced
1 tbsp toasted sesame oil (for finishing)
Cooked rice or noodles, for serving
For the Sauce / Garnish (if applicable):
1/3 cup low-sodium soy sauce (or tamari for gluten-free)
2 tbsp rice vinegar
2 tbsp brown sugar or honey
1 tbsp oyster sauce (optional, adds depth)
1/2 cup chicken broth or water
1 tbsp cornstarch mixed with 2 tbsp cold water (slurry)
1 tbsp sesame seeds, toasted, for garnish
How I Make It
Step 1:
Slice the chicken thin and toss it with 2 tbsp cornstarch and a pinch of salt. I like this trick because the cornstarch gives the chicken a silky exterior and helps the sauce cling. Heat a large wok or heavy skillet over high heat until it smells hot — you want it almost smoking. Add 2 tbsp vegetable oil and swirl.
Step 2:
Lay the chicken into the pan in a single layer. Hear that satisfying sizzle? Let it sear without crowding the pan — move a piece only when it has golden edges (about 2–3 minutes per side). Work in batches if needed. Overcrowding steals that crisp. Transfer the chicken to a plate and set aside.
Step 3:
Lower the heat to medium-high and add a splash more oil if the pan looks dry. Toss in the garlic and ginger — you’ll smell them bloom immediately, sharp and fragrant. Add the carrots and bell pepper first, stir-frying for about 2 minutes until they brighten. Add broccoli or snap peas and cook another 1–2 minutes so veggies stay crisp-tender and vibrantly colored.
Step 4:
Return the chicken to the pan. Pour in the sauce mixture (soy, rice vinegar, brown sugar, oyster sauce, chicken broth) and bring it to a simmer. Stir the cornstarch slurry and add it slowly while stirring; the sauce will thicken and go glossy within 30–60 seconds. Taste and adjust salt or sugar — the sauce should taste balanced: salty, a touch sweet, with a bright tang.
Step 5:
Turn off the heat and drizzle 1 tbsp toasted sesame oil over everything for a nutty finish. Scatter sliced green onions and toasted sesame seeds on top. Serve immediately over hot rice or noodles so the sauce soaks in and the textures remain perfect: glossy sauce, crisp veggies, and tender chicken.
Pro Tips
Slice the chicken thin against the grain for tender bites — think sashimi-thin, then cut in halves if pieces feel long.
Keep the pan very hot. High heat creates caramelized edges; low heat creates soggy chicken and sad veggies.
If your sauce thickens too quickly, stir in a splash of water or broth to loosen it — don’t add more cornstarch mid-sauce.
Make the sauce ahead and keep it in the fridge; pour it into the hot pan at the end and it will come together in seconds.
Common Mistakes to Avoid
Skipping preheating: Classic rookie move. It changes texture and bake time. For stir fry, skipping a hot pan gives you steamed, not seared, chicken.
Overmixing: Leads to dense or chewy results. Toss the chicken with cornstarch and salt just until coated.
Guessing cook time: Always use visual cues or a timer, not just vibes. Look for golden edges and glossy sauce.
Overcrowding pans: Give your food some breathing room to crisp properly. Work in batches rather than dumping everything in at once.
Alternatives & Substitutions
Replace chicken with 1 lb firm tofu (press, cube, and toss in cornstarch) for a vegetarian version. It crisps up beautifully.
Use tamari instead of soy sauce for a gluten-free swap — flavor stays almost identical.
Swap brown sugar with honey or maple syrup; honey gives a floral lift and maple adds warmth.
Make it dairy-free easily (recipe already dairy-free). If you crave richness, stir in 1 tsp vegan butter at the end.
Variations & Tips
Spicy: Add 1–2 tsp chili garlic sauce or a pinch of red pepper flakes to the sauce.
Kid-friendly: Cut the garlic to 1 clove and omit the oyster sauce; add a splash of orange juice for sweetness.
Veg-forward: Double the vegetables and halve the chicken for a lighter dish.
Nutty twist: Toss in 1/4 cup cashews or peanuts at the end for crunch and protein.
Sheet-pan version: Roast the veggies at 425°F for 15–20 minutes and add pan-seared chicken; combine with sauce.
Ginger-forward: Use 2 tbsp ginger and a squeeze of lime for a bright, aromatic punch.
FAQ (Frequently Asked Questions)
Can I make this ahead of time?
Yes! Prep the chicken and slice the vegetables up to a day ahead and keep them separate in the fridge. Store the sauce in an airtight container. When ready, cook everything fresh and toss with warmed sauce for best texture. Leftovers keep up to 3 days; reheat gently in a skillet with a splash of water or broth.
Can I double the recipe?
Sure thing. Use a larger wok or cook in two batches to avoid overcrowding; otherwise you’ll lose crispness and get more steam than sear.
Can I substitute butter with oil?
Technically yes, but you’ll miss that buttery magic. Use 3/4 the amount of oil.
How do I know it’s done?
Look for golden, slightly caramelized edges on the chicken and vibrant, crisp-tender vegetables. Cut a piece — the center should look white with no pink and feel juicy, not rubbery. For safety, chicken should reach 165°F.
What if I don’t have ingredient X?
No panic: use garlic powder (1/4 tsp) if you lack fresh garlic, and ground ginger (1/4 tsp) if you’re out of fresh. Swap bell pepper for zucchini or mushrooms without changing timings much.
How I Like to Serve It
I usually pile this over steaming jasmine rice and add a wedge of lime. For a healthier spin, I toss it into brown rice or cauliflower rice and top with extra green onions and chili flakes. It works for weeknight dinners, casual date nights, or bringing to potlucks (people fight over the leftovers). In summer, I serve it with cold soba noodles and more fresh herbs for a bright meal.
Notes
Store cooked stir fry in an airtight container up to 3 days. Reheat in a skillet over medium heat with a splash of water to revive the sauce.
Safe cooking temp for chicken: 165°F. Use a quick thermometer for peace of mind.
Final Thoughts
Closing: You just made a restaurant-worthy stir fry at home — crunchy, saucy, and full of personality. Now go impress someone — or just yourself — with your homemade masterpiece!
Hi, I’m Lina, the creator of Lina Easy Recipes.Cooking has always been my passion, and I love sharing simple, homemade dishes that anyone can prepare.
Spread the love
Love What You See?
Join me on Pinterest and Facebook for daily cooking inspiration, new recipe ideas, and behind-the-scenes kitchen stories. Let’s cook something wonderful together!