
I promise I did not set out to improve two iconic desserts at once — I simply wanted to eat banana pudding with my fingers. These Banana Pudding Rice Krispie Treats happened when I mixed nostalgia with a tiny bit of culinary mischief. Picture me, in socks, hovering over a pot while I melt butter and marshmallows, humming like a cartoon chef, and sneaking vanilla wafers into the cereal bowl. The result tastes like spooning banana pudding on a crunchy cloud. If you like chewy marshmallow, crisp cereal, and little pockets of banana crunch, this recipe will make you clap at the stove — or at least smile very loudly.
Quick Facts
- Yield: Serves 12
- Prep Time: 15 minutes
- Cook Time: 5 minutes
- Total Time: 20 minutes
Why This Recipe is Awesome
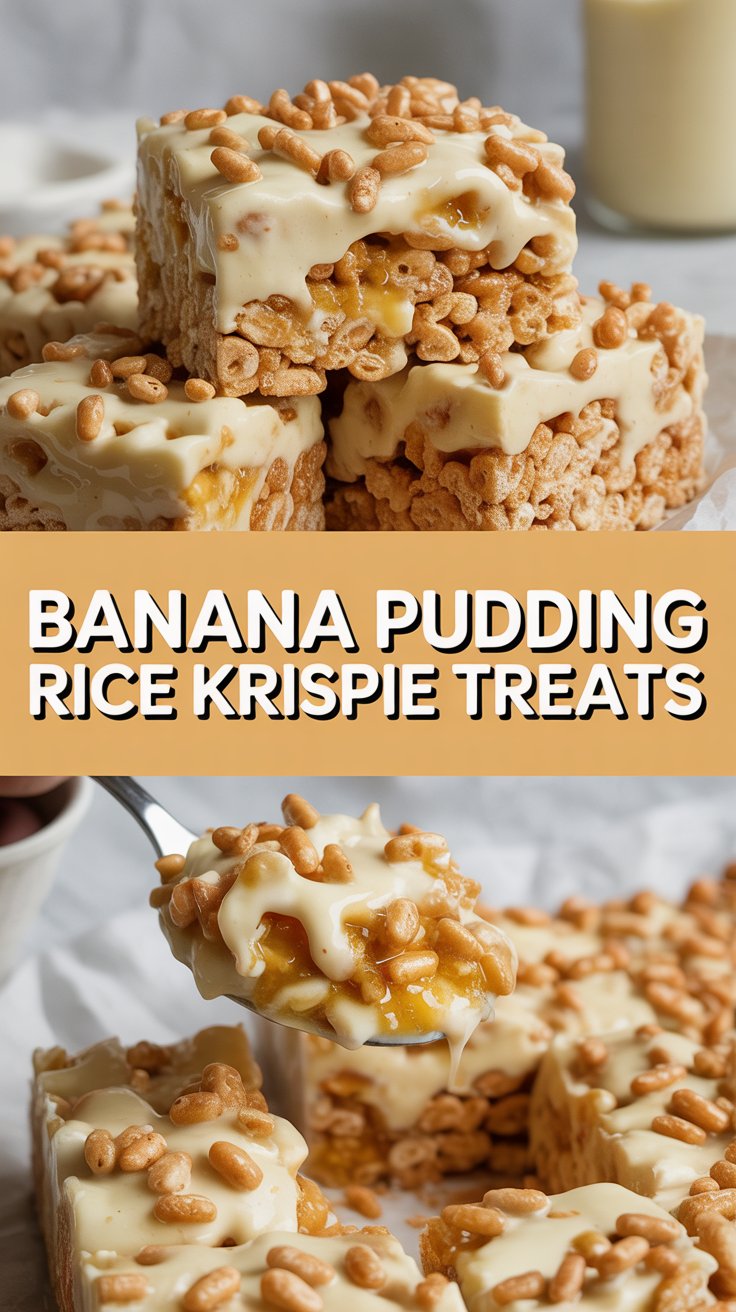
Because it gives you the creamy, vanillay-banana vibes of banana pudding with the crisp, nostalgic snap of Rice Krispie treats. It’s gooey where you want gooey, crunchy where you want crunch, and just sweet enough to make your coffee taste like brunch. It’s so easy even your microwave can’t mess it up, and the mix of textures — soft marshmallow, crunchy vanilla wafers, and salty-banana chips — keeps every bite interesting.
Ingredients
For the Main Dish:
- 3 tbsp unsalted butter
- 10 oz mini or regular marshmallows (about one 10 oz bag)
- 6 cups Rice Krispies cereal (use gluten-free brand if needed)
- 1 (3.4 oz) package instant vanilla pudding mix (dry)
- 1 cup crushed vanilla wafers (about 1 sleeve)
- 1 cup chopped dried banana chips (for crunch)
- 1 tsp vanilla extract (or 1/2 tsp banana extract for extra banana punch)
- Pinch of fine salt
- Nonstick spray or extra butter for the pan
For the Sauce / Garnish (optional):
- 1 cup heavy cream, whipped with 2 tbsp powdered sugar (or 1 tub Cool Whip for an easy swap)
- Sliced fresh banana for topping (use right before serving to avoid browning)
- Extra crushed vanilla wafers for sprinkling
How I Make It
Step 1:
I line a 9×13 pan with parchment and spray it with nonstick spray so the bars slide out easily. I measure out the Rice Krispies, crush the vanilla wafers in a zipper bag with a rolling pin, and stir them together with the dry vanilla pudding mix and banana chips in a big bowl. The dry pudding powder will coat the cereal and give that instant banana-pudding flavor without making the treats soggy.
Step 2:
I melt the butter in a large pot over medium heat until it foams, then toss in the marshmallows. I stir constantly with a heatproof spatula until the marshmallows become glossy and smooth — the aroma smells like toasted sugar and comfort. If the marshmallows clump, keep stirring and lower the heat; patience here pays off.
Step 3:
I remove the pot from heat and immediately stir in the vanilla extract (or banana extract), then dump the cereal mixture into the pot. I fold everything together gently but thoroughly so the cereal gets coated. You’ll hear a soft crackle as the crispy cereal meets the warm marshmallow — music to a snack lover’s ears.
Step 4:
I transfer the mixture to the prepared pan and press it evenly with a buttered spatula or lightly buttered parchment paper. Pressing too hard makes the bars dense; press just firmly enough so the mixture holds together. Let the pan rest at room temperature until the bars set, about 30 minutes. You can speed this up by placing the pan in the fridge for 15 minutes.
Step 5:
I slice into bars with a sharp knife (wipe the blade with a damp towel between cuts for clean edges) and top with a dollop of whipped cream, a fresh banana slice, and a sprinkle of crushed wafers if I’m feeling fancy. Serve immediately for the best texture — the cereal stays crispiest right after the first day.
Pro Tips
- Use a warm, buttered spatula or parchment to press the mixture to avoid sticking. Cold tools make the marshmallow seize and tear the bars.
- If you want a stronger banana flavor, add 1/2 tsp banana extract in addition to vanilla — extract hits fast, so add in small increments and taste.
- For chewier bars, use all mini marshmallows; for chunkier texture, toss in a handful of chopped white chocolate or banana chips after mixing.
- Store at room temperature in an airtight container for up to 3 days. Refrigeration makes them firmer but chewier.
Common Mistakes to Avoid
- Skipping preheating: Classic rookie move. It changes texture and bake time.
- Overmixing: Leads to dense or chewy results. Mix until just combined.
- Guessing cook time: Always use visual cues or a timer, not just vibes.
- Overcrowding pans: Give your food some breathing room to crisp properly.
Alternatives & Substitutions
- Want dairy-free? Use vegan margarine or 3 tbsp coconut oil and dairy-free marshmallows; choose a gluten-free cereal and gluten-free cookies to keep it allergy-friendly.
- Out of instant pudding mix? Stir in 1–2 tbsp banana powder or 1/2–1 tsp banana extract, tasting as you go.
- Swap vanilla wafers for crushed graham crackers for a slightly less sweet, toasty flavor.
- Make it gluten-free by using certified gluten-free crispy rice cereal and gluten-free cookie crumbs; texture stays delightfully similar.
Variations & Tips
- Chocolate-Banana: Fold in 1/2 cup mini chocolate chips for a classic flavor combo.
- Peanut Butter Banana: Melt 1/3 cup peanut butter with the butter and swirl into the marshmallow before adding cereal.
- Cookies & Cream: Replace vanilla wafers with crushed sandwich cookies and use white chocolate chips.
- Caramel Drizzle: Warm 1/4 cup caramel sauce and drizzle over bars before serving for an indulgent touch.
- Freeze-Friendly: Cut into squares, wrap individually, and freeze for easy grab-and-go snacks (thaw at room temp for 10–15 minutes).
FAQ (Frequently Asked Questions)
- Can I make this ahead of time?
- Yes! Make the bars, cool completely, and store in an airtight container at room temperature for up to 3 days. For longer storage, freeze wrapped bars for up to 1 month and thaw at room temperature.
- Can I double the recipe?
- Sure thing. Use two 9×13 pans or one larger sheet pan; press slightly thinner if you need it to set faster. Watch the setting time — larger mass sometimes takes extra chilling.
- Can I substitute butter with oil?
- Technically yes, but you’ll miss that buttery magic. Use ¾ the amount of oil.
- How do I know it’s done?
- Look for glossy, fully-melted marshmallows that coat the cereal evenly and hold the mixture together when pressed. The bars should set firm to the touch after cooling and feel crisp at the edges.
- What if I don’t have ingredient X?
- Use crushed graham crackers for vanilla wafers, powdered pudding or extract for instant mix, and coconut oil for butter in a pinch. Small swaps keep the dessert fun.
How I Like to Serve It
I love these on a picnic with cold milk or an iced coffee — they handle travel well and always disappear fast. For a potluck, I stack them on a pretty platter and tuck in a bowl of whipped cream for dolloping. They also pair nicely with fresh berries if you want a tart counterpoint to all that sweet.
Notes
- Store at room temperature in an airtight container for up to 3 days; chill briefly to firm up if they get sticky in warm weather.
- No meat temps apply here — just enjoy with friends and napkins. If serving with fruit, add fresh banana slices right before serving to prevent browning.
Final Thoughts
Closing: Now go impress someone — or just yourself — with your homemade masterpiece!

Hi, I’m Lina, the creator of Lina Easy Recipes.Cooking has always been my passion, and I love sharing simple, homemade dishes that anyone can prepare.
Love What You See?
Join me on Pinterest and Facebook for daily cooking inspiration, new recipe ideas, and behind-the-scenes kitchen stories. Let’s cook something wonderful together!


