
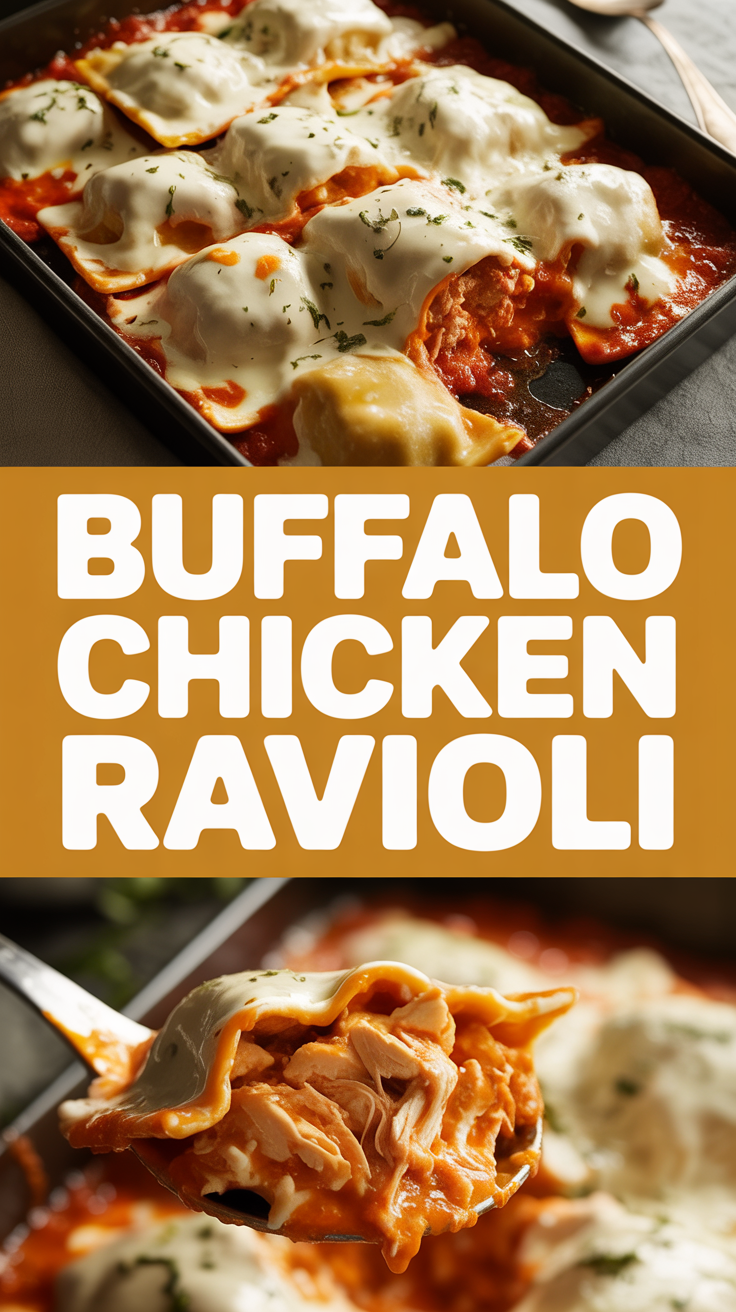
Nothing says cozy like a skillet full of cheesy, spicy little pillows that smell like game day and grandma’s best soup crossed into a hot wing. Tonight I’m wrapping that comfort up into Buffalo Chicken Ravioli — soft, tangy filling, crispy golden edges, and a creamy blue-cheese drizzle that makes the whole house hum. I picture rainy evenings, a bowl, a good movie, and the satisfying snap when you bite through a crisp edge into steaming, saucy filling. If you want comfort with a kick, this recipe hugs you and high-fives you at the same time.
Quick Facts
- Yield: Serves 4
- Prep Time: 30 minutes
- Cook Time: 15 minutes
- Total Time: 45 minutes
Why This Recipe is Awesome
This recipe turns pantry staples into something special: tender shredded **chicken**, tangy **buffalo sauce**, creamy **cream cheese**, and melty **mozzarella** all tucked into little pockets of dough. You get contrast — crunchy, golden edges, and a gooey, spicy center. It’s simple enough for a weeknight yet fancy-feeling for company. And honestly? It’s so easy even your oven won’t mess it up.
Ingredients
For the Main Dish:
- 2 cups cooked shredded **chicken** (rotisserie works great)
- 4 oz cream cheese, softened
- 1/2 cup shredded **mozzarella
- 1/4 cup crumbled **blue cheese** (optional but lovely)
- 1/3 cup **buffalo sauce** (Frank’s or your favorite)
- 2 tbsp chopped green onions
- 1/2 tsp garlic powder
- Salt and pepper to taste
- 1 package square wonton wrappers (about 50 wrappers) — or round pasta sheets cut into 3″ squares
- 1 large egg beaten with 1 tbsp water (for sealing)
- 2 tbsp butter + 1 tbsp olive oil for pan-frying
For the Sauce / Garnish (if applicable):
- 2 tbsp butter
- 1/4 cup **buffalo sauce** (extra for tossing)
- 1/4 cup sour cream or plain Greek yogurt (to mellow heat)
- Extra crumbled **blue cheese** and chopped green onions for serving
How I Make It
Step 1:
Mix the filling: in a bowl, stir together the shredded **chicken**, softened **cream cheese**, **mozzarella**, **buffalo sauce**, chopped green onions, garlic powder, and a pinch of salt and pepper until the mixture looks creamy and well-combined. Taste and add more **buffalo sauce** if you want more heat. The aroma should smell bright and tangy — that scent already tells you dinner’s coming.
Step 2:
Assemble the ravioli: lay out a few wonton wrappers on a clean surface. Brush the edges with the beaten egg. Place about 1 teaspoon of filling in the center of each wrapper. Fold into triangles (or place another square on top) and press the edges firmly to seal — run your finger along the edges to push out air so they don’t burst. If any tear, patch with a dab of egg wash and a bit of wrapper. Keep them covered with a damp towel so they don’t dry out.
Step 3:
Boil quickly: bring a pot of salted water to a rolling boil. Gently drop ravioli in batches and cook for 2–3 minutes — you want them tender and cooked through, not mushy. Use a slotted spoon to lift them out; they’ll look plump and glossy. Listen for that quiet simmer and watch for the wrappers to become slightly translucent.
Step 4:
Pan-fry for texture and sauce: heat a skillet over medium heat and add 2 tbsp butter and 1 tbsp olive oil. Place boiled ravioli in the skillet and sear until you hear a satisfying sizzle and the bottoms turn golden, about 2 minutes per side. Meanwhile, melt 2 tbsp butter in a small saucepan, whisk in 1/4 cup buffalo sauce and 1/4 cup sour cream until smooth — this gives you a creamy, tangy drizzle.
Step 5:
Finish and serve: transfer the crisped ravioli to a platter, drizzle with the buffalo cream sauce, and sprinkle extra crumbled **blue cheese** and green onions. Serve hot so you get that contrast of steam and crunch. Grab napkins — these are deliciously messy.
Pro Tips
- Use a rotisserie chicken to save time and boost flavor — shred it while it’s still warm for extra juiciness.
- Don’t overfill the wrappers; a teaspoon keeps edges sealable and prevents bursting in the water.
- Seal with an egg wash and press firmly — trapped air causes leaks. If any leak, crisp them right away to lock the filling in.
- For extra crispness, pan-fry on medium-high heat and don’t move the ravioli for the first minute — let a golden crust form.
Common Mistakes to Avoid
- Skipping preheating: Classic rookie move. It changes texture and bake time.
- Overmixing: Leads to dense or chewy results. Mix until just combined.
- Guessing cook time: Always use visual cues or a timer, not just vibes.
- Overcrowding pans: Give your food some breathing room to crisp properly.
Alternatives & Substitutions
- Swap shredded **chicken** for shredded jackfruit or roasted cauliflower for a vegetarian option — you’ll lose some meatiness but keep the spicy-saucy vibe.
- Use vegan cream cheese and dairy-free cheese to make it dairy-free; flavor will shift brighter and a bit less rich.
- Substitute wonton wrappers with gluten-free wrappers or cooked gluten-free pasta sheets for a gluten-free version.
- Trade blue cheese for crumbled feta if you want milder tang; expect a saltier, less funky finish.
Variations & Tips
- Spicy: add a pinch of cayenne or swap half the buffalo sauce for a ghost-pepper sauce (use cautiously).
- Kid-friendly: use mild wing sauce and more mozzarella, skip the blue cheese drizzle.
- Pesto twist: fold a teaspoon of basil pesto into the filling for herbaceous depth that plays nicely with buffalo heat.
- Baked version: arrange assembled ravioli in a baking dish, top with a little butter and extra sauce, and bake at 375°F for 10–12 minutes until golden.
- Crispy snack: freeze assembled ravioli for 30 minutes, then deep-fry for a crunchy appetizer with blue-cheese dip.
FAQ (Frequently Asked Questions)
- Can I make this ahead of time?
- Yes! Make the filling and assemble the ravioli a day ahead, layer them between parchment sheets in an airtight container, and refrigerate. Boil and pan-fry when ready. For longer storage, freeze them flat on a tray then transfer to a bag for up to 2 months.
- Can I double the recipe?
- Sure thing. Work in batches when filling and boiling to avoid overcrowding. If you double, use two skillets or keep finished ravioli warm in a 200°F oven while you cook the rest.
- Can I substitute butter with oil?
- Technically yes, but you’ll miss that buttery magic. Use ¾ the amount of oil.
- How do I know it’s done?
- Ravioli look slightly translucent and puffed after boiling, with no raw dough color. After pan-frying, edges should be **golden and crisp**, and the filling should steam hot when you pierce it.
- What if I don’t have ingredient X?
- No panic: if you lack cream cheese, use ricotta mixed with a tablespoon of yogurt. No buffalo sauce? Mix hot sauce with a bit of melted butter for a quick stand-in.
How I Like to Serve It
I pile these ravioli on a big platter for sharing, with celery sticks, extra blue-cheese dressing, and a cold beer or crisp white wine. They make a killer game-day plate or a cozy two-person dinner. For summer, serve alongside a crisp green salad; for winter, throw in roasted Brussels sprouts for balance. They feel friendly and a little naughty — in the best way.
Notes
- Store leftovers in an airtight container for up to 3 days. Reheat gently in a skillet to revive crisp edges.
- Cook chicken to a safe internal temperature of 165°F before shredding, especially if you prepare it yourself.
Final Thoughts
Closing: Trust me — these buffalo-filled pillows will become a fast favorite. Now go impress someone — or just yourself — with your homemade masterpiece!

Hi, I’m Lina, the creator of Lina Easy Recipes.Cooking has always been my passion, and I love sharing simple, homemade dishes that anyone can prepare.
Love What You See?
Join me on Pinterest and Facebook for daily cooking inspiration, new recipe ideas, and behind-the-scenes kitchen stories. Let’s cook something wonderful together!


