Okay, lean in—I’ve got a chef’s secret that will change how you roast a whole bird. I treat roasting like controlled magic: a few simple techniques and the oven does the rest, but those small details make the difference between “fine” and “jaw-drop good.”
Years ago a mentor showed me how rubbing butter under the skin and using a high initial roast creates crackling skin and unbelievably juicy meat; I’ve tweaked that trick into a cozy, garlic-and-rosemary version everyone asks for. Follow my step-by-step, and you’ll get golden, fragrant skin, garlicky aromas that make the whole house smell like Sunday dinner, and a pan of glossy drippings you’ll want to sop up with crusty bread. This recipe feels fancy but stays stubbornly simple.
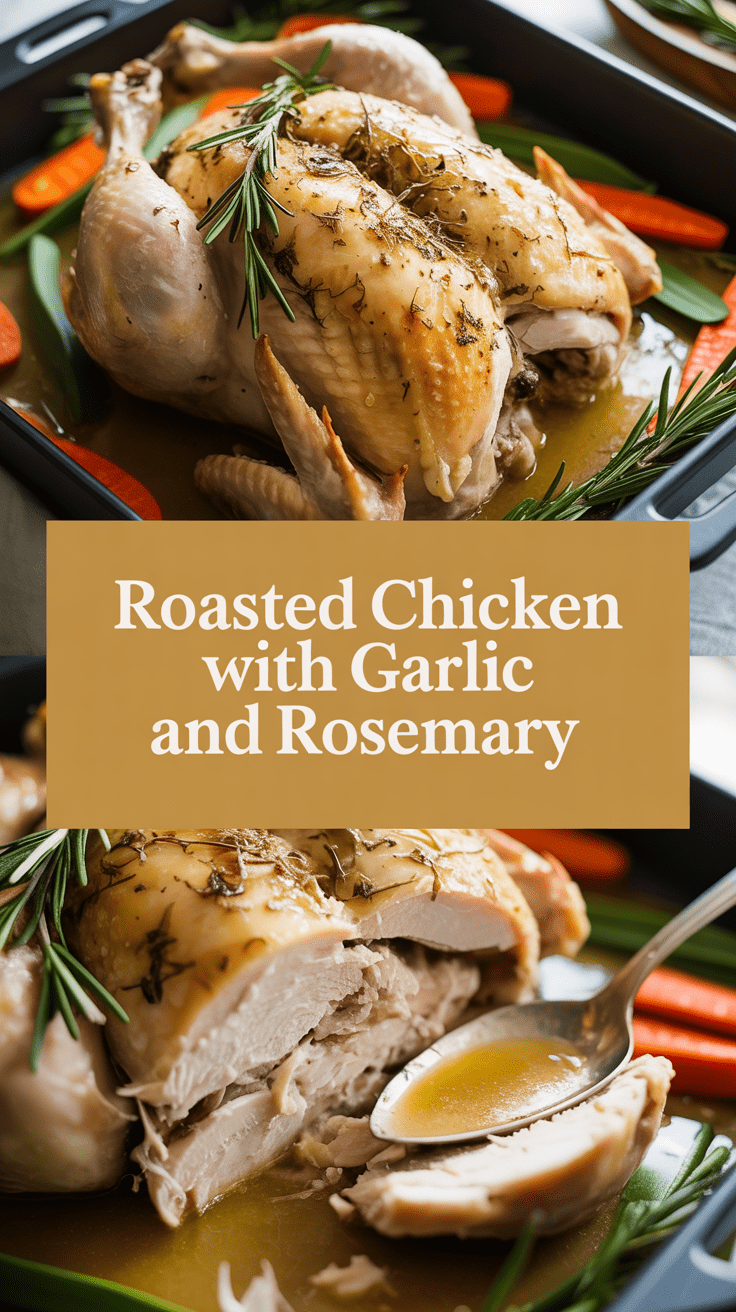
This roasted chicken with garlic and rosemary tastes like a restaurant main course with way less effort. The skin crisps up into a golden, crackly blanket while the meat stays juicy and fragrant. You get savory, herby notes, a hit of bright lemon, and a pan sauce that turns leftovers into instant gourmet lunches. It’s so easy even your oven can’t mess it up—just follow the small chef’s tricks I slip in below.
Ingredients
For the Main Dish:
1 whole chicken (about 3½–4 lbs)
2 tbsp olive oil or softened butter
4 cloves garlic, minced (about 1 tbsp)
2 tbsp fresh rosemary, chopped (or 2 tsp dried)
1 tbsp fresh thyme leaves (or 1 tsp dried)
1 lemon, zested and halved
1 tsp kosher salt (plus more to taste)
½ tsp freshly ground black pepper
1 small onion, quartered
2 carrots, cut into large chunks
1 cup low-sodium chicken broth (for the pan, optional)
For the Sauce / Garnish (optional):
½ cup chicken stock or pan juices
2 tbsp butter (or 1½ tbsp olive oil for dairy-free)
1 tbsp lemon juice
1 tsp chopped fresh rosemary
Chopped parsley for garnish (optional)
How I Make It
Step 1:
Preheat the oven to 425°F. I always pat the chicken dry with paper towels—this simple move helps the skin crisp. Gently separate the skin from the breast with your fingers, creating a small pocket. Rub 1 tbsp softened butter (or olive oil) plus half the minced garlic and half the chopped rosemary under the skin over the breasts. Rub the remaining butter all over the outside, then season the whole bird liberally with salt and pepper. Tuck the lemon halves and a few rosemary sprigs into the cavity.
Step 2:
Arrange the onion and carrots in a roasting pan to form a little bed; they lift the chicken and add flavor to the drippings. Place the chicken breast-side up on the vegetables. Tie the legs together with kitchen twine if you like a neater roast. Drizzle 1 tbsp olive oil over the vegetables and season them with a pinch of salt and pepper. Slide the pan into the hot oven—listen for that first sizzle as the skin starts to render.
Step 3:
Roast at 425°F for about 15 minutes to jump-start browning, then lower the oven to 375°F and continue roasting for about 45–60 minutes, depending on size (total about 1 hr 15 min for a 3½–4 lb bird). During cooking, baste once or twice with pan juices if you’re watching the oven closely; otherwise the initial high heat does most of the crisping work. As the chicken cooks, you’ll smell nutty, roasted garlic and piney rosemary—absolute comfort.
Step 4:
Check doneness by inserting an instant-read thermometer into the thickest part of the thigh without touching bone. Pull the bird at 165°F internal temperature. Look for golden-brown, blistered skin and clear juices running from the thigh when you pierce it. If the skin browns too quickly, tent loosely with foil for the last 10–15 minutes.
Step 5:
Transfer the chicken to a cutting board and let it rest for 10–15 minutes—I never skip this because rest lets the juices redistribute and keeps meat tender. Meanwhile, make the pan sauce: pour off excess fat, put the roasting pan on the stove over medium heat, add the chicken stock and lemon juice, scrape up browned bits, then whisk in 2 tbsp butter off-heat for shine. Carve and serve the chicken with the sauce drizzled over and a sprinkle of parsley.
Pro Tips
Rub butter under the skin for unbelievably moist breasts and crisp skin. Your oven thank-you will be audible (crackle!).
Use an instant-read thermometer and aim for 165°F in the thickest thigh—don’t guess by time alone.
Dry the skin thoroughly and start at a higher temp (425°F) to get the Maillard reaction going; then drop to 375°F to finish cooking evenly.
If you love garlic, smash a few whole cloves and tuck them under the chicken during roasting for mellow, sweet garlic pockets.
Common Mistakes to Avoid
Skipping preheating: Classic rookie move. It changes texture and bake time.
Overmixing: Leads to dense or chewy results. Mix until just combined.
Guessing cook time: Always use visual cues or a timer, not just vibes.
Overcrowding pans: Give your food some breathing room to crisp properly.
Alternatives & Substitutions
Swap chicken for a whole roasted cauliflower for a vegetarian option—roast at the same temps, but check doneness earlier; it gives a similar golden, caramelized finish.
Use olive oil instead of butter for dairy-free cooking; you lose a bit of that buttery magic but still get great browning (use ¾ the butter amount by volume).
Want lower sodium? Use low-sodium broth and reduce added salt, but taste before serving and adjust.
For a brighter flavor, swap rosemary for tarragon or add a tablespoon of chopped sage—each herb changes the vibe subtly but deliciously.
Variations & Tips
Spicy twist: Add 1 tsp smoked paprika and ½ tsp cayenne to the rub for a warming kick.
Herb-butter under the skin: Mix butter with parsley, lemon zest, and garlic for extra herbiness.
Lemon-forward: Roast extra lemon halves with the bird and squeeze over before serving for a fresh pop.
Kid-friendly: Skip the lemon zest and herbs that feel “adult” and simply season with salt, pepper, and a touch of honey for a sweet glaze.
One-pan feast: Add baby potatoes and Brussels sprouts around the bird for a complete meal—watch for crowding.
Creative twist: Rub a little Dijon mustard under the skin before the butter for a tangy crust.
FAQ (Frequently Asked Questions)
Can I make this ahead of time?
Yes! Roast the chicken fully, cool, and refrigerate for up to 3 days. Reheat in a 350°F oven covered with foil until warmed through (about 20–25 minutes). For freshest crisp skin, reheat uncovered at 400°F for the last 5 minutes.
Can I double the recipe?
Sure thing. Roast two chickens on separate racks or pans so air circulates; don’t stack them. Cooking time per bird stays similar, but the oven may take longer to recover temperature—use a thermometer to check doneness.
Can I substitute butter with oil?
Technically yes, but you’ll miss that buttery magic. Use ¾ the amount of oil (so 1½ tbsp oil for every 2 tbsp butter) and expect slightly less richness and sheen in the pan sauce.
How do I know it’s done?
Look for deep golden skin, clear juices, and an internal temp of 165°F in the thigh. The meat will feel tender when you press the breast and the legs will move loosely in the joint.
What if I don’t have ingredient X?
No panic—swap rosemary with thyme or sage, use garlic powder (¼ tsp per clove) in a pinch, and lemon can be swapped for a splash of apple cider vinegar in the pan sauce.
How I Like to Serve It
I serve this chicken with mashed potatoes and roasted green beans for a cozy Sunday meal, or slice it thin for sandwiches topped with arugula and a smear of mayo for weekday lunches. It shines at a casual dinner party next to a simple fennel salad and chilled white wine. In summer, pair with roasted vegetables and a bright citrus vinaigrette; in winter, go heavy on root vegetables and gravy.
Notes
Store leftover chicken in an airtight container for up to 3 days. Reheat gently to avoid drying out.
Safe internal temp for chicken: 165°F. Always check the thickest part of the thigh near the bone.
Final Thoughts
Closing: Now go impress someone — or just yourself — with your homemade masterpiece!
Hi, I’m Lina, the creator of Lina Easy Recipes.Cooking has always been my passion, and I love sharing simple, homemade dishes that anyone can prepare.
Spread the love
Love What You See?
Join me on Pinterest and Facebook for daily cooking inspiration, new recipe ideas, and behind-the-scenes kitchen stories. Let’s cook something wonderful together!