
Let me let you in on a little chef’s secret: the air fryer turns humble chicken breasts into something borderline magical — crispy on the outside, tender and juicy inside, and ready faster than you can decide what to have for dinner. I learned this trick the hard way after a lifetime of dry chicken disasters; now I treat the air fryer like a tiny, furious sous-chef who actually listens. The real secret? A quick oil-herb rub, a hot basket, and zero apology for the garlic. You’ll smell lemony garlic before you even open the drawer, and that first bite — golden edges giving way to a buttery, herb-scented center — will make you wonder why you ever bothered with complicated marinades.
Quick Facts
- Yield: Serves 4
- Prep Time: 10 minutes
- Cook Time: 12 minutes
- Total Time: 22 minutes
Why This Recipe is Awesome
This recipe gives you juicy, flavorful chicken with a crisp, herb-kissed exterior in under 30 minutes. It hits a perfect balance of garlic, lemon, and herbs so the meat stays bright and never bland. It’s so reliable that even a distracted weeknight version comes out impressive. And who doesn’t love crispy edges and a tender center? Plus, cleanup stays delightfully small — the air fryer basket takes one swipe.
Ingredients
For the Main Dish:
- 4 boneless, skinless chicken breasts (about 1.5–2 lbs total; aim for roughly equal thickness)
- 2 tbsp olive oil
- 3 cloves garlic, minced (about 1 tbsp)
- 1 tsp kosher salt (adjust to taste)
- 1/2 tsp black pepper
- 1 tsp dried thyme or 1 tbsp fresh, chopped
- 1 tsp dried oregano
- 1 tsp paprika (smoked or sweet — your call)
- 1 lemon, zested and juiced
- 2 tbsp fresh parsley, chopped for garnish
- Optional: 1 tbsp butter for finishing (or dairy-free spread)
For the Sauce / Garnish (if applicable):
- Quick lemon-garlic butter: 2 tbsp butter, 1 tsp lemon juice, pinch of salt, 1 tsp chopped parsley — melt and drizzle.
How I Make It
Step 1:
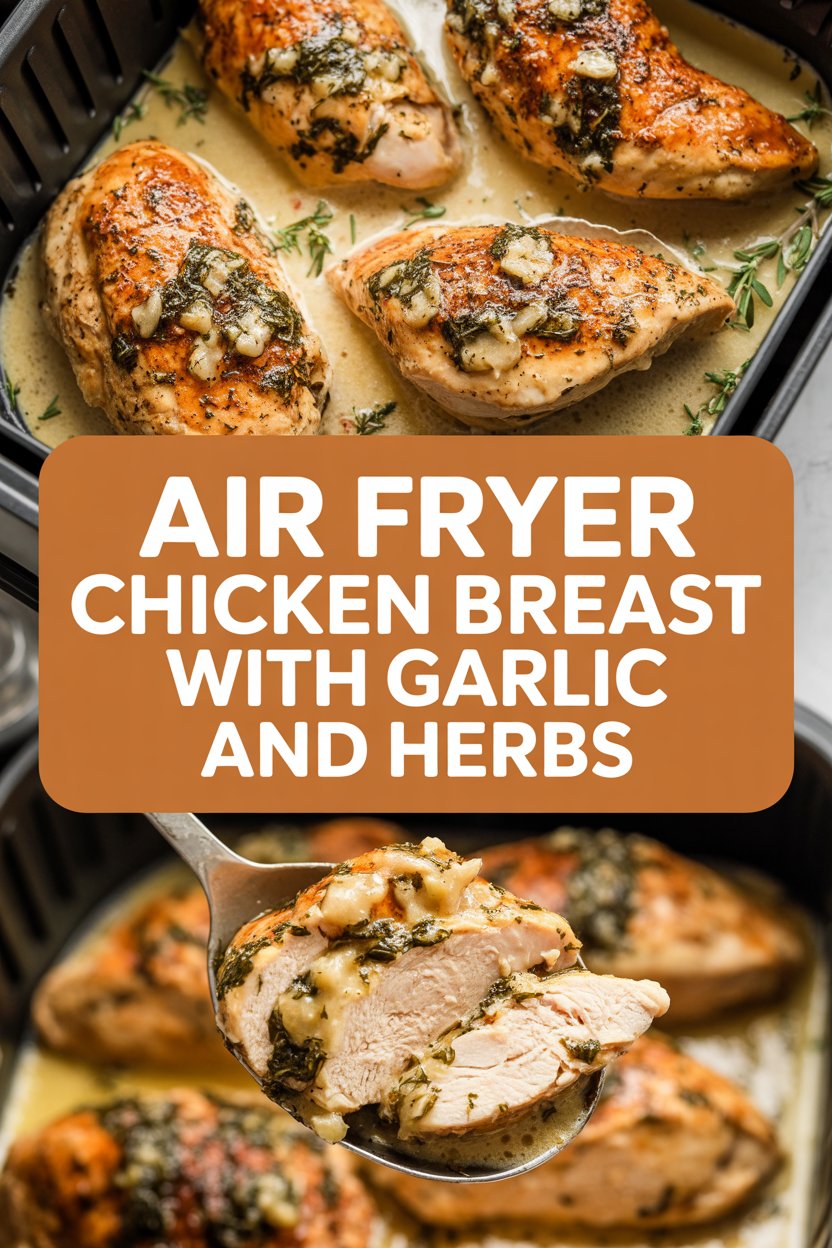
I pat the chicken breasts dry with paper towels — dry skin = better crisp. I trim any odd thin flaps so the breasts cook evenly. In a small bowl I whisk together 2 tbsp olive oil, minced garlic, lemon zest and juice, thyme, oregano, paprika, salt, and pepper. The mixture smells bright and garlicky; I rub it over both sides of each breast until each one looks glossy and confident.
Step 2:
I preheat the air fryer to 400°F for 3 minutes — trust me, that preheat jump-starts the crisp. I place the breasts in the basket with space between them so hot air can dance around the meat. If your breasts look unequal, gently pound the thicker ones to about ¾–1 inch thickness so everything finishes at the same time.
Step 3:
I cook at 400°F for 6 minutes, then flip with tongs and cook another 6 minutes. As they sizzle, you’ll hear a satisfying little pop and smell the garlic toasting and lemon brightening. The edges should look golden-brown and slightly caramelized. I keep my eye on color — not every air fryer behaves the same, so consider this your visual cue.
Step 4:
I check internal temperature with an instant-read thermometer and look for 165°F in the thickest part. If a breast needs 1–2 more minutes, I give it that extra time rather than overcook everything. If I want a tiny glossy finish, I brush each piece with 1 tbsp butter right after cooking — it melts into the hot juices and smells irresistible.
Step 5:
I let the chicken rest for 5 minutes — this keeps the juices inside instead of on your cutting board. I slice against the grain, sprinkle with chopped parsley, and drizzle any quick lemon-garlic butter over the top. Serve while hot so those edges stay crisp and the center stays juicy.
Pro Tips
- If your breasts vary in size, pound them to even thickness so they cook evenly — I use a zip-top bag and a rolling pin.
- Use an instant-read thermometer to hit 165°F. No guesswork. I always trust temp over time.
- For extra flavor, marinate 30 minutes to 2 hours in the fridge. If you rush, even a 10-minute rest after seasoning helps the garlic and lemon settle in.
- Don’t stack chicken in the basket. Cook in batches if needed; crowded food steams instead of crisps.
Common Mistakes to Avoid
- Skipping preheating: Classic rookie move. It changes texture and bake time.
- Overmixing: Leads to dense or chewy results. Mix until just combined.
- Guessing cook time: Always use visual cues or a timer, not just vibes.
- Overcrowding pans: Give your food some breathing room to crisp properly.
Alternatives & Substitutions
- Swap chicken for boneless thighs for more forgiving juiciness — thighs handle higher heat and stay tender.
- Use 1 tbsp olive oil + 1 tbsp Greek yogurt for a tangy coating that yields a slightly creamier crust (adds protein but also calories).
- Dairy-free: skip the butter and use an extra teaspoon of olive oil or a dairy-free spread to finish.
- Gluten-free: this recipe already fits — all ingredients are naturally gluten-free.
Variations & Tips
- Spicy: add ½ tsp cayenne or 1 tsp chili powder to the rub.
- Kid-friendly: swap garlic for garlic powder and reduce lemon to ½ tsp for a milder flavor.
- Mediterranean: top with chopped olives, tomatoes, and a sprinkle of feta after cooking.
- Herb-forward: double the fresh parsley and add chopped basil for a summer vibe.
- BBQ twist: brush with your favorite BBQ sauce in the last 2 minutes for sticky goodness.
- Creative twist: stuff thin breasts with a sliver of lemon zest and herb cheese before cooking for a melty surprise.
FAQ (Frequently Asked Questions)
- Can I make this ahead of time?
- Yes! Cook the chicken and store in an airtight container in the fridge for up to 3 days. Reheat gently in the air fryer at 350°F for 3–5 minutes so it warms through without drying out.
- Can I double the recipe?
- Sure thing. Air fry in batches so you don’t overcrowd the basket. If your fryer holds more, leave space between pieces and add 2–3 minutes to the total cook time only if needed.
- Can I substitute butter with oil?
- Technically yes, but you’ll miss that buttery magic. Use ¾ the amount of oil if you swap — it won’t melt the same way but still adds richness.
- How do I know it’s done?
- You’ll see golden edges and a glossy surface. The sure sign: an instant-read thermometer at 165°F in the thickest part. The meat should feel firm but still juicy.
- What if I don’t have ingredient X?
- Out of fresh parsley? Use dried parsley (1 tsp) or swap with chives or cilantro for a different but tasty finish.
How I Like to Serve It
I slice this chicken over a simple salad with lemon vinaigrette for a light lunch, tuck it into warm pita with tzatziki for a fun dinner, or serve it alongside roasted potatoes and green beans for a classic weeknight meal. It plays well with chilled white wine or an ice-cold beer and fits into cozy winter nights or easy summer BBQs. I make a double batch when I plan meal-prep lunches for the week.
Notes
- Store cooked chicken in an airtight container for up to 3 days; freeze for up to 3 months. Reheat gently to avoid drying.
- Safe internal temperature for chicken: 165°F. Always check at the thickest point.
Final Thoughts
Closing: Now go impress someone — or just yourself — with your homemade masterpiece!

Hi, I’m Lina, the creator of Lina Easy Recipes.Cooking has always been my passion, and I love sharing simple, homemade dishes that anyone can prepare.
Love What You See?
Join me on Pinterest and Facebook for daily cooking inspiration, new recipe ideas, and behind-the-scenes kitchen stories. Let’s cook something wonderful together!


