
I have a confession: I once tried to snack my way through a whole bag of bland roasted nuts and decided right then that every snack in my house needed personality — preferably with a crunch loud enough to wake the neighbors. Enter my go-to pocket-sized party starter: chickpeas roasted in the air fryer until they sing. They crackle, they rattle, and they smell like toasted magic (think nutty, slightly caramelized). I keep a jar of these around for movie nights, rushed lunches, or when I need a crunchy companion to my salad. They cost next to nothing, take practically no babysitting, and deliver big on texture. If you like snacks that snap back at you, these are your new best friend.
Quick Facts
- Yield: Serves 4 as a snack
- Prep Time: 10 minutes
- Cook Time: 15–20 minutes
- Total Time: 25–30 minutes
Why This Recipe is Awesome
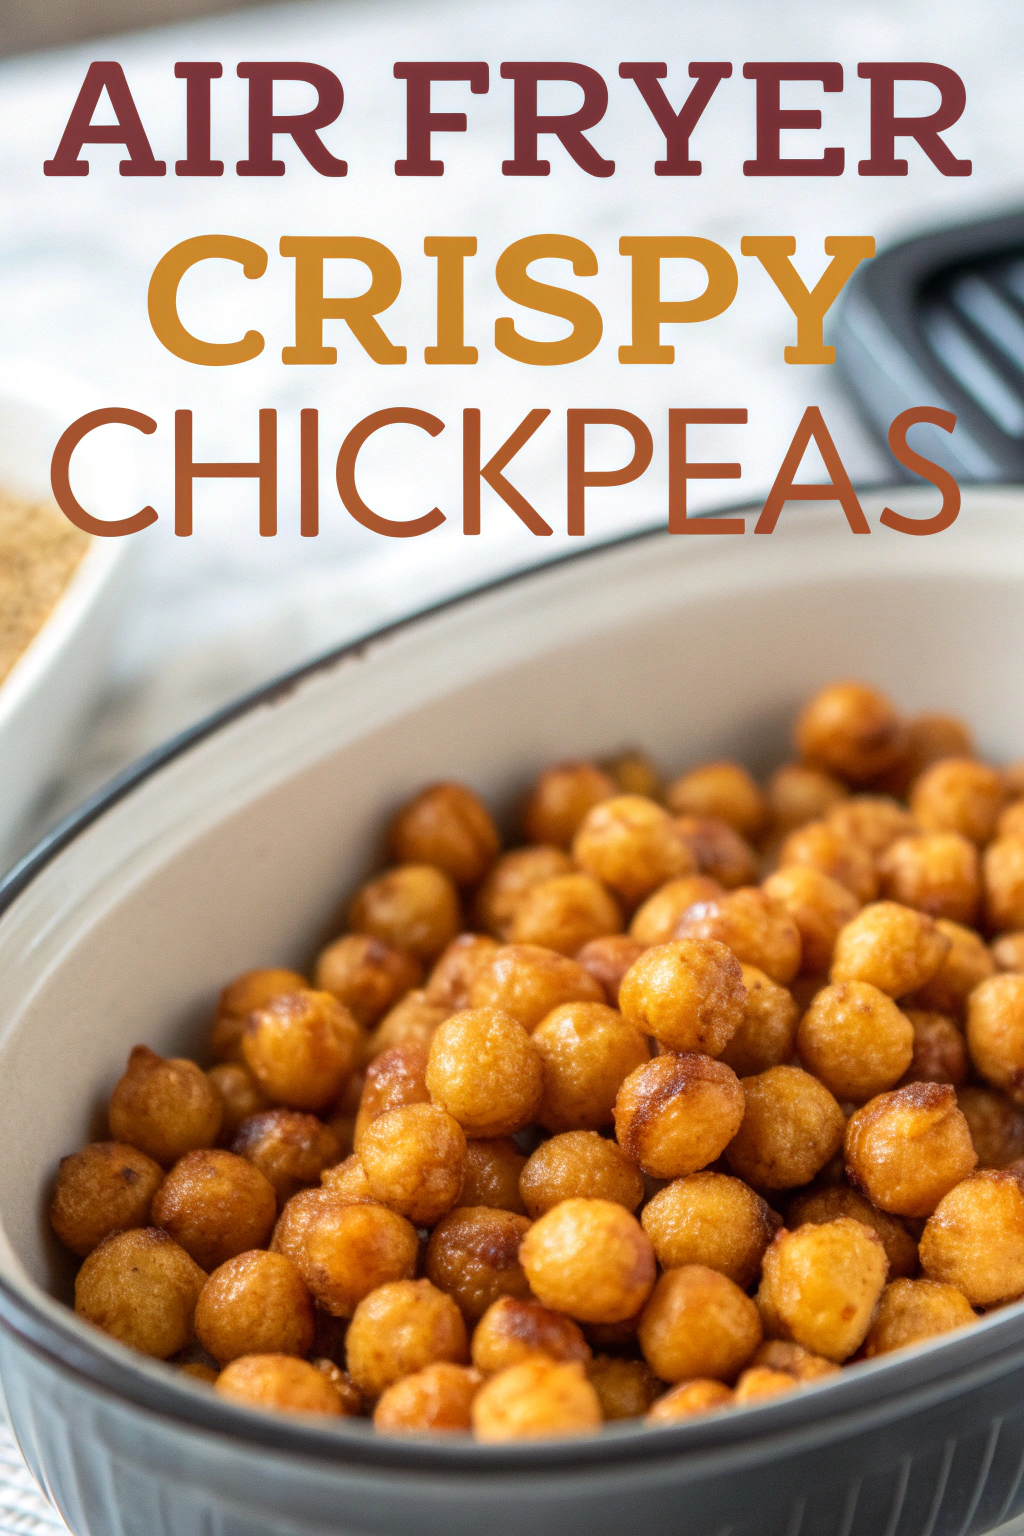
It’s quick, cheap, and stupidly satisfying. The outside gets impossibly crisp while the inside stays slightly tender — that contrast makes every bite interesting. The spices toast and bloom in the air fryer, giving you warm, toasty aromas and deep color without much effort. It’s so easy even your oven can’t mess it up — and if your air fryer yells at you, that’s just the crunchy chorus telling you dinner’s ready.
Ingredients
For the Main Dish:
- 2 (15 oz) cans chickpeas (drained and rinsed; about 3 cups)
- 1 tbsp olive oil (or avocado oil)
- 1 tsp cornstarch (helps crisp; sub with arrowroot)
- 1 tsp kosher salt
- 1 tsp smoked paprika
- 1/2 tsp garlic powder
- 1/4 tsp ground cumin
- 1/8–1/4 tsp cayenne (optional, for heat)
For the Sauce / Garnish (if applicable):
- Juice of 1/2 lemon (brightens)
- Chopped fresh parsley or cilantro, for garnish
- Optional dip: 2 tbsp tahini + 1 tbsp water + pinch salt + lemon juice
How I Make It
Step 1:
I start by drying the chickpeas thoroughly. Lay them on a clean kitchen towel and pat until mostly dry — I even roll them gently between towels to loosen skins (the loose skins crisp up and give extra crackle). Preheat the air fryer to 400°F. The preheat gives you an immediate sizzle when the chickpeas hit the basket.
Step 2:
In a bowl, I toss the chickpeas with 1 tbsp olive oil, 1 tsp cornstarch, and the seasonings: 1 tsp smoked paprika, 1/2 tsp garlic powder, 1/4 tsp cumin, 1 tsp salt, and a pinch of cayenne if I want a kick. Make sure each chickpea looks lightly coated — too much oil makes them soggy; too little leaves them dry.
Step 3:
Spread the chickpeas in a single layer in the air fryer basket. Give them space so air can circle and work its magic. I set the timer for 8 minutes, then shake the basket. You’ll hear a soft crackle as the skins tighten and the spices toast. Continue another 7–12 minutes, shaking every 4 minutes. The scent will go from raw spice to toasty and slightly sweet — that’s your cue.
Step 4:
Watch for deep golden color and audible crispness — they go from soft to crunchy quickly. When they hit that point, remove them. Overcooking makes them dry and mealy, so I pull them while they still have a tiny bit of chew inside but snap when you bite. Total cook time usually lands at 15–20 minutes depending on your air fryer.
Step 5:
Toss the hot chickpeas with a squeeze of lemon and fresh herbs. If you like, drizzle the tahini dip or sprinkle extra salt. Let them cool 5 minutes — they crisp up even more as they rest. Serve warm for the loudest crunch, or room temperature for snacking all afternoon.
Pro Tips
- Shake the basket every 4 minutes to promote even browning and prevent one-side burnout.
- If your chickpeas steam instead of crisp, pat them drier before oiling — moisture kills crunch.
- Use cornstarch or arrowroot for a thin, shattering crust; flour makes them cakier.
- Air fry in a single layer; if you need more, do two quick batches rather than crowding.
Common Mistakes to Avoid
- Skipping preheating: Classic rookie move. It changes texture and bake time.
- Overmixing: Leads to dense or chewy results. Mix until just combined.
- Guessing cook time: Always use visual cues or a timer, not just vibes.
- Overcrowding pans: Give your food some breathing room to crisp properly.
Alternatives & Substitutions
- If you don’t have cornstarch, use arrowroot or a light dusting of gluten-free flour; expect a slightly different texture.
- Swap smoked paprika for sweet paprika + tiny pinch of cumin if you need a pantry fix; flavor skews less smoky.
- Use avocado oil instead of olive oil for higher smoke point and neutral flavor.
- Dairy-free & gluten-free friendly: this recipe already fits both when you choose gluten-free starch.
Variations & Tips
- Spicy: Add extra cayenne or toss with sriracha-honey after cooking for a sticky glaze.
- Lemony-herb: Increase lemon zest and add chopped dill for bright, salad-friendly bites.
- Everything Bagel: Toss with everything bagel seasoning for a savory breakfast topper.
- Sweeter snack: Mix with 1 tsp maple syrup and cinnamon for a lightly candied treat — watch closely so it doesn’t burn.
- Kid-friendly: Use mild paprika and a little honey; serve with yogurt dip.
- Creative twist: After air frying, quickly flash in a hot pan with butter and garlic for ultra-toasty edges (use sparingly).
FAQ (Frequently Asked Questions)
- Can I make this ahead of time?
- Yes! Store cooled chickpeas in an airtight container at room temperature for up to 2 days. Re-crisp them in the air fryer at 350°F for 3–5 minutes before serving.
- Can I double the recipe?
- Sure thing. Cook in batches rather than cramming the basket. Two batches takes a little longer, but each batch crisps perfectly if you don’t overcrowd.
- Can I substitute butter with oil?
- Technically yes, but you’ll miss that buttery magic. Use ¾ the amount of oil if swapping to keep things from tasting greasy.
- How do I know it’s done?
- Look for deep golden color, a dry exterior, and a loud, pleasing snap when you bite. The chickpeas should feel firm, not squishy.
- What if I don’t have ingredient X?
- If you lack smoked paprika, use regular paprika plus a tiny pinch of cumin or chili powder. No garlic powder? Toss with a little minced fresh garlic after cooking (it won’t brown in the fryer but adds fresh flavor).
How I Like to Serve It
I toss a handful over green salads for crunch, scatter them on grain bowls, or serve them in a big bowl with cocktails at parties. They make a killer taco topping and even replace croutons in soups. In summer, I eat them with chilled cucumber salad; in winter, they perk up roasted root vegetables. Pair with a crisp white wine or an ice-cold beer — both welcome the crunch.
Notes
- Storage: Keep at room temperature in an airtight jar up to 2 days; they soften over time.
- Reheating: Use the air fryer at 350°F for 3–5 minutes to refresh the crunch. If adding chicken to the bowl, cook chicken to a safe temperature of 165°F.
Final Thoughts
Closing: Now go impress someone — or just yourself — with your homemade crunchy masterpiece! Keep a jar handy; life tastes better with a little snap.

Hi, I’m Lina, the creator of Lina Easy Recipes.Cooking has always been my passion, and I love sharing simple, homemade dishes that anyone can prepare.
Love What You See?
Join me on Pinterest and Facebook for daily cooking inspiration, new recipe ideas, and behind-the-scenes kitchen stories. Let’s cook something wonderful together!


