
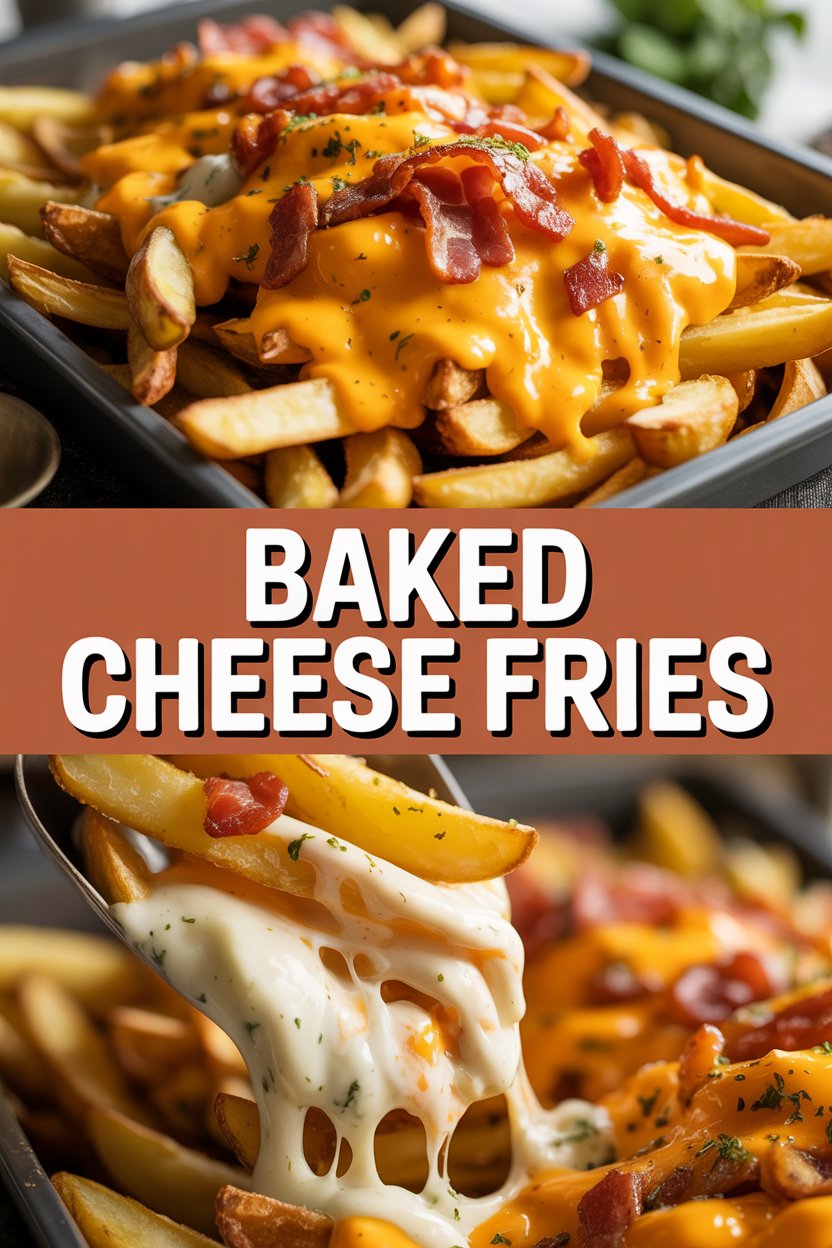
I promised myself I wouldn’t turn a bag of frozen fries into a full-on comfort crime, but here we are: melty cheese, crispy edges, and a guilty grin. I call these Baked Cheese Fries my “emergency dinner” — they come together faster than I can decide what to watch on the couch. Picture the scent of hot cheddar melting, the crackle of edges going golden-brown, and the bright pop of green onions on top. They make the house smell like a diner at midnight, and somehow feel both indulgent and oddly responsible because they’re baked, not fried. Let’s make something that winks at naughty and tucks in a cozy blanket at the same time.
Quick Facts
- Yield: Serves 4
- Prep Time: 15 minutes
- Cook Time: 35 minutes
- Total Time: 50 minutes
Why This Recipe is Awesome
This recipe gives you crispy edges, fluffy centers, and gooey, stretchy cheese without deep frying. It’s so easy even your oven can’t mess it up — you get crunchy potato texture, savory salty cheese, and a hit of fresh green onion that brightens every bite. It hits crunchy, creamy, salty, and warm all at once. Also: it doubles as dinner, snack, or the very best thing to bring to a casual watch party.
Ingredients
For the Main Dish:
- 2 pounds Russet potatoes (about 3 medium) OR 24 oz frozen crinkle-cut fries (for a shortcut)
- 2 tbsp olive oil (or avocado oil)
- 1 tsp kosher salt plus extra to taste
- 1/2 tsp black pepper
- 1/2 tsp smoked paprika
- 1/2 tsp garlic powder
- 1 cup shredded sharp cheddar cheese (4 oz)
- 1 cup shredded mozzarella cheese (4 oz) — for stretch
- 4 slices cooked bacon, chopped (optional)
- 2 green onions, thinly sliced
- Fresh parsley, chopped (optional, for color)
For the Sauce / Garnish (if applicable):
- 1/2 cup sour cream or Greek yogurt
- 1 tbsp chopped chives or 1 tsp dried dill
- Hot sauce or ketchup, for serving (optional)
How I Make It
Step 1:
Preheat the oven to 425°F and line a rimmed baking sheet with parchment paper. If you use fresh potatoes, wash and scrub the skin, then slice into 1/4–1/2 inch sticks so they cook evenly. Toss the raw fries in a bowl with 2 tbsp olive oil, 1 tsp kosher salt, 1/2 tsp smoked paprika, and 1/2 tsp garlic powder. If you’re using frozen fries, let them sit on the counter for 5 minutes while the oven heats; that little thaw helps them brown instead of steam.
Step 2:
Spread fries in a single layer on the prepared sheet — don’t overcrowd. I like to give them a little space so they crisp and sizzle instead of steam. Roast at 425°F for 20–25 minutes, flipping once halfway through. You’ll hear faint popping and see edges go golden; that’s your sweet spot. If fries crowd, they go limp, so use two pans if needed.
Step 3:
Once the fries show golden edges and a tender center (poke one with a fork), pull the pan and sprinkle on the cheese: distribute 1 cup cheddar and 1 cup mozzarella evenly. Add chopped bacon now if you use it. Return to the oven and bake another 5–7 minutes until cheese bubbles and browns lightly on top. Your kitchen will smell like a melted-cheese dream — glossy and savory.
Step 4:
Watch the cheese toward the end — I aim for bubbly with little browned spots. If the cheese takes too long to melt before the fries crisp, pop the pan under the broiler for 30–60 seconds but stand right there. Broilers move fast and go from golden to charred faster than you think.
Step 5:
Remove from oven and immediately scatter sliced green onions and chopped parsley over the top for brightness. Dollop sour cream or Greek yogurt mixed with chives on the side for dipping. Serve hot so the cheese pulls in long, gooey strings and the fries keep their crisp edges.
Pro Tips
- For extra-crispy homemade fries, soak sliced potatoes in cold water for 30 minutes, then pat dry before oiling and seasoning. That removes starch and helps them crisp.
- If you use frozen fries, skip oil on the fries but toss the finished fries lightly with a teaspoon of oil before adding cheese to encourage browning.
- Want smokier flavor? Add 1/4 tsp chipotle powder to the seasoning mix. I do this when I crave a little heat and BBQ vibe.
- Use a mix of cheeses (cheddar for flavor, mozzarella for stretch). If you go all cheddar, cut it a touch thicker so it melts without separating.
Common Mistakes to Avoid
- Skipping preheating: Classic rookie move. It changes texture and bake time.
- Overmixing: Leads to dense or chewy results. Mix until just combined.
- Guessing cook time: Always use visual cues or a timer, not just vibes.
- Overcrowding pans: Give your food some breathing room to crisp properly.
Alternatives & Substitutions
- Swap Russet potatoes for sweet potatoes for a sweeter, softer bite — they brown differently and get softer faster.
- Use vegan shredded cheese and dairy-free sour cream to make this dairy-free. Expect a slightly different melt and a milder flavor.
- Replace bacon with smoked tempeh or crumbled chorizo for a meat alternative; tempeh keeps it vegetarian-friendly and adds a smoky chew.
- If you need gluten-free, stick with fresh or certified gluten-free frozen fries and check seasonings — most are naturally gluten-free.
Variations & Tips
- Spicy: Sprinkle 1/4 tsp cayenne or drizzle with sriracha before serving.
- Loaded: Add diced tomatoes, jalapeños, and a drizzle of ranch for a loaded-fries vibe.
- BBQ: Toss finished fries in a tablespoon of BBQ sauce and top with pulled chicken.
- Keto-ish: Use oven-roasted cauliflower florets in place of fries and follow the same cheese bake method.
- Kid-friendly: Keep it simple with only cheddar and a side of ketchup for dipping.
- Cheesy twist: Stir a tablespoon of cream cheese into the shredded cheese for an ultra-luxurious melt.
FAQ (Frequently Asked Questions)
- Can I make this ahead of time?
- Yes! Roast the fries and store them separately from the cheese in an airtight container in the fridge for up to 2 days. Reheat at 400°F for about 10 minutes, then add cheese and bake until bubbly. That keeps the fries crisper than microwaving.
- Can I double the recipe?
- Sure thing. Use two baking sheets and rotate them halfway through so everything browns evenly. Don’t pile everything on one pan — you’ll lose crispiness.
- Can I substitute butter with oil?
- Technically yes, but you’ll miss that buttery magic. Use ¾ the amount of oil if you switch (so 1.5 tbsp oil for 2 tbsp butter) and add a pinch of extra salt for richness.
- How do I know it’s done?
- Look for golden-brown edges, a tender center (poke with a fork), and bubbly, slightly browned cheese. If the fries feel floppy, roast a few more minutes before adding cheese.
- What if I don’t have ingredient X?
- No sweat. No cheddar? Use a sharp Monterey Jack or Colby. No green onions? Use a sprinkle of dried chives or a little fresh parsley. No sour cream? Greek yogurt works perfectly.
How I Like to Serve It
I love serving these straight out of the oven with a tangy Greek yogurt dip and a cold beer on a Friday night. They shine at game day spread alongside wings and sliders, or tucked into a casual weeknight dinner as a fun side. In summer, I pair them with a bright salad to cut the richness; in winter, they make the coziest late-night snack.
Notes
- Store leftovers in an airtight container in the fridge for up to 2 days. Reheat in the oven at 400°F for 8–10 minutes to revive crispness.
- If you top with cooked chicken, ensure it reaches 165°F before serving for safety.
Final Thoughts
Closing: Go on — make a tray, let the cheese stretch, and enjoy the little victory of turning humble fries into something deliciously memorable. Now go impress someone — or just yourself — with your homemade masterpiece!

Hi, I’m Lina, the creator of Lina Easy Recipes.Cooking has always been my passion, and I love sharing simple, homemade dishes that anyone can prepare.
Love What You See?
Join me on Pinterest and Facebook for daily cooking inspiration, new recipe ideas, and behind-the-scenes kitchen stories. Let’s cook something wonderful together!


