
When I was a kid, summer meant sticky fingers, backyard swings, and my grandma handing me a cone stuffed with something between banana pudding and cheesecake — pure mischief in a waffle wrapper. I still remember the smell: sweet bananas, warm vanilla, and a faint butter-wafer crunch that made me eat it too fast and laugh through a gooey grin. I recreated that memory with these Banana Pudding Cheesecake Cones — creamy, slightly tangy cheesecake filling, soft hunks of banana, and the satisfying snap of a waffle cone. They look fancy but come together in under an hour, and yes, they still make me feel like that kid on the swing.
Quick Facts
- Yield: Serves 6–8 (depending on cone size)
- Prep Time: 20 minutes
- Cook Time: 0 minutes (no-bake)
- Total Time: 50 minutes including chill
Why This Recipe is Awesome
Because it mashes two all-time favorites into one handheld delight. You get that silky, tangy cheesecake mouthfeel, banana pudding comfort, and crunchy cone texture — all at once. It’s so easy your oven doesn’t even need to know about it, and you get applause-worthy dessert with minimal fuss. Who doesn’t love a dessert that tastes fancy but behaves like a lazy Sunday afternoon?
Ingredients
For the Main Dish:
- 8 oz cream cheese, room temperature
- 1/2 cup powdered sugar (confectioners’)
- 1 tsp vanilla extract
- 1 cup heavy cream (for whipping)
- 1 cup mashed ripe banana (about 2 medium bananas)
- 1 tsp banana extract (optional, for extra banana punch)
- 12–16 waffle cones (standard size)
- 1 cup crushed vanilla wafers or Nilla wafers (about 30 cookies)
- 1–2 small bananas, thinly sliced for garnish
- Optional: mini chocolate chips or caramel sauce for drizzling
For the Sauce / Garnish (if applicable):
- Optional salted caramel drizzle (store-bought or homemade), or extra crushed wafers for topping.
How I Make It
Step 1:
Beat the 8 oz cream cheese in a bowl until smooth and creamy — I use a hand mixer so I don’t fatigue my arm. Add the 1/2 cup powdered sugar and 1 tsp vanilla extract. Scrape the sides once or twice so no lumps hide in the corners. The texture should feel silky and slightly dense under your beaters.
Step 2:
Whip the 1 cup heavy cream in a chilled bowl to stiff peaks — you’ll see glossy peaks that stand tall when you lift the whisk. Fold one-third of the whipped cream into the cream cheese to lighten the mixture, then fold in the rest gently. Overmixing deflates air, so fold like you mean it but don’t huff the dessert away.
Step 3:
Fold in the 1 cup mashed banana and 1 tsp banana extract if using. Taste and adjust: if your bananas don’t scream banana enough, a tiny pinch more extract helps. The filling should smell of sweet bananas and vanilla, and feel pillowy when you press a spoonful between your fingers.
Step 4:
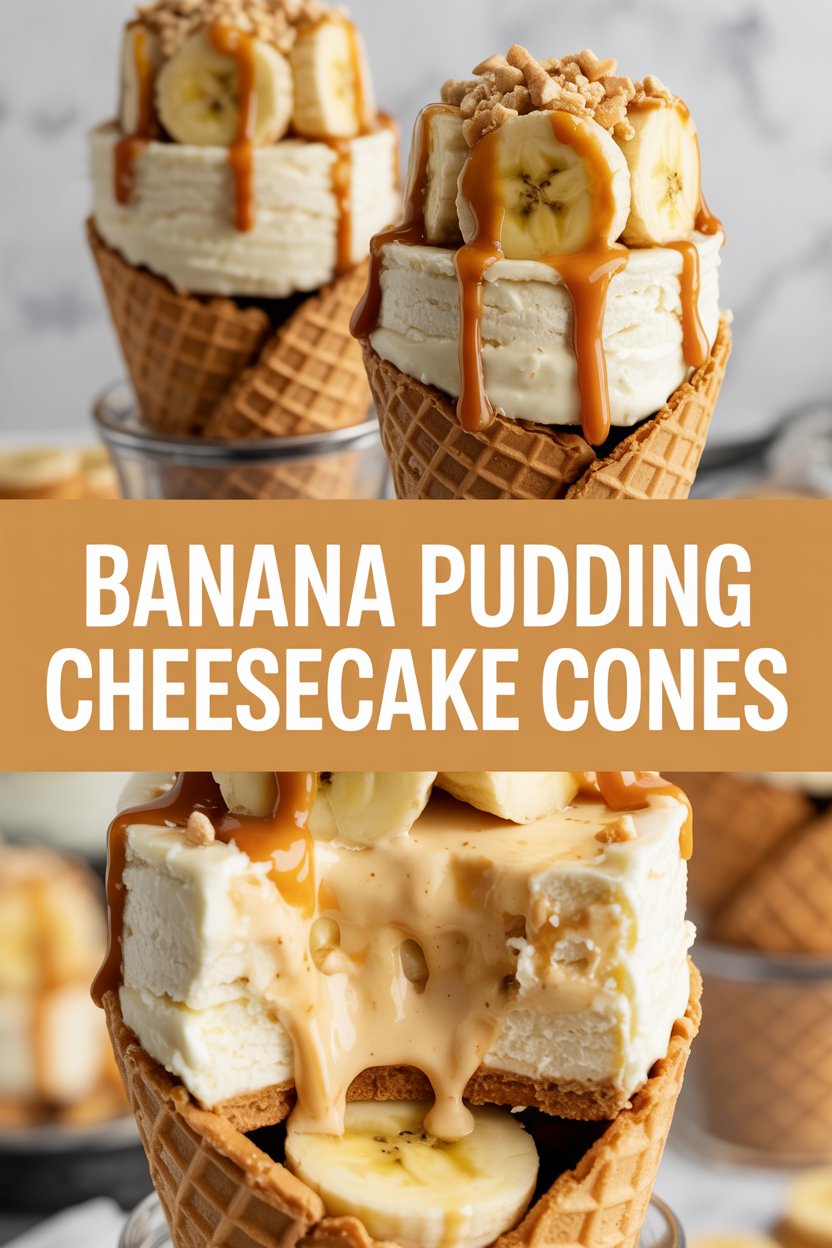
Layer the cones: spoon a tablespoon of crushed vanilla wafers into each cone to create a crunchy base, then pipe or spoon the cheesecake-banana filling into cones until full. I like to leave a little space at the top for a banana slice and more crumbs. Stand cones upright in a muffin tin or a cone holder so they don’t wobble.
Step 5:
Top each cone with a thin banana slice, a sprinkle of crumbs, and a drizzle of caramel or a scattering of mini chocolate chips. Chill the cones for at least 30 minutes to let the filling set and flavors meld. Serve cold; the contrast of chilled filling and crisp cone feels like a little celebration in your mouth.
Pro Tips
- Use ripe bananas with brown speckles for the most banana flavor; underripe bananas taste starchy.
- Chill the mixing bowl and whisk for the whipped cream — it whips faster and holds peaks better that way.
- If cones get soggy, fill them right before serving or keep filled cones on a chilled tray until guests arrive.
- Want a silkier filling? Swap half the heavy cream for mascarpone (about 4 oz) — it adds richness without extra sweetness.
Common Mistakes to Avoid
- Skipping preheating: Classic rookie move. It changes texture and bake time.
- Overmixing: Leads to dense or chewy results. Mix until just combined.
- Guessing cook time: Always use visual cues or a timer, not just vibes.
- Overcrowding pans: Give your food some breathing room to crisp properly.
Alternatives & Substitutions
- Use full-fat Greek yogurt (1/2 cup) swapped for 1/2 cup of the cream to lighten calories — expect a tangier filling.
- Substitute whipped coconut cream for heavy cream to make it dairy-free; the texture becomes slightly less pillowy but still delicious.
- For a gluten-free option, use gluten-free waffle cones and certified GF vanilla wafers; texture stays nearly identical.
- Swap vanilla extract with rum extract (small pinch) for a boozy, grown-up twist.
Variations & Tips
- Chocolate-Banana: Fold in 1/4 cup mini chocolate chips and dust tops with cocoa powder.
- Caramel-Banana: Stir 2 tbsp of caramel sauce into the filling and drizzle extra on top.
- Kid-Friendly: Add sprinkles to the top and use mini marshmallows inside for squeals of delight.
- Healthy-ish: Mix mashed banana with Greek yogurt and a touch of honey for a lighter filling.
- Grilled Banana Twist: Caramelize banana slices in a hot skillet with a little butter and brown sugar before topping for smoky sweetness.
FAQ (Frequently Asked Questions)
- Can I make this ahead of time?
- Yes! Prepare the filling up to 24 hours ahead and keep it chilled in an airtight container. Fill cones up to 2 hours before serving to keep them crisp. If you must assemble earlier, wrap cones individually and keep them refrigerated.
- Can I double the recipe?
- Sure thing. Double all ingredients and use two mixing bowls or mix in batches so you don’t overwork the filling. You may need more chill time overall if your refrigerator gets crowded.
- Can I substitute butter with oil?
- Technically yes, but you’ll miss that buttery magic. Use ¾ the amount of oil if a recipe calls for butter to keep texture similar.
- How do I know it’s done?
- Look for a smooth, slightly firm filling that holds its shape when piped or spooned. The whipped cream should still show soft peaks folded in, and the cones should sit upright without collapsing. Chill for 30 minutes to firm up before serving.
- What if I don’t have ingredient X?
- If you lack vanilla wafers, use crushed graham crackers or crushed shortbread. No heavy cream? Substitute with full-fat coconut cream or beat 8 oz of chilled sour cream with a little powdered sugar (different texture but tasty).
How I Like to Serve It
I love to serve these at backyard parties or as an after-school treat. Pair them with cold brew coffee or a sparkling lemon soda to cut the richness. They also work great on a warm afternoon — the cold filling feels like a hug against summer heat. For gatherings, arrange cones upright in a decorative bowl lined with a tea towel; it makes serving feel festive.
Notes
- Store leftover filling in an airtight container in the refrigerator for up to 2 days. Filled cones keep best for a few hours; after 24 hours they’ll start to soften.
- No meat temps apply here, but if you grill bananas, handle hot pans carefully and cook over medium-high heat until caramelized (about 2–3 minutes per side).
Final Thoughts
Closing: Go make a batch, share with friends, and then hide one for yourself — these cones practically invent smiles on demand.

Hi, I’m Lina, the creator of Lina Easy Recipes.Cooking has always been my passion, and I love sharing simple, homemade dishes that anyone can prepare.
Love What You See?
Join me on Pinterest and Facebook for daily cooking inspiration, new recipe ideas, and behind-the-scenes kitchen stories. Let’s cook something wonderful together!


