
I still remember the warm, tomato-sweet smell that used to drift from my childhood kitchen on chilly evenings — my mom would hollow out big, glossy peppers and pack them with a savory, rice-and-beef mixture that felt like a hug on a plate. Tonight I recreated that comfort with a few modern shortcuts and the same cozy vibes: bright bell peppers standing like little bowls, a bubbling blanket of tomato, and a sprinkle of melty cheese that makes everyone pause. This recipe keeps things simple and honest, so you can hear the sizzle of onions, smell the garlic caramelize, and watch the peppers blush in the oven. Trust me, nothing cures a long day like pulling a tray of stuffed peppers from the oven and stealing a corner while it cools.
Quick Facts
- Yield: Serves 4
- Prep Time: 20 minutes
- Cook Time: 45 minutes
- Total Time: 65 minutes
Why This Recipe is Awesome
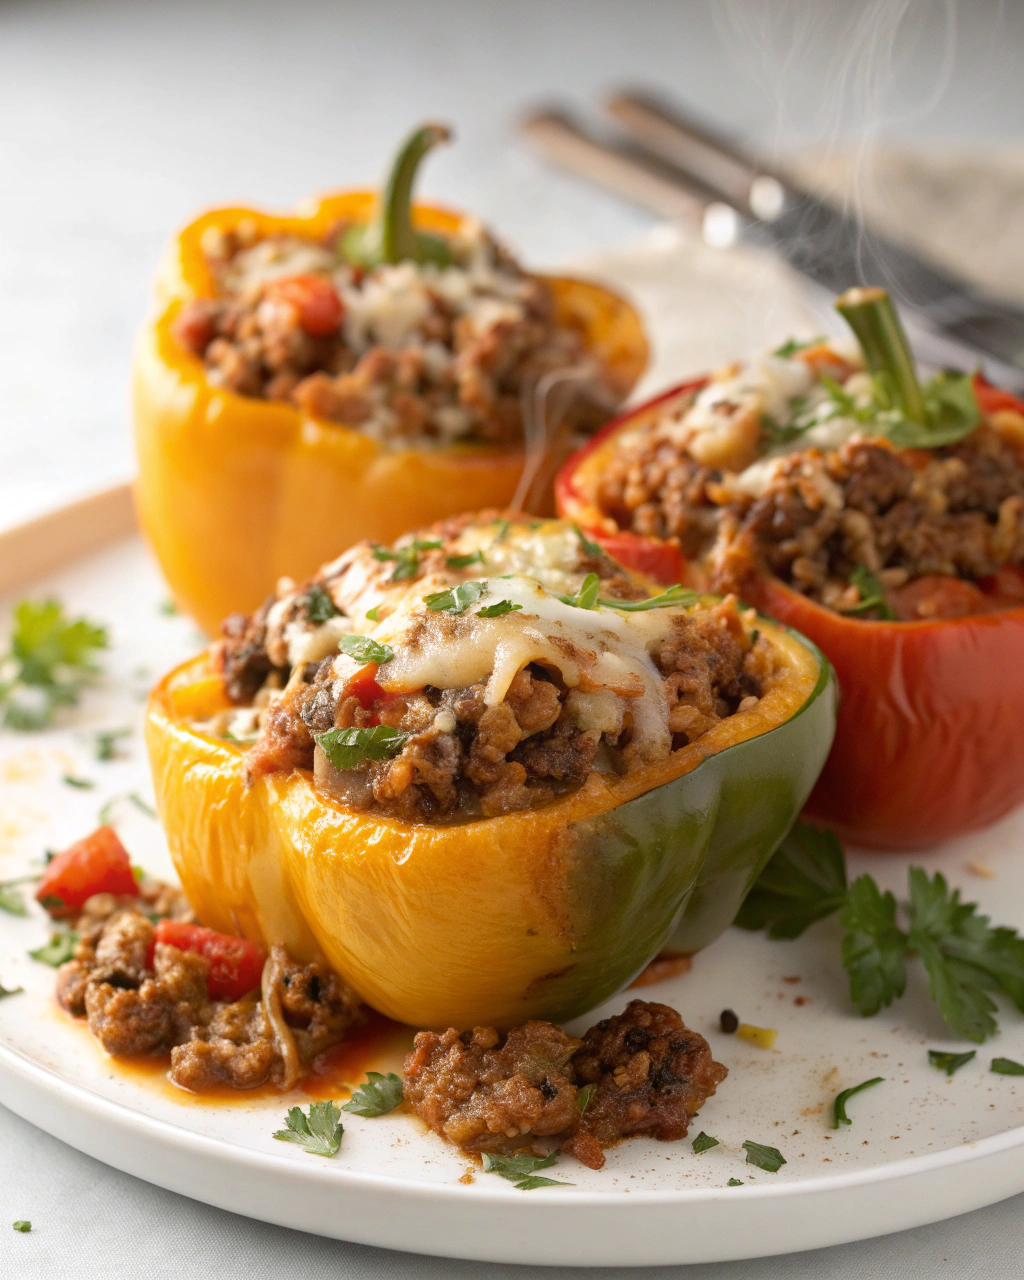
This recipe delivers a cozy, hands-on dinner that tastes like home. The stuffed peppers give you tender, slightly charred edges, a juicy, savory beef-and-rice center, and a gooey top of melted cheese. It’s comforting without being heavy, and you can customize it fast. Plus, the aroma while it bakes? Absolutely addictive. It’s so easy even your oven can’t mess it up — and you get real, satisfying textures: soft rice, slightly crisp pepper skin, and browned bits of meat.
Ingredients
For the Main Dish:
- 4 large bell peppers (any color), tops cut and seeds removed
- 1 lb ground beef (85% lean works great)
- 1 cup uncooked long-grain white rice (yields about 3 cups cooked)
- 2 cups low-sodium beef broth or water (for cooking rice)
- 1 medium yellow onion, finely chopped (about 1 cup)
- 2 cloves garlic, minced
- 1 (14 oz) can tomato sauce
- 1 cup shredded cheddar or Monterey Jack cheese
- 2 tbsp olive oil
- 1 tbsp Worcestershire sauce
- 1 tsp dried oregano
- 1 tsp dried basil
- 1 tsp kosher salt (adjust to taste)
- 1/2 tsp black pepper
- Optional: 1/4 cup breadcrumbs for texture
For the Sauce / Garnish (if applicable):
- Extra 1/2 cup tomato sauce to spoon over peppers before baking (optional)
- Chopped fresh parsley or basil for garnish
How I Make It
Step 1:
Preheat your oven to 375°F. Rinse and halve the rice if needed (just kidding—rinsing helps if you want fluffier rice). Put the 1 cup rice and 2 cups beef broth in a small pot, bring to a boil, then lower the heat to a simmer and cover. Cook for about 18–20 minutes until tender. While the rice cooks, heat 2 tbsp olive oil in a large skillet over medium-high heat and sauté the chopped onion until translucent and fragrant — you’ll hear a soft sizzle and smell that sweet onion perfume.
Step 2:
Add the 1 lb ground beef to the skillet and brown it, breaking it into small pieces with a spatula. Sprinkle in the garlic, oregano, basil, salt, and pepper. Cook until the beef browns and the kitchen fills with a rich, savory scent — about 6–8 minutes. Drain excess fat if it looks excessive, but leave a little for flavor.
Step 3:
Stir the cooked rice into the meat mixture along with 1 (14 oz) can tomato sauce, 1 tbsp Worcestershire, and optional breadcrumbs. Taste and adjust seasoning; the filling should be slightly saucy so it doesn’t dry out while baking. You want a cohesive, spoonable texture — not a wet mess and not a brick. If it seems dry, add a splash of broth or tomato sauce.
Step 4:
Stand the prepared bell peppers in a baking dish. Spoon the filling into each pepper, pressing gently but not compressing. If you like extra sauciness, spoon a little extra tomato sauce over each stuffed pepper. Sprinkle the tops with 1 cup shredded cheese. Bake at 375°F for 25–30 minutes until the peppers soften and the cheese melts and bubbles with golden edges. If you want a little char, pop under the broiler for 1–2 minutes — watch closely!
Step 5:
Let the peppers rest for about 5 minutes before serving so the filling firms up a touch. Garnish with chopped parsley or basil for a fresh color pop. Slice one open and listen to that satisfying steam escape. Serve warm and dig in.
Pro Tips
- Cook the rice a little underdone (check at 16 minutes) so it finishes cooking in the oven without getting mushy.
- Use a mix of cheeses for extra flavor — cheddar for sharpness + Monterey Jack for meltiness.
- If your peppers wobble, slice a thin sliver off the bottom to level them, but don’t cut too deep or holes will form.
- Make ahead: fill peppers and refrigerate, then bake when you’re ready. Add 5–10 minutes to bake time if straight from the fridge.
Common Mistakes to Avoid
- Skipping preheating: Classic rookie move. It changes texture and bake time.
- Overmixing: Leads to dense or chewy results. Mix until just combined.
- Guessing cook time: Always use visual cues or a timer, not just vibes.
- Overcrowding pans: Give your food some breathing room to crisp properly.
Alternatives & Substitutions
- Swap ground beef for ground turkey or chicken for a lighter option (it’ll taste milder; add a splash more Worcestershire).
- Use cooked quinoa instead of rice for a slightly nutty texture and extra protein — great gluten-free swap.
- For dairy-free: omit the cheese and top with a drizzle of olive oil and chopped herbs; the filling still tastes amazing.
- Vegetarian: substitute beef with cooked lentils or crumbled tofu and boost seasoning with soy sauce or tamari.
Variations & Tips
- Add a pinch of red pepper flakes or chopped jalapeño for a spicy kick.
- Make it kid-friendly: mix in corn and carrots and go easy on the Worcestershire.
- Mediterranean twist: use feta, olives, and a squeeze of lemon instead of tomato sauce.
- Mexican style: swap tomato sauce for salsa, add cumin, and top with avocado and cilantro.
- Make mini versions using mini bell peppers for appetizers — great for parties.
- Creative twist: stir in 2 tbsp of cream cheese for an ultra-creamy filling before baking.
FAQ (Frequently Asked Questions)
- Can I make this ahead of time?
- Yes! Prepare the filling and peppers, then cover and refrigerate for up to 24 hours. Bake straight from the fridge, adding about 10 minutes to the bake time. Reheat leftovers in a 350°F oven until warmed through.
- Can I double the recipe?
- Sure thing. Use two baking dishes or a large roasting pan to avoid overcrowding. You may need an extra 5–10 minutes of baking time if the peppers sit closer together.
- Can I substitute butter with oil?
- Technically yes, but you’ll miss that buttery magic. Use ¾ the amount of oil as a swap for melted butter in any part of the recipe.
- How do I know it’s done?
- Look for tender peppers (fork easily pierces skin), bubbling sauce, and browned cheese edges. The filling should stay moist but hold its shape when scooped.
- What if I don’t have ingredient X?
- Out of Worcestershire? Use a splash of soy sauce plus a pinch of sugar. No shredded cheese? A few slices of mozzarella work fine; they melt beautifully.
How I Like to Serve It
I usually plate one stuffed pepper with a crisp green salad or roasted potatoes and a glass of something cold — iced tea in summer, a hearty red wine in winter. They work great for weeknights because they rehear beautifully, and they travel well for potlucks. I love serving them at cozy family dinners when I want everyone to linger at the table and share stories.
Notes
- Store leftovers in an airtight container in the fridge for up to 3 days. Reheat at 350°F for 10–15 minutes.
- Ground beef should reach a safe internal temp of 160°F when cooked.
Final Thoughts
Closing: Now go impress someone — or just yourself — with your homemade masterpiece. Pop one of these on the table, breathe in that delicious steam, and enjoy every comforting bite.

Hi, I’m Lina, the creator of Lina Easy Recipes.Cooking has always been my passion, and I love sharing simple, homemade dishes that anyone can prepare.
Love What You See?
Join me on Pinterest and Facebook for daily cooking inspiration, new recipe ideas, and behind-the-scenes kitchen stories. Let’s cook something wonderful together!


