
I still remember the kitchen countertop dusted with powdered sugar and my grandmother humming as she filled little sponge rounds with velvety custard. Those afternoons taught me that desserts that look fancy don’t need to be fussy. These Boston Cream Pie Cupcakes let you play pastry chef without a pastry degree: a light, buttery cupcake, a spoonful of homemade pastry cream, and a glossy chocolate ganache on top. They smell like vanilla and warm milk, and they make your whole house feel like a bakery for an hour. Pull up a stool — I’ll walk you through every cozy, delicious step I learned from my grandma (plus a few shortcuts I stole over the years).
Quick Facts
- Yield: Serves 12 cupcakes
- Prep Time: 25 minutes (plus chilling)
- Cook Time: 18–22 minutes
- Total Time: ~1 hour 15 minutes (including cooling and chilling)
Why This Recipe is Awesome
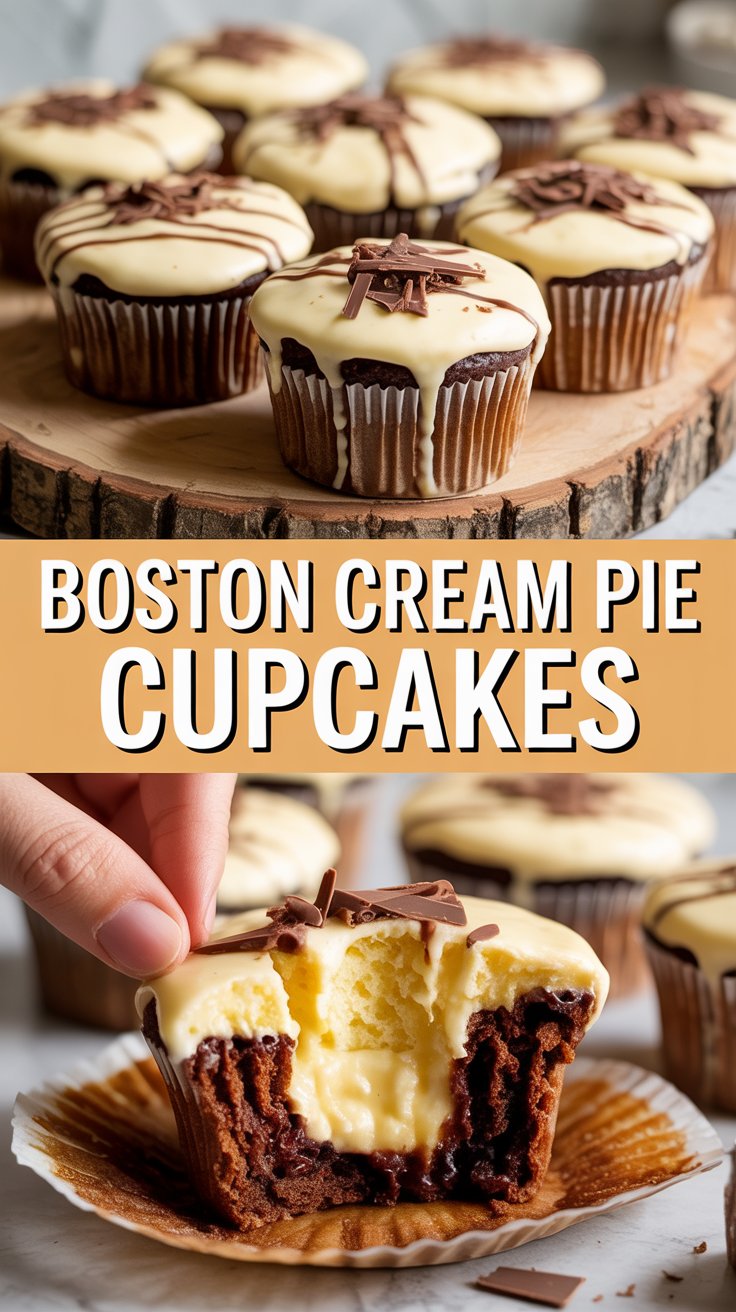
You get the whole Boston Cream Pie experience in one handheld cupcake — soft, tender crumb, a decadent dollop of creamy pastry cream, and a shiny chocolate crown. It tastes fancy but comes together with pantry staples. It’s so easy even your oven can’t mess it up (but I’ll give you cues so it won’t). Expect a light vanilla sponge, cool custard that smells like warm vanilla bean, and a glossy ganache that snaps just a little when you bite into it. Comforting, elegant, and slightly nostalgic — everything I want in a dessert.
Ingredients
For the Main Dish:
- 1 1/4 cups all-purpose flour
- 1 1/4 tsp baking powder
- 1/4 tsp salt
- 1/2 cup unsalted butter, softened (1 stick)
- 3/4 cup granulated sugar
- 2 large eggs, room temperature
- 1 tsp pure vanilla extract
- 1/2 cup whole milk, warmed slightly
For the Pastry Cream (Custard):
- 1 cup whole milk
- 1/4 cup granulated sugar
- 3 large egg yolks
- 2 tbsp cornstarch
- 2 tbsp unsalted butter
- 1 tsp pure vanilla extract
For the Chocolate Ganache:
- 4 oz semi-sweet chocolate, finely chopped (about 2/3 cup)
- 1/3 cup heavy cream
- 1 tbsp unsalted butter (optional for shine)
How I Make It
Step 1:
I preheat the oven to 350°F and line a muffin tin with 12 liners. I whisk together the flour, baking powder, and salt in a bowl. In my mixer, I beat the butter and sugar until fluffy and pale — that takes about 2–3 minutes and smells like cookie dough heaven. I add the eggs one at a time, scraping down the bowl, then stir in the vanilla.
Step 2:
I alternate adding the dry mixture and the warmed milk, starting and ending with the dry ingredients, folding gently with a spatula until just combined. Avoid overmixing here — you want a light batter, not a tough brick. I spoon the batter into liners, filling each about two-thirds full so they get domed, not overflowing.
Step 3:
I bake the cupcakes for 18–22 minutes, or until a toothpick inserts into the center and comes out with a few moist crumbs. You’ll see the tops turn a soft golden color and the kitchen will fill with a warm vanilla scent — that’s your cue. I cool the cupcakes on a rack for 10 minutes, then transfer them to the rack to cool completely while I make the pastry cream.
Step 4:
For the pastry cream, I heat the cup of milk with half the sugar until it steams (don’t let it boil). In a bowl I whisk the egg yolks, remaining sugar, and cornstarch until smooth and pale. I temper the yolks by pouring a thin stream of hot milk into the yolks while whisking hard, then pour everything back into the saucepan. I cook over medium heat, whisking constantly until the mixture thickens and bubbles — you’ll hear it change from liquid to velvet. Off the heat, I stir in the butter and vanilla, then cover with plastic pressed onto the surface to keep a skin from forming. I chill for at least 30 minutes so it sets up thick enough to pipe.
Step 5:
Once the custard cools, I core each cupcake with a small knife or apple corer and pipe or spoon about 1–2 tbsp of pastry cream into each cavity. Then I make the ganache: pour 1/3 cup hot cream over the chopped chocolate, let sit for 1 minute, then stir until glossy. I add the optional 1 tbsp butter for extra shine. I dip or spoon ganache over each filled cupcake, letting it set for a few minutes. Serve at room temperature so the ganache keeps its silky texture.
Pro Tips
- Warm the milk slightly — it blends into the batter more smoothly and keeps the cupcakes tender.
- Beat the butter and sugar until light and pale for airy cupcakes; don’t try to speed this step.
- If your pastry cream ends up a bit lumpy, whisk it vigorously or strain it through a fine mesh while still warm.
- For shinier ganache, add 1 tbsp of butter at the end and stir until glossy.
Common Mistakes to Avoid
- Skipping preheating: Classic rookie move. It changes texture and bake time.
- Overmixing: Leads to dense or chewy results. Mix until just combined.
- Guessing cook time: Always use visual cues or a timer, not just vibes.
- Overcrowding pans: Give your food some breathing room to crisp properly.
Alternatives & Substitutions
- Swap whole milk for 2% in the batter — cupcakes stay soft but the custard gets a touch less creamy.
- Use coconut milk and a dairy-free chocolate to make a dairy-free version; custard will taste coconutty and a bit lighter.
- For gluten-free, replace the flour with a 1:1 gluten-free flour blend and add 1/4 tsp xanthan gum if your blend lacks it; texture may be slightly crumbly but still delicious.
- Prefer a quicker filling? Use thick pastry cream from the grocery bakery or a high-quality vanilla pudding — you’ll skip time but keep the flavor.
Variations & Tips
- Make mini cupcakes for a party — reduce bake time to 12–14 minutes.
- Add citrus: fold 1 tsp lemon zest into the batter for a bright twist.
- Chocolate sponge: swap 2 tbsp flour for 2 tbsp cocoa powder for a chocolatey shell.
- Adult version: stir 1 tbsp rum or Kahlúa into the pastry cream for a grown-up note.
- Decorate with toasted chopped almonds or shaved chocolate for texture contrast.
FAQ (Frequently Asked Questions)
- Can I make this ahead of time?
- Yes! Bake the cupcakes up to 2 days ahead and store cooled in an airtight container. Make the pastry cream up to 2 days ahead and keep refrigerated. Assemble within a few hours of serving so the cupcakes don’t get soggy.
- Can I double the recipe?
- Sure thing. Use two muffin tins and rotate them halfway through baking if your oven has hot spots. Keep the same bake temp but watch the cupcakes; they may need an extra 2–4 minutes.
- Can I substitute butter with oil?
- Technically yes, but you’ll miss that buttery magic. Use ¾ the amount of oil (so 6 tbsp oil instead of 8 tbsp butter) and expect a slightly different mouthfeel and flavor.
- How do I know it’s done?
- Look for soft golden tops and a toothpick that comes out with a few moist crumbs. The cupcakes will spring back lightly when touched; they shouldn’t feel jiggly in the center.
- What if I don’t have ingredient X?
- If you lack vanilla extract, use 1/2 tsp almond extract for a different but lovely flavor. No cornstarch? Use 3 tbsp all-purpose flour in the custard, but cook a little longer until it thickens.
How I Like to Serve It
I bring these cupcakes to potlucks and get immediate compliments — they feel special without fuss. Pair with coffee for brunch, or a glass of cold milk for kids. In summer I serve them slightly chilled; in winter they pair beautifully with a cup of hot tea or a small pour of dessert wine. They brighten birthdays, casual dinners, and Sunday baking experiments alike.
Notes
- Store filled cupcakes in the refrigerator up to 3 days; bring to room temperature before serving for best texture.
- If you need to reheat, warm gently in a 300°F oven for a few minutes — but don’t overdo it or the custard will soften too much.
Final Thoughts
Closing: Now go impress someone — or just yourself — with your homemade masterpiece! These Boston Cream Pie Cupcakes keep well, taste like nostalgia, and make the kitchen smell amazing. Happy baking!

Hi, I’m Lina, the creator of Lina Easy Recipes.Cooking has always been my passion, and I love sharing simple, homemade dishes that anyone can prepare.
Love What You See?
Join me on Pinterest and Facebook for daily cooking inspiration, new recipe ideas, and behind-the-scenes kitchen stories. Let’s cook something wonderful together!


 - spooky Halloween cupcake idea")

