
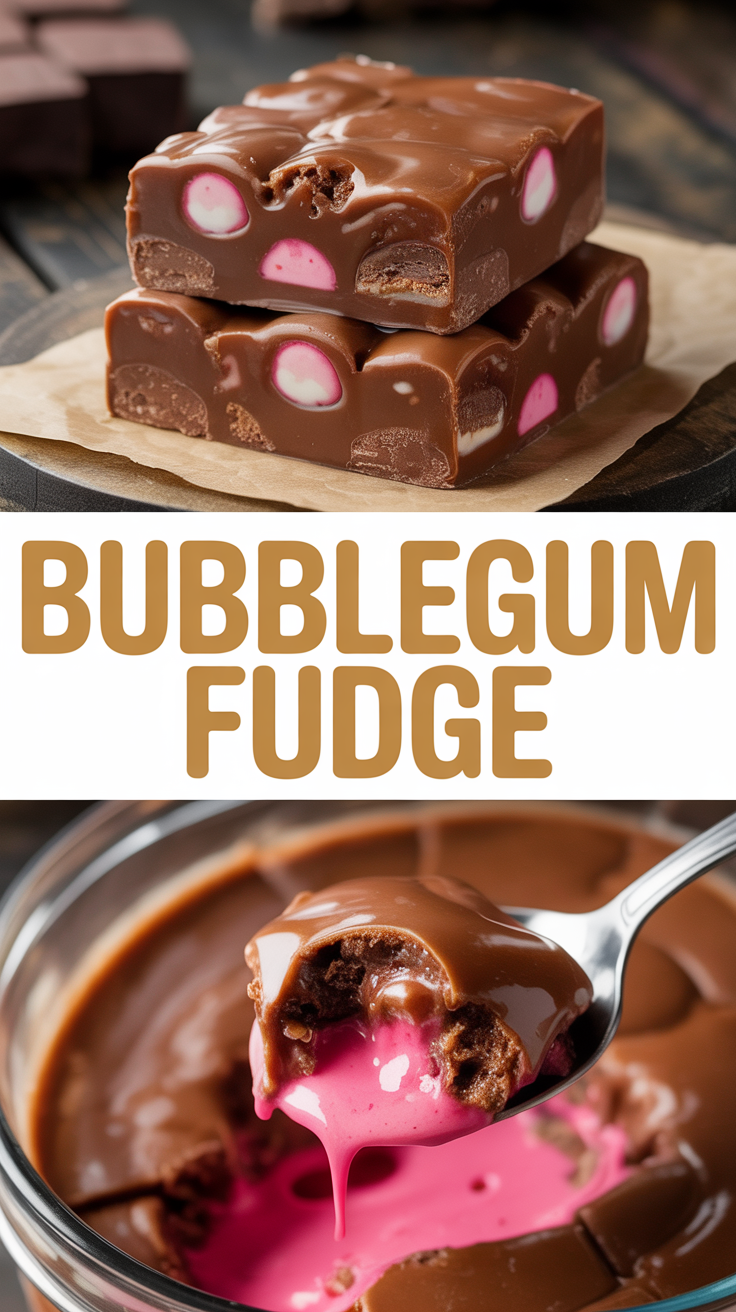
I’ll admit it up front: I made this bubblegum fudge because my inner five-year-old staged a coup. Picture me in the kitchen, humming a cartoon theme while the whole house filled with the sweet, nostalgic smell of white chocolate and a ridiculous pink hue that made me grin like a kid. This fudge tastes exactly like childhood birthday parties—too-sweet in the best way, chewy-smooth, and loud pink. It’s deceptively simple: creamy white chocolate, sticky-sweet sweetened condensed milk, a pat of butter, and a little bubblegum extract (plus color, because presentation matters). If you want to revisit that sugary, silly era without the sticky fingers and lost party hats, this is your ticket.
Quick Facts
- Yield: Serves 16 (about 1-inch squares)
- Prep Time: 15 minutes
- Cook Time: 10 minutes
- Total Time: 145 minutes (includes 2 hours chilling)
Why This Recipe is Awesome
This fudge tastes playful and nostalgic and looks like a candy shop stole my mixing bowl. It’s creamy, slightly chewy, and packed with that bubblegum note without tasting artificial or one-note. It’s so easy even your oven can’t mess it up—no baking required—just gentle heating and patient chilling. The texture stays silky, the color pops, and if you love sweets that make you smile, this one delivers.
Ingredients
For the Main Dish:
- 3 cups white chocolate chips (10–11 oz)
- 14 oz can sweetened condensed milk (one can)
- 2 tbsp unsalted butter
- 1 tsp bubblegum extract (start with less and taste)
- 1 tsp vanilla extract
- Pinch of fine sea salt
- Pink gel or liquid food coloring (a few drops, to desired color)
- Optional: 1/2 cup mini marshmallows or sprinkles for folding in or topping
- Optional: crushed bubblegum-flavored hard candies or edible confetti for garnish
For the Sauce / Garnish (if applicable):
- Optional drizzle: 2 tbsp melted white chocolate + a drop of bubblegum extract for extra shine
How I Make It
Step 1:
Line an 8×8-inch pan with parchment, leaving an overhang for easy removal. Measure the white chocolate chips and the 14 oz sweetened condensed milk. Having everything ready makes the process smooth and keeps the chocolate from seizing.
Step 2:
In a medium saucepan over low heat, combine the sweetened condensed milk and white chocolate chips. Stir constantly with a heatproof spatula until the chips melt into a glossy, thick mixture—about 5–7 minutes. Keep the heat low; you want a gentle, quiet simmer if anything. Don’t walk away—stirring keeps the texture silky.
Step 3:
Remove the pan from heat and stir in the butter, vanilla, and a pinch of salt until smooth. Now taste a tiny bit (don’t double-dip!). Add 1 tsp bubblegum extract starting with ¾ tsp if you’re cautious, then adjust. Add a few drops of pink coloring until the color sings. The kitchen will smell sweet and nostalgic—like a carnival tent in a cup.
Step 4:
Pour the fudge mixture into the prepared pan and smooth the top. If you want marshmallows or sprinkles folded in, fold gently now so you keep that fluffy texture. Sprinkle crushed candy or edible confetti on top while the surface still looks shiny so they stick. Listen: no sizzling, just thick, comforting silence—fudge heaven.
Step 5:
Let the pan cool to room temperature, then move it to the refrigerator and chill for at least 2 hours, or until firm. Use the parchment overhang to lift the fudge out, then cut into 1-inch squares. Store in an airtight container in the fridge for up to 2 weeks or freeze for longer storage.
Pro Tips
- Use good-quality white chocolate—it melts smoother and tastes less waxy. If chips seem dry, add a splash more condensed milk.
- Start with ¾ tsp bubblegum extract and taste—extracts can vary wildly. You can always add more, but you can’t take it out.
- Don’t overheat the mixture. Keep heat low and stir constantly to prevent graininess.
- If you want softer fudge, chill just until set, about 90 minutes; for firmer squares, go the full 2 hours.
Common Mistakes to Avoid
- Skipping preheating: Classic rookie move. It changes texture and bake time.
- Overmixing: Leads to dense or chewy results. Mix until just combined.
- Guessing cook time: Always use visual cues or a timer, not just vibes.
- Overcrowding pans: Give your food some breathing room to crisp properly.
Alternatives & Substitutions
- If you don’t have bubblegum extract, substitute strawberry or cotton candy extract for a similar sweet profile—flavor will shift slightly.
- For dairy-free: use dairy-free white baking chips and a can of dairy-free condensed milk; texture will be a touch looser but still delicious.
- For gluten-free: this recipe is naturally gluten-free—just watch your sprinkles and toppers for hidden gluten.
- If you want less sugar, reduce the amount of added candy and use fewer sprinkles—fudge will still be sweet but slightly toned down.
Variations & Tips
- Adult twist: stir in 1 tbsp rum or bourbon for a grown-up bubblegum fudge.
- Nutty: fold in 1/2 cup chopped toasted almonds or pistachios for crunch and color contrast.
- Swirl: drop spoonfuls of strawberry jam onto the surface and swirl with a toothpick for a fruit-bubblegum mashup.
- Color-block: split the batter and color half neon pink and half pastel for a playful two-tone effect.
- Kid-friendly: top with edible glitter, rainbow sprinkles, or small candy pearls for party-ready squares.
- Chocolate twist: fold in 1/2 cup mini chocolate chips for occasional melty pockets of cocoa.
FAQ (Frequently Asked Questions)
- Can I make this ahead of time?
- Yes! Make it up to a week ahead and keep it chilled in an airtight container. For parties, cut squares the morning of and keep them refrigerated until serving.
- Can I double the recipe?
- Sure thing. Use a 9×13-inch pan for doubled volume and increase chilling time by 30–45 minutes since the fudge layer will be thicker.
- Can I substitute butter with oil?
- Technically yes, but you’ll miss that buttery magic. Use ¾ the amount of oil.
- How do I know it’s done?
- Look for a firm, glossy surface that sets when you touch it lightly. It should lift cleanly from the pan with parchment and cut into neat squares—no gooey middle.
- What if I don’t have ingredient X?
- Swap white chocolate chips with high-quality white baking bars chopped up. Swap bubblegum extract with strawberry or cotton candy extract for near-equivalent sweetness and color. If you lack pink dye, a tiny bit of red mixed with a touch of yellow or just red alone will do the trick.
How I Like to Serve It
I love a platter of these at a casual birthday brunch alongside coffee and milk—kids and nostalgic adults both gravitate toward the pink squares. They pair well with plain cookies or fresh berries to cut the sweetness. For movie night, I cut them into bite-sized pieces and toss a few on a small dessert board with popcorn for salty-sweet crunch.
Notes
- Store leftover fudge in an airtight container in the refrigerator for up to 2 weeks; freeze up to 3 months. Thaw in the fridge overnight.
- No meat here—no safety temp needed. If you ever add nut butter or alcohol, store accordingly (refrigerated is safest).
Final Thoughts
Closing: Now go make something delightfully pink and ridiculous—this fudge will cheer up any day, and yes, you deserve a sweet, silly treat. Enjoy!

Hi, I’m Lina, the creator of Lina Easy Recipes.Cooking has always been my passion, and I love sharing simple, homemade dishes that anyone can prepare.
Love What You See?
Join me on Pinterest and Facebook for daily cooking inspiration, new recipe ideas, and behind-the-scenes kitchen stories. Let’s cook something wonderful together!


")
