
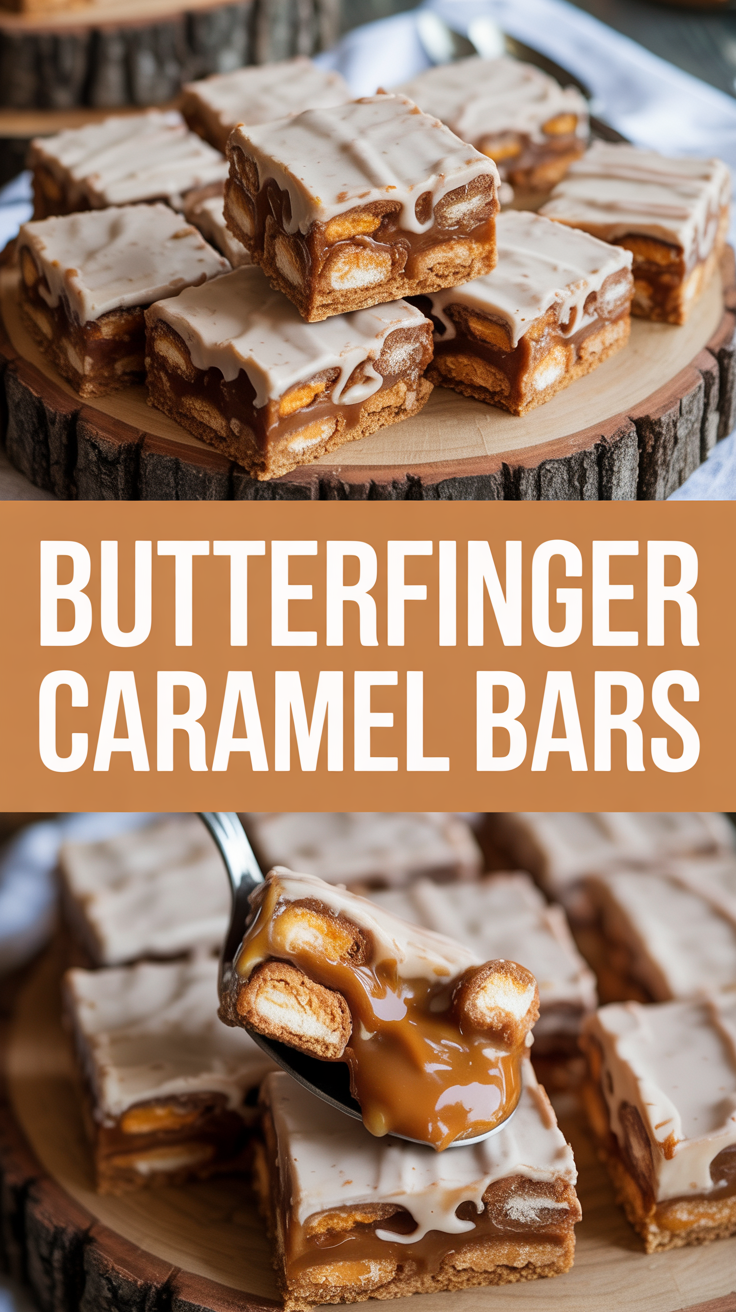
I can still smell my grandma’s kitchen when I bite into these Butterfinger Caramel Bars — sweet caramel warming the air, Butterfinger bits crackling under your teeth, and that little chocolate puddle on top that always made me lick my fingers. When I was a kid, she wrapped up candy bars from the corner store and we’d “help” her turn them into dessert, which mostly meant sampling. This recipe grew out of that sticky, golden nostalgia: simple layers that make a perfect party centerpiece or a guilty-pleasure after-school snack. If you love crunchy, buttery crumbs, gooey caramel, and that unmistakable Butterfinger crunch, you’re in the right place.
Quick Facts
- Yield: Serves 12
- Prep Time: 20 minutes
- Cook Time: 10 minutes (plus chocolate melting)
- Total Time: 2 hours (including chilling)
Why This Recipe is Awesome
These bars balance textures like a dream — a crisp, buttery crust, a glossy, chewy caramel layer, and lightning-fast Butterfinger crunch on top. They look fancy but take almost no effort. They’re so straightforward even your oven can’t mess them up. The caramel smells like toasted sugar and butter, the chocolate shine makes everything feel festive, and the Candy Bar crunch keeps you coming back for just one more bite.
Ingredients
For the Main Dish:
- 1 1/2 cups graham cracker crumbs (about 10 full sheets)
- 6 tbsp unsalted butter, melted
- 1/4 cup granulated sugar
- 14 oz bag soft caramels, unwrapped
- 2 tbsp heavy cream
- 8 oz Butterfinger candy, chopped (about 3 standard bars or 12 fun-size)
- 8 oz semisweet chocolate chips
- 1 tbsp unsalted butter (for melting with chocolate)
- Pinch of flaky sea salt (optional, for finishing)
For the Sauce / Garnish (if applicable):
- Extra crushed Butterfinger or a sprinkle of flaky sea salt for the top, optional
How I Make It
Step 1:
Preheat the oven to 350°F. Line a 9×13 pan with parchment, leaving an overhang so you can lift the bars out easily. In a bowl, stir together 1 1/2 cups graham cracker crumbs, 6 tbsp melted butter, and 1/4 cup sugar until the mixture looks like wet sand. Press that into the pan with the bottom of a measuring cup until you have an even layer. The crust should feel firm and compact — this gives you clean bar edges when you slice.
Step 2:
Bake the crust at 350°F for 10 minutes until it smells buttery and the edges take on a light golden color. Let the crust cool for 5 minutes while you melt the caramels. Pro tip: don’t walk away; you’ll want it warm, not piping hot, when the caramel hits it.
Step 3:
Place the 14 oz unwrapped caramels and 2 tbsp heavy cream in a medium saucepan over low heat. Stir constantly until the caramel becomes glossy and pourable — about 4–6 minutes. Watch closely so the caramel doesn’t scorch; low heat and a wooden spoon keep you safe. Pour the caramel evenly over the warm crust and use an offset spatula to smooth it out.
Step 4:
Immediately scatter 8 oz chopped Butterfinger over the caramel and lightly press the pieces into the caramel so they stick. Slide the pan into the fridge and chill for 1 hour to let the caramel firm up. While the bars chill, microwave the 8 oz chocolate chips and 1 tbsp butter in 30-second bursts, stirring between bursts until glossy.
Step 5:
Drizzle or spread the melted chocolate over the chilled bars. If you like contrast, sprinkle a few extra crushed Butterfinger pieces and a pinch of flaky sea salt while the chocolate still feels tacky. Return the pan to the fridge for another 30 minutes to let everything set. Lift the bars out using the parchment overhang and cut into 12 squares using a sharp knife warmed under hot water for cleaner edges.
Pro Tips
- Warm your knife under hot water and dry it between cuts for neat, glossy slices.
- If your caramels look grainy, add a splash more cream and keep stirring over low heat — patience beats high heat here.
- Use a 9×13 pan for even thickness; if you go smaller, reduce bake time slightly and increase chilling time for thicker bars.
- To avoid soggy bottoms, make sure the crust bakes until it smells toasty and feels set when you press it gently.
Common Mistakes to Avoid
- Skipping preheating: Classic rookie move. It changes texture and bake time.
- Overmixing: Leads to dense or chewy results. Mix until just combined.
- Guessing cook time: Always use visual cues or a timer, not just vibes.
- Overcrowding pans: Give your food some breathing room to crisp properly.
Alternatives & Substitutions
- Swap graham crackers for 1 1/2 cups digestive biscuits or crushed pretzels for a salty contrast — pretzels add crunch and a pleasant savory pop.
- Use a 14 oz can of dulce de leche instead of melting caramels for a deeper caramel flavor and less hands-on stirring.
- For dairy-free, use vegan caramels and coconut cream, and choose dairy-free chocolate chips; replace butter with coconut oil for the crust but expect a slightly different flavor.
- Replace Butterfinger with Heath bars, Twix, or chopped peanut butter cups to change the flavor profile.
Variations & Tips
- Salted Caramel: Sprinkle flaky sea salt on the caramel layer before adding Butterfinger for a grown-up sweet-salty twist.
- Nutty Crunch: Mix 1/2 cup chopped toasted pecans into the crust for extra texture and aroma.
- Peanut Butter Swirl: Warm 1/3 cup peanut butter and swirl it into the caramel before chilling for a nutty ribbon.
- Mini Bars: Use an 8×8 pan and cut into 16 smaller squares for bite-size party treats.
- Chocolate Lovers: Fold 1/2 cup mini chocolate chips into the crust for pockets of melted chocolate.
- Creative Twist: Add a thin layer of espresso-spiked ganache under the chocolate for a mocha-candy bar mashup.
FAQ (Frequently Asked Questions)
- Can I make this ahead of time?
- Yes! Make the bars up to 3 days ahead and store them in an airtight container in the fridge. Bring to room temperature 15–20 minutes before serving so the caramel softens slightly.
- Can I double the recipe?
- Sure thing. Use two 9×13 pans or one larger pan, but don’t double the bake time — keep an eye on the crust and add a few minutes only if it still looks pale.
- Can I substitute butter with oil?
- Technically yes, but you’ll miss that buttery magic. Use ¾ the amount of oil.
- How do I know it’s done?
- The crust will smell toasty and show light golden edges. The caramel should spread smoothly over the crust and firm when chilled — the top should feel set, not wiggle, after refrigeration.
- What if I don’t have ingredient X?
- No problem. If you lack graham crackers, use crushed vanilla wafers. If you don’t have caramels, heat a can of 14 oz dulce de leche until pourable or use jarred caramel sauce — both work fine.
How I Like to Serve It
I serve these bars with strong coffee for breakfast treats or with vanilla ice cream and a cold glass of milk for dessert. They shine at potlucks or game nights — people fight over the crunchy edges. In summer, I keep them chilled; in winter, I let them sit a bit to soften so the caramel gets gloriously chewy.
Notes
- Store leftovers in an airtight container in the fridge for up to 5 days or freeze individual bars for up to 1 month.
- Reheat gently in the microwave for 8–10 seconds if you like the caramel slightly gooier before serving.
Final Thoughts
Closing: Now go impress someone — or just yourself — with your homemade Butterfinger Caramel Bars. They’re sticky, crunchy, and unapologetically delicious.

Hi, I’m Lina, the creator of Lina Easy Recipes.Cooking has always been my passion, and I love sharing simple, homemade dishes that anyone can prepare.
Love What You See?
Join me on Pinterest and Facebook for daily cooking inspiration, new recipe ideas, and behind-the-scenes kitchen stories. Let’s cook something wonderful together!


 - spooky Halloween popcorn snack")

