
When I was a kid, my grandmother kept a mason jar of bright, candied lemon peels on the counter like a tiny sun you could eat. I remember sneaking one between homework and TV, the sharp citrus scent waking up my nose while the sugar crackled between my teeth. Making candied lemon peel feels exactly like stealing a little grown-up candy from that jar — nostalgic, bright, and a tiny bit indulgent. Today I’ll walk you through the same simple method she used: quick blanching to cut bitterness, a gentle simmer in a clear syrup until the peels turn translucent, and a final sugar-dusting that makes them glisten like little jewels.
Quick Facts
- Yield: Serves 6–8 (about 1 cup finished peel)
- Prep Time: 20 minutes active
- Cook Time: 45 minutes simmer + 15 minutes oven dry (optional)
- Total Time: ~1 hour 20 minutes (plus cooling)
Why This Recipe is Awesome
This recipe gives you candy that tastes like sunshine: bright lemon flavor, a chewy-translucent texture, and a crackling sugar coating. It feels fancy but stays stupid-simple — honestly, it’s so easy even your most distracted kitchen helper can’t mess it up. Use the peels as cocktail garnishes, holiday nibblers, or chopped into cookies for surprise citrus pop. The smell while the syrup simmers? Sharp citrus and sugar, like a bakery meets a garden.
Ingredients
For the Main Dish:
- 4 large lemons (preferably organic or unwaxed)
- 1 cup water (for blanching)
- 1 cup water (for syrup)
- 1 1/2 cups granulated sugar (for syrup)
- 1 cup granulated sugar (for coating; optional)
- Pinch of salt
- Optional: 1 tsp vanilla extract or a strip of vanilla bean for flavor
For the Sauce / Garnish (if applicable):
- Optional 4 oz dark chocolate, melted for dipping
- Optional fine sea salt for finishing
How I Make It
Step 1:
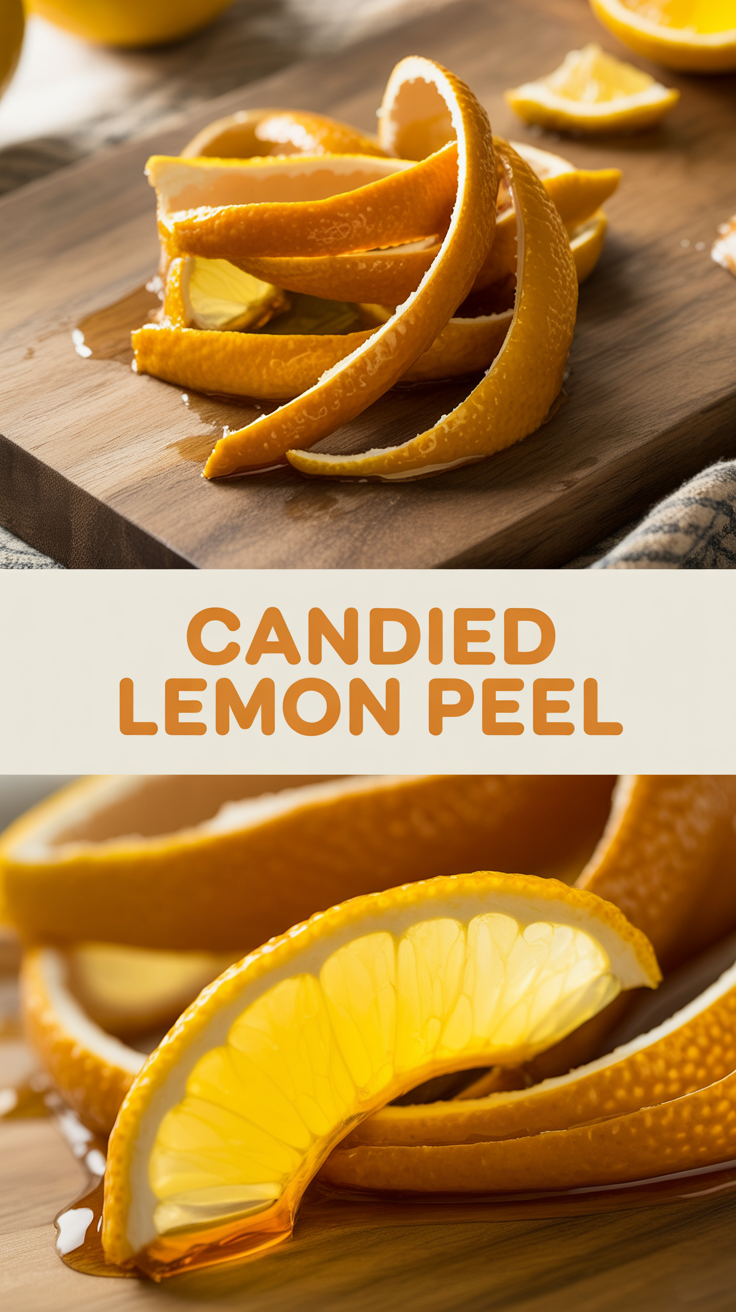
Wash the lemons and cut off the ends. Use a sharp knife or vegetable peeler to remove the peel in long strips, keeping about 1/8–1/4 inch of the white pith attached so the peels hold together. Place the peels in a saucepan and cover with 1 cup water. Bring to a boil, then drain. Repeat this quick blanching twice more to remove bitterness — you’ll notice the water looks less cloudy after each boil.
Step 2:
In the same pan, combine 1 cup water and 1 1/2 cups sugar. Stir over medium heat until the sugar dissolves, then add the lemon peels and a pinch of salt. Bring to a gentle simmer and lower the heat so the surface barely trembles. If you like, add 1 tsp vanilla for a soft perfume.
Step 3:
Simmer the peels for about 45 minutes, stirring occasionally so everything cooks evenly. Watch as the peels turn translucent and the syrup thickens to a glossy coat — the kitchen fills with a bright, candy-like citrus smell that makes you grin. If the syrup reduces too much, add a splash of water; if it bubbles too vigorously, lower the heat. You want a gentle simmer, not a hard boil.
Step 4:
Use tongs to transfer the peels to a cooling rack set over parchment. Let excess syrup drip back into the pan. For quicker drying and a chewy finish, place the peels on a baking sheet and bake at 200°F for 15–20 minutes, flipping once. They should feel tacky but not wet.
Step 5:
While still tacky, toss the peels in the extra 1 cup sugar if you want a classic crystal coating. For a grown-up spin, dip half of each strip in melted dark chocolate and let set on parchment until the chocolate snaps. Store finished peels in an airtight jar; they taste better after a day or two when the sugar settles and flavors mingle.
Pro Tips
- Use organic, unwaxed lemons whenever possible. Wax blocks syrup penetration and can taste off.
- Blanch peels three times to tame bitterness — trust me, skipping this makes them harsh.
- If the syrup threatens to burn, lower the heat. A gentle simmer gives a clear, glossy syrup; a hard boil ruins texture.
- To speed-dry, use your oven at 200°F for short bursts. Watch closely so the sugar doesn’t brown.
Common Mistakes to Avoid
- Skipping preheating: Classic rookie move. It changes texture and bake time.
- Overmixing: Leads to dense or chewy results. Mix until just combined.
- Guessing cook time: Always use visual cues or a timer, not just vibes.
- Overcrowding pans: Give your food some breathing room to crisp properly.
Alternatives & Substitutions
- Short on lemons? Use oranges or grapefruit for sweeter or more floral peels — adjust sugar to taste.
- Skip the vanilla for a purer citrus flavor, or add a cinnamon stick for warmth (remove before serving).
- Dairy-free / gluten-free: this recipe already works for both diets — use dark chocolate labeled dairy-free if dipping.
Variations & Tips
- Add a pinch of cayenne to the syrup for spicy-sweet peels that jazz up cocktails.
- Roll peels in powdered sugar instead of granulated for a softer finish and less crunch.
- Try zesting the syrup into a glaze for pound cake or drizzling over ice cream.
- Chop candied peel and stir into cookie dough, scones, or hot cereal for citrusy surprise bites.
- Make a chocolate-covered version for holiday platters — the contrast tastes luxurious.
- Swap lemon for lime for a bright, tart variation that pairs well with tequila-based drinks.
FAQ (Frequently Asked Questions)
- Can I make this ahead of time?
- Yes! Store candied peels in an airtight jar at room temperature for up to 2 weeks, or refrigerate for a month. If you dipped them in chocolate, keep them in a cool place to avoid sweating. Let them come to room temp before serving for best chew.
- Can I double the recipe?
- Sure thing. Double the lemons and syrup in a wide pan so peels lie in a single layer. Increase simmer time slightly if the pan crowding changes evaporation, and stir more often.
- Can I substitute butter with oil?
- Technically yes, but you’ll miss that buttery magic. Use ¾ the amount of oil.
- How do I know it’s done?
- You’ll see the peels turn translucent and the syrup thicken to a glossy, slightly clingy consistency. The peels should feel tacky, not slimy. After oven-drying, they should feel chewy with a slight snap when coated in sugar.
- What if I don’t have ingredient X?
- No lemon? Use orange or grapefruit for similar results. No extra sugar for coating? Let peels dry fully and use them plain — they still taste wonderful in baked goods or cocktails.
How I Like to Serve It
I love piling candied lemon peel on a little dessert board with dark chocolate, almonds, and a sharp rind of Manchego for contrast. They make cocktails pop — drop a strip into a gin and tonic or a whiskey old-fashioned. During winter holidays, I slice them thin and scatter on shortbread; in summer, they brighten a bowl of yogurt and granola. They work as hostess gifts wrapped in parchment or tucked into mason jars.
Notes
- Store in an airtight container at room temperature for up to 2 weeks, or refrigerate for up to 1 month. If dipped in chocolate, keep cool.
- No meat here, so no reheating temps needed — just patience while they dry and set.
Final Thoughts
Closing: Bright, simple, and nostalgic — candied lemon peel makes the kitchen smell like celebration. Now go make a jar; gift one, garnish everything, or eat them all standing at the counter. You deserve this little sunny treat.

Hi, I’m Lina, the creator of Lina Easy Recipes.Cooking has always been my passion, and I love sharing simple, homemade dishes that anyone can prepare.
Love What You See?
Join me on Pinterest and Facebook for daily cooking inspiration, new recipe ideas, and behind-the-scenes kitchen stories. Let’s cook something wonderful together!


 - spooky Halloween popcorn snack")

