Chicken katsu with simple tonkatsu sauce and steamed rice
Spread the love
I keep a little pan of oil heating on the stove most Fridays — not because I need to, but because the sizzle of panko hitting hot oil feels like the weekend announcing itself. Chicken katsu always brings that comfort: crunchy, golden breadcrumbs, a warm cloud of steamed rice, and that glossy, tangy tonkatsu sauce I ladle over everything. Tonight I’ll walk you through my simple version that tastes restaurant-level but uses pantry staples. Expect crispy edges that snap, a juicy chicken center, and a sauce that balances sweet, savory, and a tiny hit of umami. Bonus: it comes together faster than you think, and it makes the whole kitchen smell like a cozy Japanese diner.
Quick Facts
Yield: Serves 3–4
Prep Time:20 minutes
Cook Time:20 minutes
Total Time:40 minutes
Why This Recipe is Awesome
Hands down, this chicken katsu delivers on crunch, comfort, and speed. The panko breadcrumb crust fries up ultra-crispy while the inside stays tender and juicy. The simple homemade tonkatsu sauce brings bright sweetness, tang, and depth without any weird ingredients. It’s so easy even your weekend self will think you’re a pro. Who doesn’t love crunchy edges, steaming rice, and a sauce that glazes everything in deliciousness?
Vegetable oil or canola oil for frying (about 1–1.5 cups)
2–3 cups cooked steamed rice (short-grain or jasmine)
For the Sauce / Garnish (if applicable):
1/3 cup ketchup
2 tbsp Worcestershire sauce
1 tbsp soy sauce
1 tbsp brown sugar
1 tsp Dijon mustard or yellow mustard
1 tsp rice vinegar (or apple cider vinegar)
Green onions, thinly sliced, for garnish (optional)
Shredded cabbage or lemon wedges, for serving (optional)
How I Make It
Step 1:
Start by prepping the chicken: place each chicken breast between two sheets of plastic wrap and gently pound with a rolling pin or meat mallet until about 1/2-inch thick. This step helps the meat cook evenly and keeps it juicy. Season both sides with salt, pepper, and a little garlic powder. Set up a dredging station with three shallow bowls: flour, beaten eggs, and panko. Press the chicken into the flour, dip in egg, then coat thoroughly with panko, pressing gently so the crumbs adhere.
Step 2:
Pour oil into a heavy skillet so it reaches about 1/4-inch deep and heat over medium-high to reach around 350–360°F. If you don’t have a thermometer, test with a pinch of panko—if it sizzles and browns in about 30 seconds, you’re ready. Carefully lay the cutlets in the pan; you should hear a satisfying sizzle. Fry for about 3–4 minutes per side until the crust turns golden brown.
Step 3:
As the chicken fries, whisk together the sauce: combine ketchup, Worcestershire, soy sauce, brown sugar, mustard, and rice vinegar in a small saucepan. Warm over low heat while stirring until the sugar dissolves and the sauce glazes slightly—this takes 2–3 minutes. The aroma will shift to tangy-sweet and a little smoky; your kitchen will smell irresistible.
Step 4:
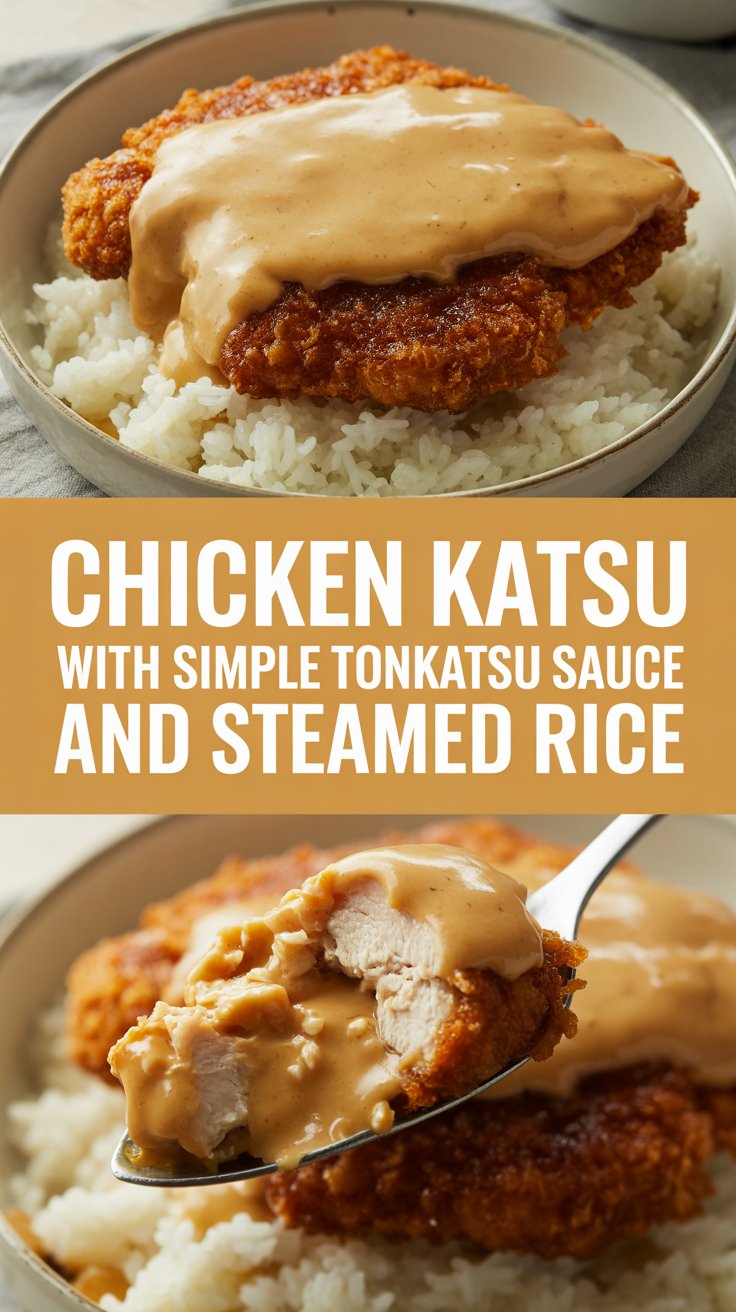
Transfer the fried cutlets to a wire rack or paper towel-lined plate to rest for 3–5 minutes. This brief rest keeps the crust crisp and lets juices redistribute so the chicken stays juicy. Slice the cutlets into strips and arrange over bowls of steaming rice. Drizzle or brush the tonkatsu sauce over the top. The contrast between the shiny sauce and the matte crunchy crumbs looks gorgeous.
Step 5:
Garnish with thinly sliced green onions and a wedge of lemon or a small pile of shredded cabbage for crunch and brightness. Serve immediately while the cutlet sings with fresh crunch and the rice still steams.
Pro Tips
Dry the chicken with paper towels before pounding so seasonings and panko stick better.
Keep the oil at a steady 350–360°F. Too hot and the panko burns; too cool and the crust soaks up oil.
Use a wire rack for resting to keep the bottom crisp instead of getting soggy on a plate.
If you want even crispier crust, double-dip: egg, panko, light egg wash, then more panko.
Common Mistakes to Avoid
Skipping preheating: Classic rookie move. It changes texture and bake time.
Overmixing: Leads to dense or chewy results. Mix until just combined.
Guessing cook time: Always use visual cues or a timer, not just vibes.
Overcrowding pans: Give your food some breathing room to crisp properly.
Alternatives & Substitutions
Use chicken thighs (boneless) for more fat and flavor; they stay extra juicy but may need a minute longer to cook.
Swap panko for crushed cornflakes or gluten-free panko for a gluten-free option; texture changes slightly but stays crunchy.
Turn this into tofu katsu by pressing extra-firm tofu and following the same dredge-and-fry method.
Replace soy sauce with tamari for gluten-free sauce; the flavor remains savory with less wheat.
Variations & Tips
Spicy: mix 1 tsp sriracha into the tonkatsu sauce or dust panko with a pinch of cayenne.
Kid-friendly: leave out mustard and vinegar for a sweeter, milder sauce.
Low-carb: use crushed pork rinds or almond flour mixed with parmesan for the coating.
Oven-baked: brush cutlets with oil and bake at 425°F for 12–15 minutes, flipping once (less crisp than frying).
Serve as a sandwich: tuck sliced katsu into a soft roll with coleslaw and extra sauce.
Creative twist: top with a fried egg (sunny-side up) for a katsu-don inspired bowl.
FAQ (Frequently Asked Questions)
Can I make this ahead of time?
Yes! Prep the chicken up to the panko stage and refrigerate for a few hours. Fry just before serving for best crisp. Store leftovers in the fridge up to 3 days and reheat in a hot oven or air fryer to revive the crunch.
Can I double the recipe?
Sure thing. Fry in batches and keep finished cutlets on a wire rack in a warm oven (200°F) while you finish the rest so they stay crisp.
Can I substitute butter with oil?
Technically yes, but you’ll miss that buttery magic. Use ¾ the amount of oil.
How do I know it’s done?
Look for a golden-brown crust and an internal temperature of 165°F. Slice once and check for no pink; the juices should run clear and the meat should feel firm but springy.
What if I don’t have ingredient X?
No panicked runs to the store: use ketchup + a splash of soy for the sauce if you lack Worcestershire; or swap brown sugar for honey (use a little less). If you lack panko, crush tortilla chips or plain crackers for a crunchy coat.
How I Like to Serve It
I plate this with a mound of steaming rice, a small heap of shredded cabbage dressed lightly with lemon, and extra sauce on the side for dunking. It suits weeknight dinners with cold beer or a simple green tea on calmer evenings. For a weekend treat, serve with a bowl of miso soup and a ripe avocado salad — the crunch pairs beautifully with silky textures.
Notes
Store leftovers in an airtight container in the fridge up to 3 days. Reheat in a hot oven or air fryer to restore crispness.
Safe cooking temp for chicken: 165°F internal temperature.
Final Thoughts
Closing: Now go impress someone — or just yourself — with your homemade masterpiece! The crunch, the sauce, the warm rice — simple comfort that never gets old.
Hi, I’m Lina, the creator of Lina Easy Recipes.Cooking has always been my passion, and I love sharing simple, homemade dishes that anyone can prepare.
Spread the love
Love What You See?
Join me on Pinterest and Facebook for daily cooking inspiration, new recipe ideas, and behind-the-scenes kitchen stories. Let’s cook something wonderful together!