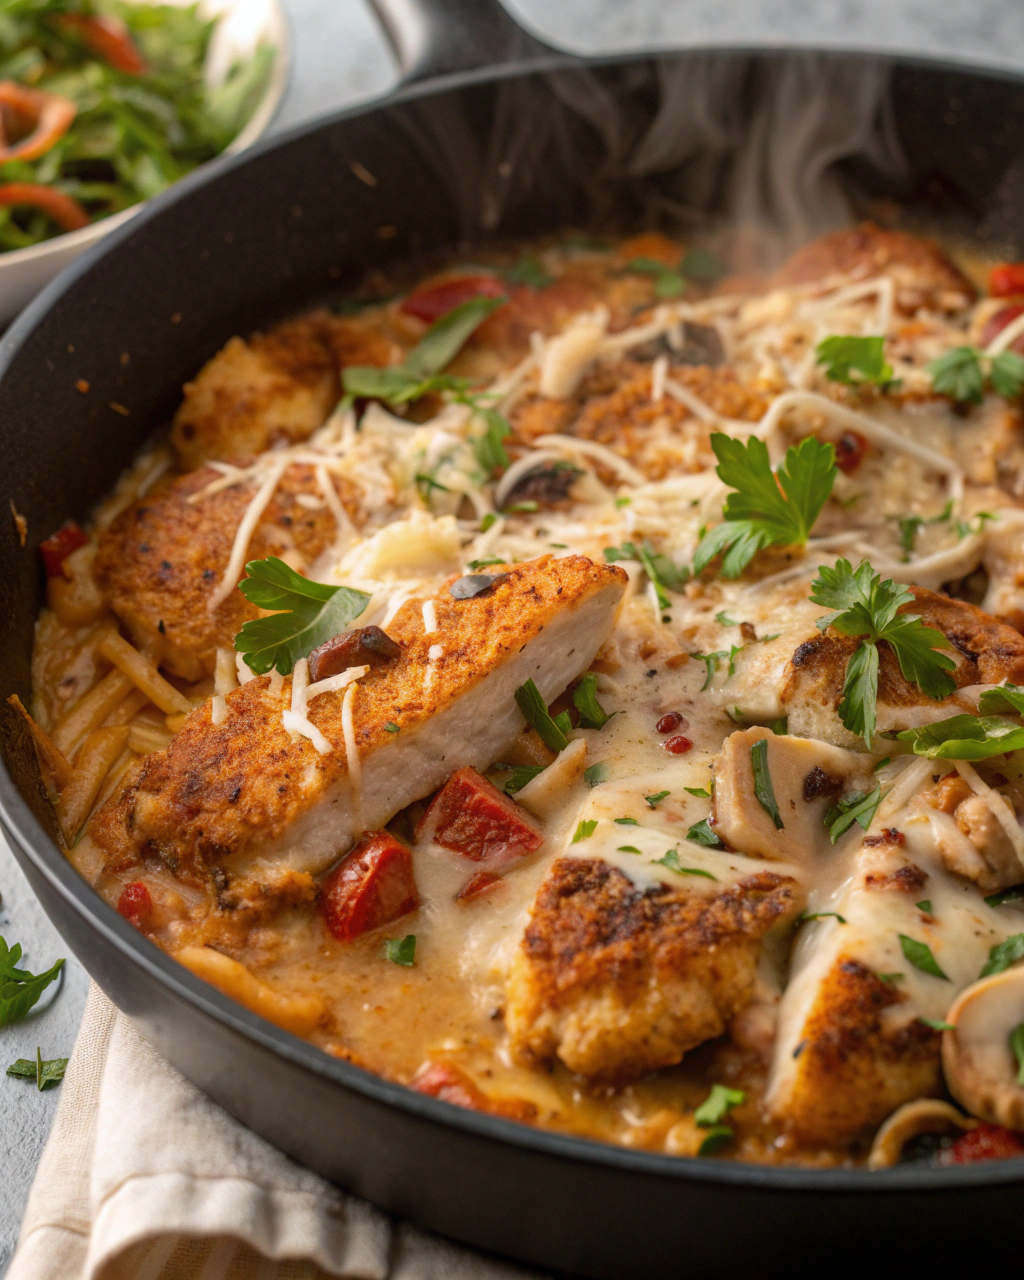
Okay, small kitchen secret: I treat stroganoff like a cozy sweater that benefits from a little texture — enter the crispy chicken crust. I learned this trick when I got bored with mushy strips of meat and decided to give my favorite creamy mushroom sauce something to cling to. The result? A dish that snaps when you cut into it, then melts into silky, tangy sauce. If you love contrast — crunchy meets velvety — this version will become your new weeknight hero. I’ll walk you through frying and finishing perfectly juicy chicken, building a mushroom-forward sauce, and the little tricks that keep cleanup easy and your stovetop smelling like dinner heaven.
Quick Facts
- Yield: Serves 4
- Prep Time: 15 minutes
- Cook Time: 25 minutes
- Total Time: 40 minutes
Why This Recipe is Awesome
This Crispy Chicken Stroganoff gives you the classic creamy, tangy sauce you love with a crunchy twist that keeps every bite interesting. The contrast of the golden, crisp crust against a lush, mushroom-sour-cream sauce sings on your plate. It smells amazing — earthy mushrooms, browned butter, and a whisper of mustard — and it comes together fast enough for a weeknight dinner. Plus, it’s so forgiving even your distracted brain can handle it (hello, slow kids doing homework). Who doesn’t love crispy edges and a silky sauce to sop up with egg noodles?
Ingredients
For the Main Dish:
- 1 1/2 lb boneless, skinless chicken breasts (about 3 small breasts)
- 1/2 cup all-purpose flour
- 1 tsp kosher salt and 1/2 tsp black pepper, plus more to taste
- 2 large eggs, beaten
- 3/4 cup panko breadcrumbs (or plain breadcrumbs)
- 3 tbsp olive oil or vegetable oil for frying
- 2 tbsp butter (for sauce)
- 8 oz cremini or white mushrooms, sliced
- 1 medium yellow onion, thinly sliced
- 2 cloves garlic, minced
For the Sauce / Garnish:
- 1 cup low-sodium chicken broth
- 2 tsp Dijon mustard
- 1 tsp Worcestershire sauce
- 3/4 cup sour cream (or plain Greek yogurt)
- 1 tbsp fresh parsley, chopped (optional)
- Egg noodles or mashed potatoes, for serving
How I Make It
Step 1:
Prep the chicken: slice each breast in half horizontally so you end up with thinner cutlets (about 1/2-inch thick). Pat them dry with paper towels — that helps the coating stick and gives you crunch. Season both sides with 1 tsp kosher salt and 1/2 tsp black pepper. Set up a dredging station: one plate with 1/2 cup flour, a shallow bowl with the beaten 2 eggs, and a third plate with 3/4 cup panko. Dredge each cutlet in flour, dip in egg, then press into panko. Press firmly so the crumbs really cling.
Step 2:
Heat a large skillet over medium-high heat and add 3 tbsp olive oil. You want a sizzle when the chicken hits the pan. Fry the cutlets in batches so you don’t crowd the pan — 3–4 minutes per side should give you a deep, golden crust. Flip once and listen for that satisfying sizzle. Transfer to a wire rack or paper towels to rest while you make the sauce. If the chicken takes on color too fast, lower the heat a touch; you want color without burning.
Step 3:
In the same skillet, lower heat to medium and add 2 tbsp butter. Toss in the sliced onion and cook until translucent and soft, about 5 minutes — you’ll smell sweet onion notes rising. Add the sliced mushrooms and spread them into a single layer for a minute or two to brown. Stir and cook until they release liquid and that liquid evaporates, then let them take on color — another 4–5 minutes. Add the minced garlic and cook a quick 30 seconds until fragrant.
Step 4:
Deglaze the pan with 1 cup chicken broth, scraping up the browned bits — that’s flavor gold. Stir in 2 tsp Dijon mustard and 1 tsp Worcestershire sauce. Let the sauce simmer and reduce for 3–4 minutes until slightly thickened and glossy. Turn the heat to low and stir in 3/4 cup sour cream (or Greek yogurt). Taste and adjust salt and pepper. You want a rich, tangy, silky sauce that coats a spoon.
Step 5:
Return the crispy chicken to the pan, nestling cutlets into the sauce so the bottoms pick up flavor but the crust stays mostly crisp. Heat for 1–2 minutes just to warm through — avoid boiling after adding sour cream. Garnish with chopped parsley and serve on buttered egg noodles or mashed potatoes. Slice into a cutlet and enjoy the contrast: crunchy edge, juicy center, and a creamy mushroom hug. If you like extra crisp, pop the pan under a broiler for 2 minutes before serving.
Pro Tips
- Pat the chicken dry and press the crumbs firmly for the crunchiest crust. Moisture kills crispiness.
- Don’t overcrowd the skillet — give each cutlet space so they brown instead of steam.
- If the sauce looks too thin, simmer a couple minutes longer; if it gets too thick, whisk in a splash of chicken broth.
- For ultra-even cooking, pound breasts to an even thickness (about 1/2 inch) before breading.
Common Mistakes to Avoid
- Skipping preheating: Classic rookie move. It changes texture and bake time.
- Overmixing: Leads to dense or chewy results. Mix until just combined.
- Guessing cook time: Always use visual cues or a timer, not just vibes.
- Overcrowding pans: Give your food some breathing room to crisp properly.
Alternatives & Substitutions
- Chicken ↔ firm tofu: press tofu, coat in panko, and pan-fry. You’ll get texture without meatiness.
- Sour cream ↔ plain Greek yogurt: yogurt gives tang and saves calories but thin it with a little milk if it’s too thick.
- All-purpose flour ↔ gluten-free flour blend and panko ↔ gluten-free breadcrumbs to make it gluten-free (texture changes slightly).
- Butter ↔ oil: for dairy-free use oil for cooking and replace sour cream with coconut yogurt or a dairy-free sour cream alternative (the sauce will taste different).
Variations & Tips
- Spicy: add 1/2 tsp smoked paprika and a pinch of cayenne to the breadcrumb mix.
- Kid-friendly: skip the mustard and Worcestershire, use a little extra sour cream for creaminess.
- Herby: stir in 1 tbsp chopped tarragon or chives at the end for bright, herbal notes.
- Make it paleo-ish: use almond flour and crushed pork rinds for the coating and coconut cream for the sauce.
- Creative twist: finish with a splash of sherry or dry white wine when deglazing for extra depth.
FAQ (Frequently Asked Questions)
- Can I make this ahead of time?
- Yes! Cook the chicken and sauce separately. Keep the chicken on a rack so it stays crisper, cool quickly, and store in the fridge up to 2 days. Reheat gently: warm the sauce in a skillet, add the chicken just to heat through, or re-crisp chicken in a 400°F oven for 5–7 minutes and spoon hot sauce over it.
- Can I double the recipe?
- Sure thing. Use two skillets or work in batches so you don’t overcrowd. You may need to increase sauce reduction time slightly when scaling up.
- Can I substitute butter with oil?
- Technically yes, but you’ll miss that buttery magic. Use ¾ the amount of oil.
- How do I know it’s done?
- Look for a golden-brown crust and a juicy center. Cut a small slit into the thickest part: the meat should run clear and feel firm, not rubbery. Use a thermometer for certainty — chicken reaches safe doneness at 165°F.
- What if I don’t have ingredient X?
- No panic. No mushrooms? Use caramelized onions and spinach for a different angle. No panko? Use crushed crackers or regular breadcrumbs. No chicken broth? Use water plus a bouillon cube or a splash of white wine.
How I Like to Serve It
I spoon this over buttered egg noodles for a classic feel, or heap it onto creamy mashed potatoes when I crave something cozy. Pair with a crisp green salad to cut the richness, and a light white wine or cold beer if you’re feeling fancy. It works for weeknight dinners but also makes a lovely potluck dish because everyone fights over the crispy pieces.
Notes
- Store leftovers in an airtight container for up to 2 days. Reheat gently to preserve crispiness and avoid breaking the sauce.
- Safe cooking temp for chicken: 165°F. Use an instant-read thermometer to check the thickest part.
Final Thoughts
Closing: Now go impress someone — or just yourself — with your homemade masterpiece; the crunch-silk combo will make you smile with every forkful.

Hi, I’m Lina, the creator of Lina Easy Recipes.Cooking has always been my passion, and I love sharing simple, homemade dishes that anyone can prepare.
Love What You See?
Join me on Pinterest and Facebook for daily cooking inspiration, new recipe ideas, and behind-the-scenes kitchen stories. Let’s cook something wonderful together!

