Easy Chicken Parmesan with Fresh Mozzarella and Basil
Spread the love
Chef’s Secret time: I stumbled onto this shortcut midweek when my oven and I were both running on fumes, and now I swear by it. Instead of wrestling with thick cutlets, I pound the chicken thin, give it a double-dip in egg and seasoned crumbs, and let a hot skillet do the heavy lifting before a quick bake to melt the cheese. The result? Crisp, golden edges, bubbling marinara, and slices of fresh mozzarella that stretch just like in the good pizza places. Keep a jar of good marinara on hand and a bunch of basil in the fridge, and you can turn a tired Tuesday into a dinner that smells like celebration.
Quick Facts
Yield: Serves 4
Prep Time:20 minutes
Cook Time:25 minutes
Total Time:45 minutes
Why This Recipe is Awesome
This version tastes restaurant-worthy but stays totally doable on a weeknight. You get a crunchy, golden crust, warm, tangy marinara, and gooey fresh mozzarella with bright ribbons of basil. It’s forgiving, fast, and so satisfying — honestly, it’s the kind of meal that makes your kitchen smell like comfort and applause. And yes, it’s so easy even your oven can’t mess it up.
1 1/2 cups plain breadcrumbs (Panko for extra crunch)
1/2 cup grated Parmesan cheese
1 tsp garlic powder
1/2 tsp dried oregano
3 tbsp olive oil (for skillet)
1 1/2 cups marinara sauce (store-bought or homemade)
8 oz fresh mozzarella, sliced or torn into pieces
Fresh basil leaves, for garnish (about 1/2 cup loosely packed)
Optional: lemon wedges for serving
For the Sauce / Garnish (if applicable):
Extra Parmesan for grating at the table
Pinch of red pepper flakes for heat (optional)
How I Make It
Step 1:
I start by flattening the chicken for even cooking. Place each breast between two sheets of plastic wrap and gently pound them to about 1/2-inch thickness with a meat mallet or rolling pin. Season both sides with salt and pepper. Set up a breading station: flour in one shallow dish, beaten eggs with 2 tbsp water in another, and the breadcrumbs mixed with Parmesan, garlic powder, and oregano in a third. The kitchen will already smell faintly of garlic from the seasoning — a good omen.
Step 2:
Dredge each piece in flour, shake off excess, dip in the egg, then press into the breadcrumb mixture until well coated. Heat a large skillet over medium-high heat and add 3 tbsp olive oil. When the oil shimmers (you’ll see tiny ripples and smell that toasty olive oil aroma), add the cutlets and cook until the crust turns golden brown, about 3–4 minutes per side. Don’t crowd the pan — give each piece some space so the coating crisps instead of steaming.
Step 3:
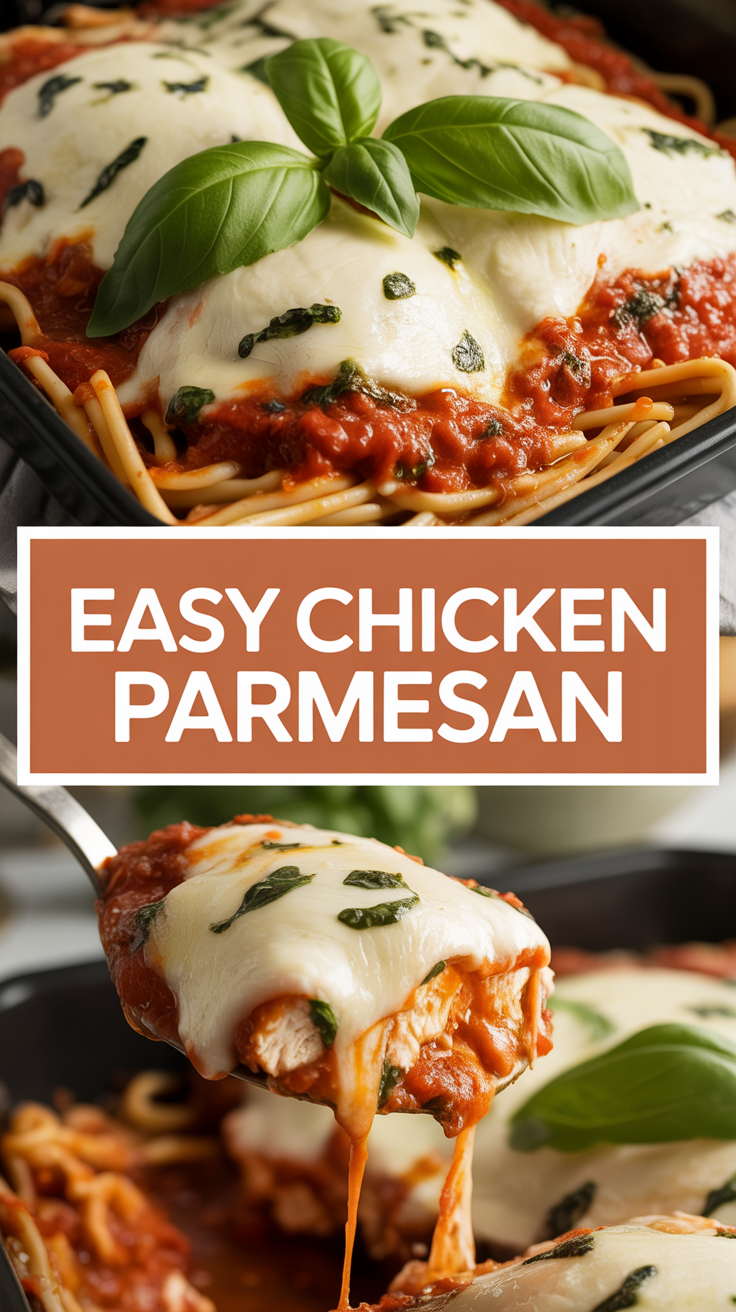
Preheat your oven to 425°F. Spoon a thin layer of marinara into the bottom of a baking dish and arrange the seared cutlets on top. Spoon more sauce over each one, then tuck slices of fresh mozzarella over the sauce so the cheese can melt into soft, milky puddles. At this point the kitchen will smell like warm tomatoes and browned crusts; my mouth waters every single time.
Step 4:
Bake until the chicken reaches an internal temperature of 165°F and the cheese bubbles, about 12–15 minutes. If you want golden, slightly blistered cheese, switch to broil for the last 2–3 minutes — watch it closely so it doesn’t go from perfect to charred. You’ll know it’s done when the edges look crisp and browned and the center reads 165°F.
Step 5:
Remove from the oven and let the chicken rest for 3–5 minutes. Scatter torn basil leaves and a little extra grated Parmesan on top. Serve with a squeeze of lemon if you like brightness. That first forkful should give you a satisfying crunch, molten cheese, and a hit of herbaceous basil — absolute bliss.
Pro Tips
Pound the chicken evenly to 1/2-inch for quick, consistent cooking and tender results.
Use Panko crumbs for the crispiest crust; regular breadcrumbs work fine but yield a denser coating.
Don’t skip the quick sear — it locks in moisture and builds flavor before the oven finishes the job.
Prep the breading station on a rimmed baking sheet for easy cleanup and less mess.
Common Mistakes to Avoid
Skipping preheating: Classic rookie move. It changes texture and bake time.
Overmixing: Leads to dense or chewy results. Mix until just combined.
Guessing cook time: Always use visual cues or a timer, not just vibes.
Overcrowding pans: Give your food some breathing room to crisp properly.
Alternatives & Substitutions
Swap chicken for extra-firm tofu (press it dry and slice into 1/2-inch slabs) for a vegetarian option — expect a firmer texture and lighter flavor.
Use shredded mozzarella or a dairy-free cheese to make it lactose-free; flavor will shift slightly but the melody of tomato and herbs still sings.
Make it gluten-free by using gluten-free flour and breadcrumbs — crust texture may be more delicate but still tasty.
Short on Parmesan? Use Pecorino or a sharp cheddar in small amounts — the saltiness will change slightly.
Variations & Tips
Spicy: Add 1/4–1/2 tsp red pepper flakes to the breadcrumb mix and sprinkle extra on top.
Kid-friendly: Use a milder marinara and avoid red pepper flakes; cut into strips for easy dipping.
Vegetarian: Make classic eggplant parm using 1/2-inch slices, dredged and cooked the same way.
Herby twist: Mix chopped fresh oregano or thyme into the breadcrumbs for extra aroma.
Creative twist: After baking, drizzle a spoonful of basil pesto over the top for a bright, nutty lift.
FAQ (Frequently Asked Questions)
Can I make this ahead of time?
Yes! Prepare the breaded cutlets and refrigerate on a sheet tray for up to 24 hours, then sear and bake when ready. Store leftovers tightly covered for up to 3 days and reheat in a 375°F oven until warmed through to keep the crust crisp.
Can I double the recipe?
Sure thing. Use two pans or bake in shifts so you don’t overcrowd. You may need to increase baking time by a few minutes if your dish gets crowded or stacked.
Can I substitute butter with oil?
Technically yes, but you’ll miss that buttery magic. Use ¾ the amount of oil if swapping. Olive oil works great for flavor; avocado oil gives higher heat tolerance.
How do I know it’s done?
Look for golden, crisp edges on the crust, bubbling sauce, and melted cheese. For safety and juiciness, the internal temperature should reach 165°F.
What if I don’t have ingredient X?
Short on fresh mozzarella? Use shredded whole-milk mozzarella or provolone. No breadcrumbs? Crush crackers or cornflakes for a crunchy substitute.
How I Like to Serve It
I love this with a simple green salad and crusty bread to mop up sauce. Pour a glass of chilled white wine or a light red — this dish pairs with both. For a weekend crowd, serve it family-style on a big platter and let everyone tear basil and grates of Parmesan. It works for cozy weeknights and casual dinner parties alike.
Notes
Store leftovers covered in the fridge for up to 3 days. Reheat at 375°F until warmed through to keep crust crisp.
Safe internal temp for chicken: 165°F.
Final Thoughts
Closing: Now go impress someone — or just yourself — with your homemade masterpiece!
Hi, I’m Lina, the creator of Lina Easy Recipes.Cooking has always been my passion, and I love sharing simple, homemade dishes that anyone can prepare.
Spread the love
Love What You See?
Join me on Pinterest and Facebook for daily cooking inspiration, new recipe ideas, and behind-the-scenes kitchen stories. Let’s cook something wonderful together!