
Okay, lean in — I’m about to whisper my little kitchen cheat that turns plain chicken into something people fight over. As a former weeknight firefighter (read: perpetually hungry and time-poor), I learned to coax big flavor from simple moves. This honey garlic chicken started as a rescue dinner and became my go-to for busy nights and impressing friends without sweating a single technique. Think sticky, shiny sauce that clings to tender, caramel-kissed chicken, sweet with a touch of umami and a tiny hit of heat if you want it. I’ll show you how to get that perfect glossy coat, hear the sizzle, and avoid the two-minute sauce disaster. Ready? Your dinner just got upgraded — and you didn’t need to call for backup.
Quick Facts
- Yield: Serves 4
- Prep Time: 15 minutes
- Cook Time: 20 minutes
- Total Time: 35 minutes
Why This Recipe is Awesome
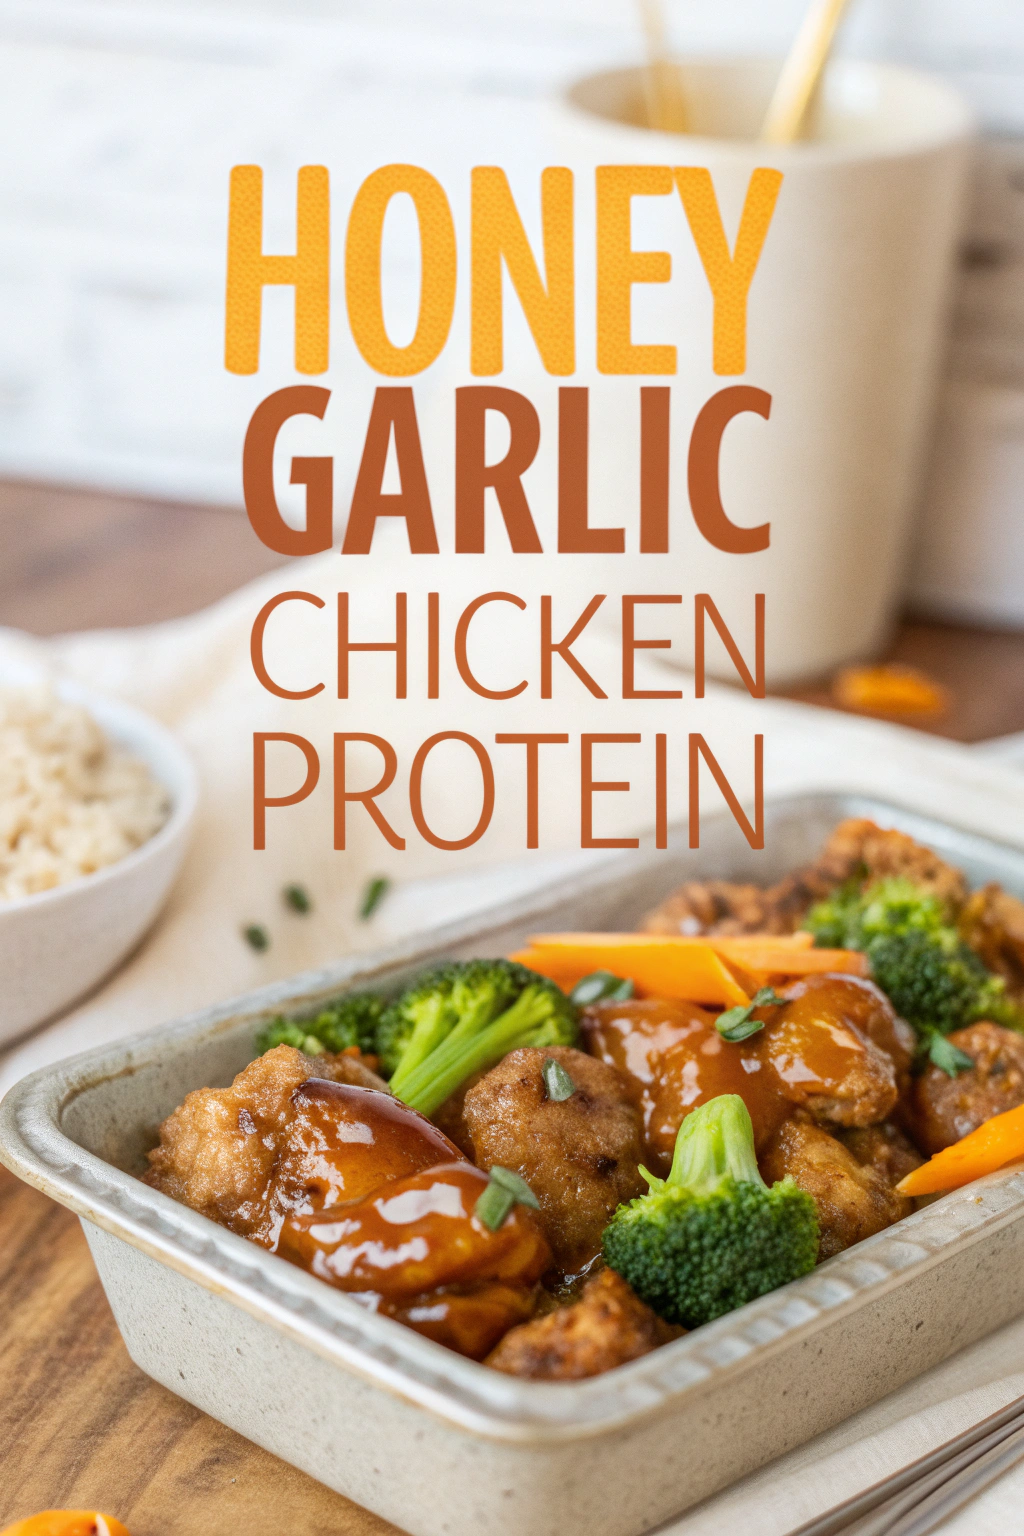
This Honey Garlic Chicken packs big flavor into a cozy, weeknight-friendly package. The sauce becomes sticky and glossy, the chicken gets crisp edges and a juicy center, and the kitchen smells like sweet garlic heaven. It’s fast, forgiving, and protein-forward — perfect for meal-prep bowls or a dinner that feels fancy without the fuss. Honestly, it’s so easy even your oven can’t mess it up.
Ingredients
For the Main Dish:
- 1.5 lbs boneless, skinless chicken breasts (about 24 oz), cut into 1-inch strips
- 1 tsp kosher salt
- 1/2 tsp freshly ground black pepper
- 2 tbsp cornstarch
- 2 tbsp olive oil (or neutral oil like canola)
- 1 tbsp unsalted butter (optional for finishing)
For the Sauce / Garnish:
- 1/3 cup honey
- 1/4 cup low-sodium soy sauce (or tamari for gluten-free)
- 2 tbsp rice vinegar (or apple cider vinegar)
- 3 garlic cloves, minced (about 1 tbsp)
- 1 tsp freshly grated ginger (optional)
- 1 tbsp cornstarch + 2 tbsp water (slurry)
- 2 green onions, thinly sliced
- 1 tsp sesame seeds (optional)
- Pinch red pepper flakes (optional for heat)
How I Make It
Step 1:
I pat the chicken dry with paper towels, then toss it with salt, pepper, and 2 tbsp cornstarch. That little dusting does wonders — it gives the chicken a light crust and helps the sauce cling. Heat a large skillet over medium-high heat until it shimmers, then add 2 tbsp oil.
Step 2:
Work in batches so you don’t crowd the pan. I sear the chicken strips for about 3–4 minutes per side until the edges turn golden and you hear a confident sizzle. Don’t fuss with them — let the pan do its thing. Transfer the browned pieces to a plate and keep them warm.
Step 3:
Lower the heat to medium and add the minced garlic and grated ginger to the hot pan. Stir for about 30–45 seconds until fragrant — your kitchen will smell amazing, like warm, toasted garlic. Pour in the honey, soy sauce, and rice vinegar. Bring the sauce to a gentle bubble.
Step 4:
Whisk in the cornstarch slurry (1 tbsp cornstarch + 2 tbsp water) and cook the sauce for about 1–2 minutes until it thickens and becomes glossy. Toss the chicken back into the pan and spoon the sauce over each piece, coating them in that sticky goodness. If you like a silkier finish, drop in 1 tbsp butter and swirl it through the sauce.
Step 5:
Turn off the heat and sprinkle with sliced green onions and sesame seeds. Let the chicken rest for 3–5 minutes so the juices settle and the sauce clings. Serve over warm rice or quinoa and listen to the satisfied hum at your table.
Pro Tips
- Freeze your chicken for 20 minutes before slicing — it firms up and makes even strips easier to cut cleanly.
- Use a heavy-bottomed skillet to get that nice sear; thin pans lose heat and give you steam instead of crisp edges.
- If your sauce thickens too fast, add a splash of water or chicken broth to loosen it — you can always reduce again.
- For meal prep, store sauce and chicken separately for the first day to keep textures optimal.
Common Mistakes to Avoid
- Skipping preheating: Classic rookie move. It changes texture and bake time.
- Overmixing: Leads to dense or chewy results. Mix until just combined.
- Guessing cook time: Always use visual cues or a timer, not just vibes.
- Overcrowding pans: Give your food some breathing room to crisp properly.
Alternatives & Substitutions
- Swap chicken for firm tofu (press it first) for a vegetarian version; expect a firmer texture and let it brown well.
- Use tamari or coconut aminos for a gluten-free option; flavor stays savory but slightly sweeter.
- Replace honey with maple syrup for a different sweet profile — slightly deeper, less floral.
- For dairy-free, omit the butter and finish with a teaspoon of toasted sesame oil instead.
Variations & Tips
- Turn up the heat: add 1 tsp sriracha or ½ tsp chili flakes for a spicy honey garlic version.
- Make it citrusy: stir in 1 tbsp fresh lime juice at the end for bright acidity.
- Kid-friendly: reduce the garlic and skip the red pepper flakes for a sweeter, milder sauce.
- Grill instead of pan-sear: brush the sauce on in the last 2 minutes of grilling for charred flavor.
- Make it a bowl: serve over brown rice with steamed broccoli and a drizzle of extra sauce.
- Creative twist: fold in chopped roasted peanuts and cilantro for a Thai-inspired crunch.
FAQ (Frequently Asked Questions)
- Can I make this ahead of time?
- Yes! Cook the chicken and sauce, cool completely, and store in an airtight container for up to 4 days. Reheat gently in a skillet over low heat or in the microwave — add a splash of water to revive the sauce.
- Can I double the recipe?
- Sure thing. Use a larger skillet or cook in batches to avoid crowding. If you bake instead of stovetop, use a rimmed sheet and increase cook time by a few minutes, watching for golden edges.
- Can I substitute butter with oil?
- Technically yes, but you’ll miss that buttery magic. Use ¾ the amount of oil as a swap and add a tiny splash of toasted sesame oil at the end to mimic richness.
- How do I know it’s done?
- Look for golden, caramelized edges and a juicy center. Chicken reaches safe doneness at 165°F — I use an instant-read thermometer to check the thickest piece.
- What if I don’t have ingredient X?
- No panic. Swap rice vinegar for apple cider vinegar, or use brown sugar instead of honey in a pinch (reduce added water). Garlic powder works if fresh garlic ran away from your cart.
How I Like to Serve It
I love this over fluffy brown rice with steamed broccoli and a wedge of lime. For a lighter meal, I toss the chicken with mixed greens and cucumbers for a warm salad. It also shines in a meal-prep bowl with quinoa and roasted carrots — perfect for lunches. This dish works for casual weeknights, small dinner parties, and game-day snack spreads alike.
Notes
- Store leftovers in the fridge for up to 4 days. Reheat gently to avoid drying out the chicken.
- Always cook chicken to a safe internal temperature of 165°F.
Final Thoughts
Closing: Go make this honey garlic chicken — your future self will thank you when dinner tastes like a hug and took under 40 minutes to pull off. Now go impress someone — or just yourself — with your homemade masterpiece!

Hi, I’m Lina, the creator of Lina Easy Recipes.Cooking has always been my passion, and I love sharing simple, homemade dishes that anyone can prepare.
Love What You See?
Join me on Pinterest and Facebook for daily cooking inspiration, new recipe ideas, and behind-the-scenes kitchen stories. Let’s cook something wonderful together!


