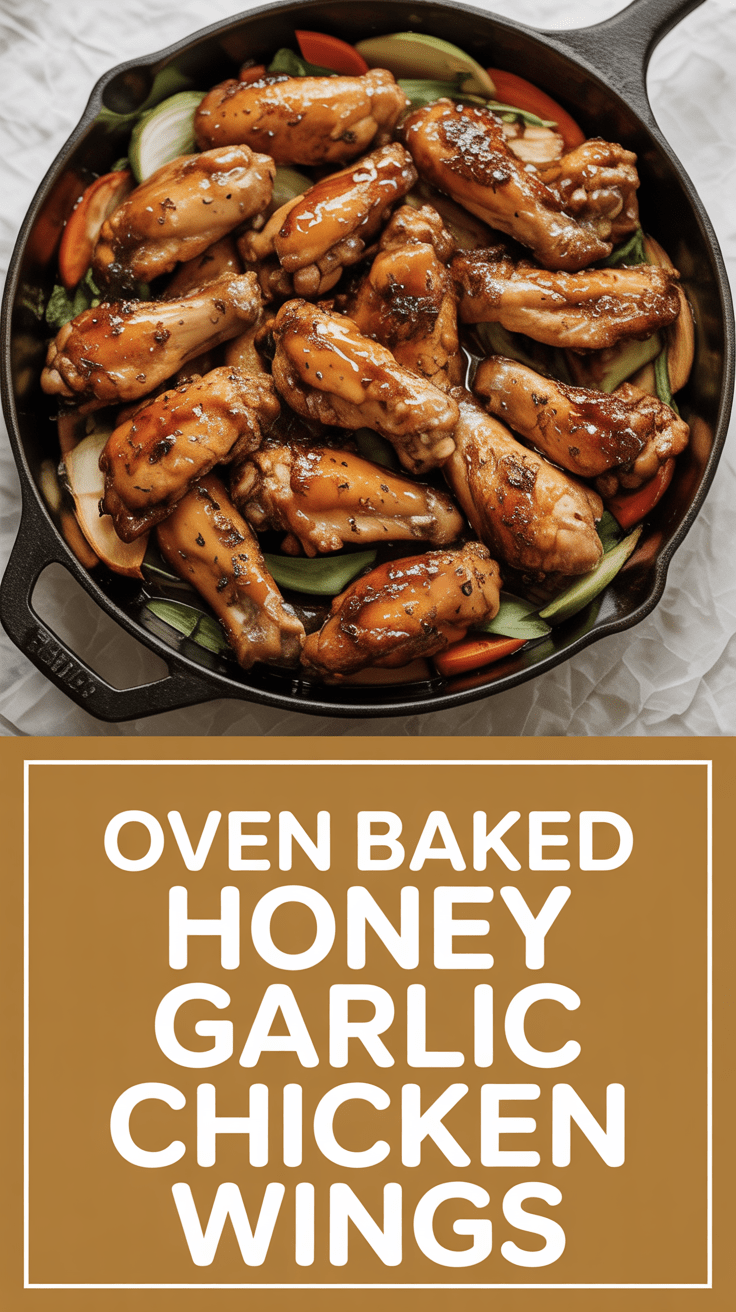
Okay, confession time: I started making these wings because my couch demanded snacks and my mouth demanded sticky, crunchy joy. I promise you, they live up to the hype — golden, slightly charred edges, sticky-sweet honey coating that clings to your fingers (and bravely survives a napkin). I’ll keep this short: they bake in the oven, not the fryer, so you get that crave-worthy crisp without the splatter. If you like sweet, garlicky, slightly sticky wings that everyone fights over, this recipe will become your go-to weeknight champion — and yes, I’ll tell you the little tricks I learned the hard way.
Quick Facts
Yield: Serves 4
Prep Time: 15 minutes
Cook Time:45 minutes
Total Time: 60 minutes
Why This Recipe is Awesome
This recipe gives you crisp, golden edges and a glossy, garlicky-honey glaze with almost zero babysitting. It tastes like pub wings but feels homemade — sweet, savory, with a little tang and heat if you want. The texture balances crunchy skin and juicy meat, and the sauce caramelizes in the last few minutes so you get those irresistible sticky bites. It’s so easy even your oven can’t mess it up (seriously).
Ingredients
For the Main Dish:
2 ½ pounds chicken wings, tips removed and drumettes/flat separated (about 12–14 pieces)
1 tbsp baking powder (aluminum-free)
1 tsp kosher salt
½ tsp freshly ground black pepper
1 tbsp olive oil
For the Sauce / Garnish (if applicable):
⅓ cup honey
3 tbsp low-sodium soy sauce (or coconut aminos for GF)
2 tbsp rice vinegar or apple cider vinegar
3 tbsp unsalted butter (or 2 tbsp oil — see FAQ)
4 cloves garlic, minced (about 2 tbsp)
1 tsp sriracha or hot sauce (optional)
½ tsp red pepper flakes (optional)
2 tbsp water (to loosen sauce if needed)
2 tbsp sliced green onions and 1 tsp sesame seeds for garnish
How I Make It
Step 1:
Preheat the oven to 425°F and line a rimmed baking sheet with foil; place a wire rack on top. Pat the wings dry with paper towels — dry skin crisp faster and brown better. Toss the wings in a large bowl with baking powder, salt, pepper, and olive oil so the powder coats every bit. You’ll hear a little rustle as the baking powder clings — that’s a good sound.
Step 2:
Arrange wings in a single layer on the rack, giving each piece breathing room so air circulates. Slide the tray into the oven and bake for 25 minutes. Don’t open the oven door constantly — keep the heat steady so the skin dries and starts to blister and turn golden.
Step 3:
While the wings bake, make the sauce: melt the butter in a small skillet over medium heat, then add the minced garlic. Sauté until the garlic smells fragrant and turns light golden — that smell alone should make you drool. Stir in honey, soy sauce, rice vinegar, and sriracha if you want heat. Simmer 2–3 minutes until glossy and slightly thickened; if it gets too thick, whisk in a tablespoon or two of water.
Step 4:
Pull the wings from the oven after the initial 25 minutes and brush them generously with half the sauce. Return the tray and bake another 15–20 minutes until wings show deep golden edges and tiny caramelized spots. You want crisp skin and a sticky gloss. If you love char, broil on high 1–2 minutes — watch like a hawk so they don’t burn.
Step 5:
Toss the hot wings in the remaining sauce (or brush them again), then plate and sprinkle with sliced green onions and sesame seeds. Listen for the quiet clink of plates and the soft “ooh” from whoever gets the first wing. Let them rest 3 minutes if you can — they stay juicier and you won’t scorch your mouth. Serve immediately and grab napkins.
Pro Tips
Use aluminum-free baking powder to avoid a metallic aftertaste and get the crispiest skin.
Pat wings super dry — moisture fights crispiness. I press paper towels on each wing for a few seconds.
For extra-crisp results, flip the wings halfway through the first bake so both sides dry evenly.
If your sauce thickens too much, thin it with a splash of water or vinegar; heat reduces stickiness but not flavor.
Common Mistakes to Avoid
Skipping preheating: Classic rookie move. It changes texture and bake time.
Overmixing: Leads to dense or chewy results. Mix until just combined.
Guessing cook time: Always use visual cues or a timer, not just vibes.
Overcrowding pans: Give your food some breathing room to crisp properly.
Alternatives & Substitutions
Swap chicken for cauliflower florets or tofu for a vegetarian twist — roast longer for cauliflower until tender and slightly charred.
Use coconut aminos instead of soy sauce to make the sauce gluten-free and slightly sweeter.
Substitute honey with maple syrup for a deeper, woodsy sweetness (slightly less viscous).
Use olive oil or avocado oil in place of butter to keep the recipe dairy-free; you’ll lose a touch of buttery richness but keep the flavor bright.
Variations & Tips
Spicy variation: Add 1–2 tbsp gochujang or double the sriracha for a Korean-inspired kick.
Sticky citrus: Swap half the honey for fresh orange juice and a teaspoon of zest for bright acidity.
BBQ twist: Mix 2 tbsp of your favorite BBQ sauce into the honey glaze for smoky depth.
Kid-friendly: Skip the red pepper flakes and sriracha, and make a milder honey-soy dip on the side.
Crunchy finish: Toss finished wings with crushed peanuts for a Thai-inspired crunch.
Charred glaze: Broil briefly to get little blackened spots — they add a lovely bitter contrast to the sweet sauce.
FAQ (Frequently Asked Questions)
Can I make this ahead of time?
Yes! Bake the wings through the first 25 minutes, let cool, then store in an airtight container in the fridge for up to 24 hours. Reheat at 425°F for 8–10 minutes or until crisp, then toss with warm sauce just before serving.
Can I double the recipe?
Sure thing. Use two rimmed baking sheets and rotate racks halfway through baking so air circulates. Don’t cram everything on one tray — give the wings space to crisp.
Can I substitute butter with oil?
Technically yes, but you’ll miss that buttery magic. Use ¾ the amount of oil (about 2 tbsp) and add a pinch of salt for balance.
How do I know it’s done?
Look for deep golden-brown skin with slightly blistered edges and a sticky glaze. You can check internal temp: pull a thick part of a wing off the rack and poke with a thermometer — the safe temp for chicken is 165°F.
What if I don’t have ingredient X?
Short on soy sauce? Use Worcestershire in a pinch (different flavor). No honey? Use maple syrup or brown sugar mixed with a little water. No baking powder? Bake longer at the same temp but expect less crispiness.
How I Like to Serve It
I serve these wings hot with cool, crunchy slaw and celery sticks for contrast. They work for game night with beer, for a casual weeknight with rice and steamed greens, or at a potluck where everyone sneaks back for seconds. In summer I add lime wedges for brightness; in winter I reach for extra hot sauce to cut through the richness.
Notes
Store leftovers in an airtight container in the fridge for up to 3 days. Reheat in a 400°F oven for 6–8 minutes to restore crispiness.
Remember the safe internal temp for cooked chicken: 165°F. Use a probe thermometer for confidence.
Final Thoughts
Closing: Now go impress someone — or just yourself — with your homemade masterpiece! These wings fry nobody, but they sure do make a lot of happy faces.
Hi, I’m Lina, the creator of Lina Easy Recipes.Cooking has always been my passion, and I love sharing simple, homemade dishes that anyone can prepare.
Spread the love
Love What You See?
Join me on Pinterest and Facebook for daily cooking inspiration, new recipe ideas, and behind-the-scenes kitchen stories. Let’s cook something wonderful together!