Oven-Baked Parmesan Chicken Tenders with Garlic Butter
Spread the love
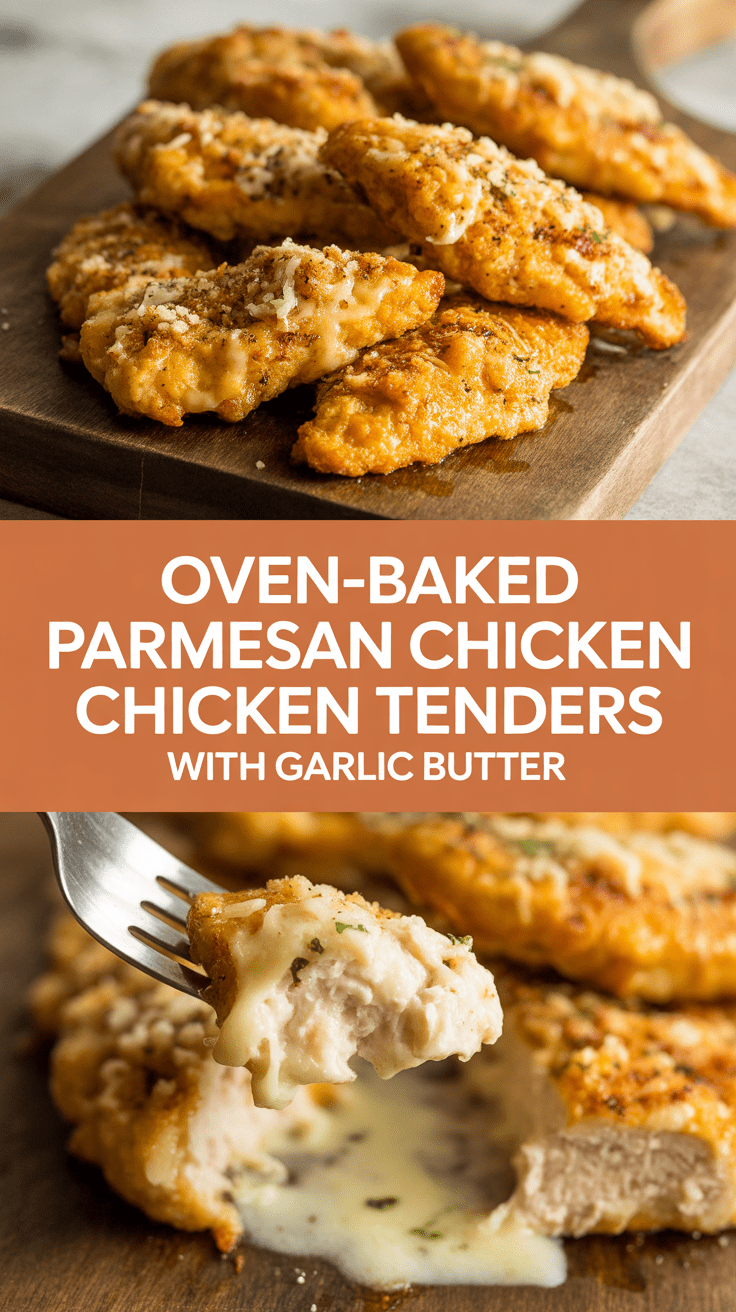
Chef’s secret time: I didn’t discover this oven-baked trick in a fancy test kitchen — I found it when I wanted crunchy, golden tenders without the grease fight and the smoke alarm drama. Pull a small bowl, a fork, and a rimmed baking sheet close, and you’ll feel like you learned a trade-secret shortcut. The real trick? A little melted butter folded into the breadcrumb mix and a quick brush of garlicky butter right after the oven — that double-hit of fat gives you that deep, browned flavor that makes people suspicious you deep-fried. The smell of browned Parmesan and roasted garlic will have everyone hovering by the oven before the timer even dings.
Quick Facts
Yield: Serves 4
Prep Time: 15 minutes
Cook Time: 12–15 minutes
Total Time: 30 minutes
Why This Recipe is Awesome
You get crunchy, golden edges, a juicy center, and a hit of nutty Parmesan in every bite — all without tons of oil or fuss. It’s so easy even your oven can’t mess it up. The texture? Light, crisp exterior with tender, juicy chicken. The taste? Buttery, garlicky, slightly tangy from the cheese. I love that it satisfies the comfort-food craving but cleans up fast. Who doesn’t love a chicken tender that snaps when you bite it?
Ingredients
For the Main Dish:
1 1/2 pounds chicken tenders (about 12 tenders) or chicken breasts cut into strips
3/4 cup all-purpose flour
2 large eggs
1 cup panko breadcrumbs
3/4 cup grated Parmesan cheese (freshly grated, if possible)
Preheat the oven to 425°F and line a rimmed baking sheet with foil or parchment. Give it a light spray of oil or brush with a little oil so the tenders don’t stick. In three shallow bowls: put the flour in one, whisk the eggs with a tablespoon of water in the second, and combine panko, Parmesan, garlic powder, onion powder, paprika, salt, and pepper in the third. Stir in 3 tbsp melted butter to the breadcrumb mix until it looks evenly moistened — you want it clumpy, not soggy.
Step 2:
Pat the chicken tenders dry with paper towels — dryness = crispness. Dredge each tender in the flour, shake off excess, dip in the egg, then press into the breadcrumb mixture. Make sure each tender gets a good press so the crumbs stick. Arrange tenders on the baking sheet with space between them so the air circulates and the crust can crisp.
Step 3:
Bake at 425°F for 12–15 minutes, flipping once halfway through. Listen for tiny crackles; smell that toasty, nutty Parmesan aroma? That means brown edges forming. If you want extra color, slide them under the broiler for 1–2 minutes — watch closely so they don’t burn. The centers should stay juicy, not dry.
Step 4:
While the tenders bake, make the garlic butter: melt 3 tbsp butter in a small pan, add minced garlic and cook 30–45 seconds until fragrant (you should smell warm, toasty garlic). Remove from heat, stir in 1 tbsp lemon juice and 2 tbsp parsley. When the tenders come out of the oven, brush them with the garlic butter for shine and extra flavor — this step makes a huge difference in mouthfeel.
Step 5:
Let the tenders rest 2–3 minutes on the tray so the crust sets. Serve with lemon wedges and whatever dip your crew likes — ranch, honey mustard, or a quick sriracha-mayo. Watch the first bite: you should hear a crisp bite and see a juicy, pale interior. If not, pop them back in the oven for a minute or two.
Pro Tips
For maximum crunch, use panko and press it firmly onto the chicken. Don’t skip the press.
If your tenders are uneven, pound thicker ones thinner for uniform cooking. They’ll finish at the same time.
Room-temperature chicken bakes more evenly than fridge-cold chicken — pull it out 10 minutes before you start.
Want extra flavor? Stir 1 tsp dried Italian seasoning or a pinch of cayenne into the breadcrumb mix.
Common Mistakes to Avoid
Skipping preheating: Classic rookie move. It changes texture and bake time.
Overmixing: Leads to dense or chewy results. Mix until just combined.
Guessing cook time: Always use visual cues or a timer, not just vibes.
Overcrowding pans: Give your food some breathing room to crisp properly.
Alternatives & Substitutions
Use chicken thighs cut into strips for richer flavor and a bit more fat — they stay juicy but may need an extra 2–3 minutes.
Swap panko for crushed cornflakes or gluten-free breadcrumbs to make this gluten-free (texture changes slightly — cornflakes give great crunch).
For dairy-free: replace Parmesan with nutritional yeast and use olive oil for the butter elements.
Vegetarian option: use firm tofu strips, press out moisture, and follow the same breading method — bake a few minutes longer at 425°F.
Variations & Tips
Spicy: add 1 tsp cayenne or 1 tbsp hot sauce to the egg wash for a kick.
Kid-friendly: reduce spices and serve with honey mustard or ketchup — always a win.
Herby: fold 2 tbsp chopped fresh basil or thyme into the breadcrumb mix for a bright note.
Cheesy upgrade: mix 1/4 cup shredded mozzarella into the crumbs for extra gooeyness if you love cheese pulls.
Party platter: double the batch and serve with an assortment of dips and lemon wedges for game day.
Creative twist: sprinkle a little lemon zest over the hot tenders for a citrusy pop that lifts the whole plate.
FAQ (Frequently Asked Questions)
Can I make this ahead of time?
Yes! Bread the tenders and store them on a tray in the fridge for up to 24 hours. Bake just before serving for best texture. Reheat in a 425°F oven for 5–8 minutes to re-crisp.
Can I double the recipe?
Sure thing. Use two baking sheets and rotate them halfway through so everything bakes evenly. Don’t overcrowd a single pan.
Can I substitute butter with oil?
Technically yes, but you’ll miss that buttery magic. Use ¾ the amount of oil.
How do I know it’s done?
Look for golden-brown, crisp edges and a firm but springy interior. The safe internal temp for chicken is 165°F. If you don’t have a thermometer, cut one open — juices should run clear, not pink.
What if I don’t have ingredient X?
Out of Parmesan? Use 1/4 cup extra panko and 2 tbsp nutritional yeast or finely grated cheddar. No panko? Crush plain crackers or cornflakes.
How I Like to Serve It
I pile these tenders onto a big platter for weeknight dinners, with roasted sweet potato fries and a bright cabbage slaw. For parties, I set them next to bowls of ranch, honey mustard, and sriracha mayo — they disappear. On a cozy night, I pair them with buttery mashed potatoes and green beans. They work in summer (picnic finger food) or winter (comfort dinner that brightens a grey day).
Notes
Store leftovers in an airtight container in the fridge for up to 3 days. Re-crisp in a hot oven at 400°F for 6–8 minutes.
Safe cooking temp for chicken: 165°F.
Final Thoughts
Closing: Now go impress someone — or just yourself — with your homemade masterpiece! There’s nothing like that crunchy first bite and warm garlicky butter on your lips.
Hi, I’m Lina, the creator of Lina Easy Recipes.Cooking has always been my passion, and I love sharing simple, homemade dishes that anyone can prepare.
Spread the love
Love What You See?
Join me on Pinterest and Facebook for daily cooking inspiration, new recipe ideas, and behind-the-scenes kitchen stories. Let’s cook something wonderful together!