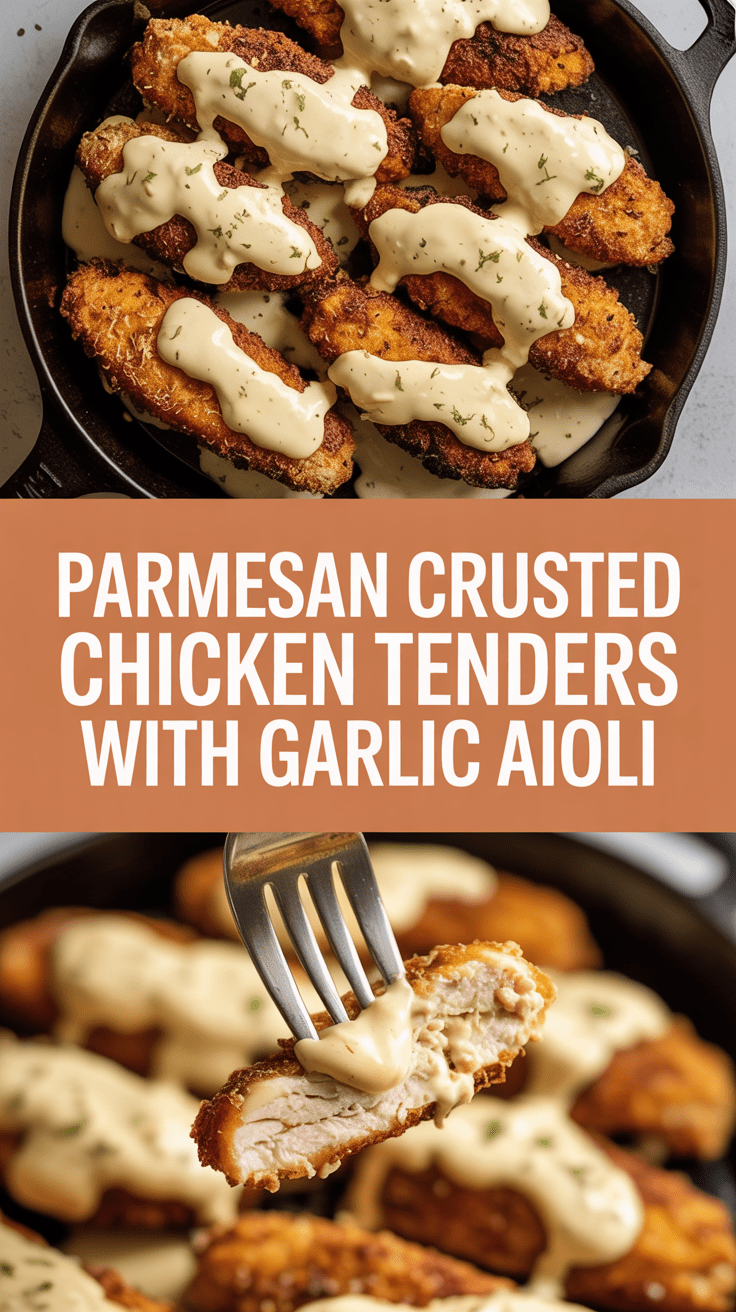
Parmesan crusted chicken tenders with garlic aioli
Spread the love
Chef’s Secret: want to know how I get restaurant-grade crunch with minimal fuss? I stumbled on this trick after a botched dinner party—too soggy, not enough flavor—and I refused to let chicken tenders be boring ever again. The magic? A Parmesan-forward crust that browns like a dream and a simple garlic aioli that tastes like you slaved for hours. I’ll show you how to get that golden, crackly exterior and a juicy center every single time, with easy pantry ingredients and one small pro move that makes the crumbs cling like they mean it.
Quick Facts
Yield: Serves 4
Prep Time: 15 minutes
Cook Time: 15 minutes
Total Time: 30 minutes
Why This Recipe is Awesome
This dish delivers crunch, savory Parmesan umami, and a garlicky dip that keeps you dunking. It tastes indulgent but stays simple—no complicated batter, no deep-frying. The crust browns to a beautiful golden brown and snaps when you bite it, while the chicken stays tender and juicy. It’s so easy even your oven can’t mess it up. Also, who doesn’t love a finger food that makes you feel like a culinary genius?
1 cup finely grated Parmesan cheese (freshly grated, not the powder)
1 tsp garlic powder
1 tsp paprika
1 tsp kosher salt
1/2 tsp black pepper
2 tbsp olive oil or melted butter (for tossing or brushing)
Olive oil spray (optional, helps crisping)
For the Sauce / Garnish (if applicable):
1/2 cup mayonnaise
2 cloves garlic, finely minced (or grated)
1 tbsp fresh lemon juice
1 tsp Dijon mustard (optional)
2 tbsp chopped fresh parsley or chives
Salt & pepper to taste
How I Make It
Step 1:
I preheat the oven to 425°F and line a rimmed baking sheet with foil. Then I put a wire rack on the sheet—this little lift lets air circulate so the crust crisps all around. I set up a dredging station: one shallow bowl with 1/2 cup flour seasoned with a pinch of salt, one with the 2 beaten eggs, and one with the breadcrumb mix (1 cup Panko + 1 cup grated Parmesan + 1 tsp garlic powder + 1 tsp paprika + 1/2 tsp pepper). The kitchen already smells faintly cheesy and cozy—promise, this gets better fast.
Step 2:
I pat each chicken tender dry with a paper towel (drying helps the coating stick). I dredge in the flour, shake off excess, dip into the egg, then press firmly into the Parmesan-Panko mixture. I press the crumbs on with my fingers so each piece wears a solid crust. If crumbs refuse to stay, a light spray of olive oil on the rack helps them cling. No heavy-handed flipping—gentle pressure and confidence, that’s the trick.
Step 3:
I place tenders on the rack and brush or drizzle them with 2 tbsp olive oil or a touch of melted butter—this gives the crust that deep, nutty browning. At this point the kitchen fills with a warm, toasty aroma from the Parmesan. I pop the tray into the 425°F oven and set a timer for 12–15 minutes. A little sizzle and the edges darken to a gorgeous golden brown.
Step 4:
Halfway through (around 7 minutes), I flip each tender and give the top a quick spray of oil to encourage even browning. Look for crisp edges and no pink in the center. If you have a thermometer, aim for an internal temp of 165°F. The crust should sound crisp when you tap it and the juices should run clear. If you want extra crunch, slide them under the broiler for 1–2 minutes—watch closely so they don’t singe.
Step 5:
While the tenders rest for 3 minutes, I whisk the aioli: 1/2 cup mayo, 2 minced garlic cloves, 1 tbsp lemon juice, 1 tsp Dijon (if using), and 2 tbsp chopped parsley. I taste and adjust salt and lemon. I serve the tenders warm with the aioli on the side, a squeeze of lemon, and extra parsley for color. That first bite should snap, release steam, and reveal a tender, juicy interior—chef’s kiss.
Pro Tips
For extra adhesion, pat the chicken dry and press the crumb mixture firmly onto each piece—no shy breading allowed.
If you don’t have a wire rack, elevate the chicken on a bed of halved onions or even use a silicone rack—anything that keeps the bottom from steaming.
Use freshly grated Parmesan. The pre-grated stuff won’t brown the same way and can taste chalky.
Want faster cleanup? Line the baking sheet with foil and spray lightly with oil—crumbs come off easily.
Common Mistakes to Avoid
Skipping preheating: Classic rookie move. It changes texture and bake time.
Overmixing: Leads to dense or chewy results. Mix until just combined.
Guessing cook time: Always use visual cues or a timer, not just vibes.
Overcrowding pans: Give your food some breathing room to crisp properly.
Alternatives & Substitutions
Gluten-free: Use GF panko or crushed GF cereal instead of breadcrumbs; use GF flour.
Dairy-free: Swap Parmesan for 3 tbsp nutritional yeast + a pinch of smoked paprika for umami.
Vegetarian: Replace chicken with thick slices of cauliflower or extra-firm tofu—press tofu dry and bake the same way.
Lower-fat aioli: Use Greek yogurt in place of half the mayo for tang and fewer calories.
Variations & Tips
Spicy: Add 1/2 tsp cayenne to the breadcrumb mix and serve with sriracha-mayo.
Herb-forward: Mix 2 tbsp finely chopped fresh basil or oregano into the crumbs for a Mediterranean twist.
Kid-friendly: Omit garlic powder and paprika, and serve with honey-mustard or ketchup.
Crunch upgrade: Toss 1/2 cup crushed cornflakes into the Panko for a nostalgic extra crunch.
Creative twist: Make mini Parmesan “tender tacos” by slicing tenders and piling into warmed tortillas with slaw and cilantro-lime aioli.
FAQ (Frequently Asked Questions)
Can I make this ahead of time?
Yes! Bread the tenders, arrange them on a tray, cover, and refrigerate up to 6 hours. Bake straight from the fridge and add 2–3 minutes to the bake time. Store cooked tenders in an airtight container in the fridge for 3 days; reheat in a 400°F oven for 8–10 minutes to revive the crisp.
Can I double the recipe?
Sure thing. Use two baking sheets or cook in batches to avoid crowding. If the oven feels full, rotate trays halfway through to ensure even browning.
Can I substitute butter with oil?
Technically yes, but you’ll miss that buttery magic. Use ¾ the amount of oil.
How do I know it’s done?
Look for a deep golden crust and clear juices. The sure sign: an internal temperature of 165°F at the thickest part. The crust should feel crisp and the center should pull apart tenderly.
What if I don’t have ingredient X?
If you don’t have Panko, use regular breadcrumbs or crushed tortilla chips. No mayo? Mix Greek yogurt with a little oil and lemon for a quick swap.
How I Like to Serve It
I serve these with a bright slaw or simple baby greens dressed in lemon vinaigrette for weeknight dinners. For parties, arrange tenders on a platter with a trio of dips—aioli, honey mustard, and marinara—and watch people fight over the last piece. They work great with cold beers in summer or cozy mashed potatoes in winter. Versatile and crowd-pleasing, they adapt to whatever mood I’m in.
Notes
Store cooked tenders in the fridge up to 3 days. Reheat in a 400°F oven for 8–10 minutes to restore crisp.
Safe cooking temp for chicken: 165°F.
Final Thoughts
Closing: Now go impress someone — or just yourself — with your homemade masterpiece!
Hi, I’m Lina, the creator of Lina Easy Recipes.Cooking has always been my passion, and I love sharing simple, homemade dishes that anyone can prepare.
Spread the love
Love What You See?
Join me on Pinterest and Facebook for daily cooking inspiration, new recipe ideas, and behind-the-scenes kitchen stories. Let’s cook something wonderful together!