I love the thrill of a kitchen secret that sounds fancy but really just saves dinner: this roast chicken is one of those secrets. Think of it as my little “chef’s trick”—slipping garlic and thyme under the skin and roasting at a higher temp to get that crisp, lacquered skin while keeping the meat ridiculously juicy. You’ll hear the skin pop and smell the garlic and herbs perfume the whole house—instant comfort and major dinner cred. If you want a roast that looks like you spent all afternoon but took less time, follow along and I’ll show you how to get that golden, herb-scented magic every single time.
Quick Facts
Yield: Serves 4
Prep Time:15 minutes
Cook Time:75 minutes
Total Time:90 minutes
Why This Recipe is Awesome
This roast chicken tastes like a restaurant classic but behaves like a home cook’s dream. The skin turns glossy and crisp, the meat stays tender and juicy, and the garlic-thyme combo makes the whole house smell irresistible. It’s so forgiving that even if you get distracted by a phone call, the flavors still come through. Who doesn’t love crispy edges paired with meltingly soft meat? Plus, the pan juices make a simple sauce that elevates everything on your plate.
1 head garlic, cloves separated and smashed (about 8–10 cloves)
2 tbsp fresh thyme leaves (or 2 tsp dried thyme)
1 lemon, halved
1 small onion, quartered
2 carrots, cut into large chunks
2 celery stalks, cut into large chunks
2 tbsp olive oil
1½ tsp kosher salt (more to taste)
1 tsp freshly ground black pepper
½ cup low-sodium chicken broth (optional, for the pan)
For the Sauce / Garnish (if applicable):
2 tbsp butter (or olive oil)
2 tbsp pan drippings + 2 tbsp chicken broth
1 tsp lemon juice
Chopped parsley for garnish (optional)
How I Make It
Step 1:
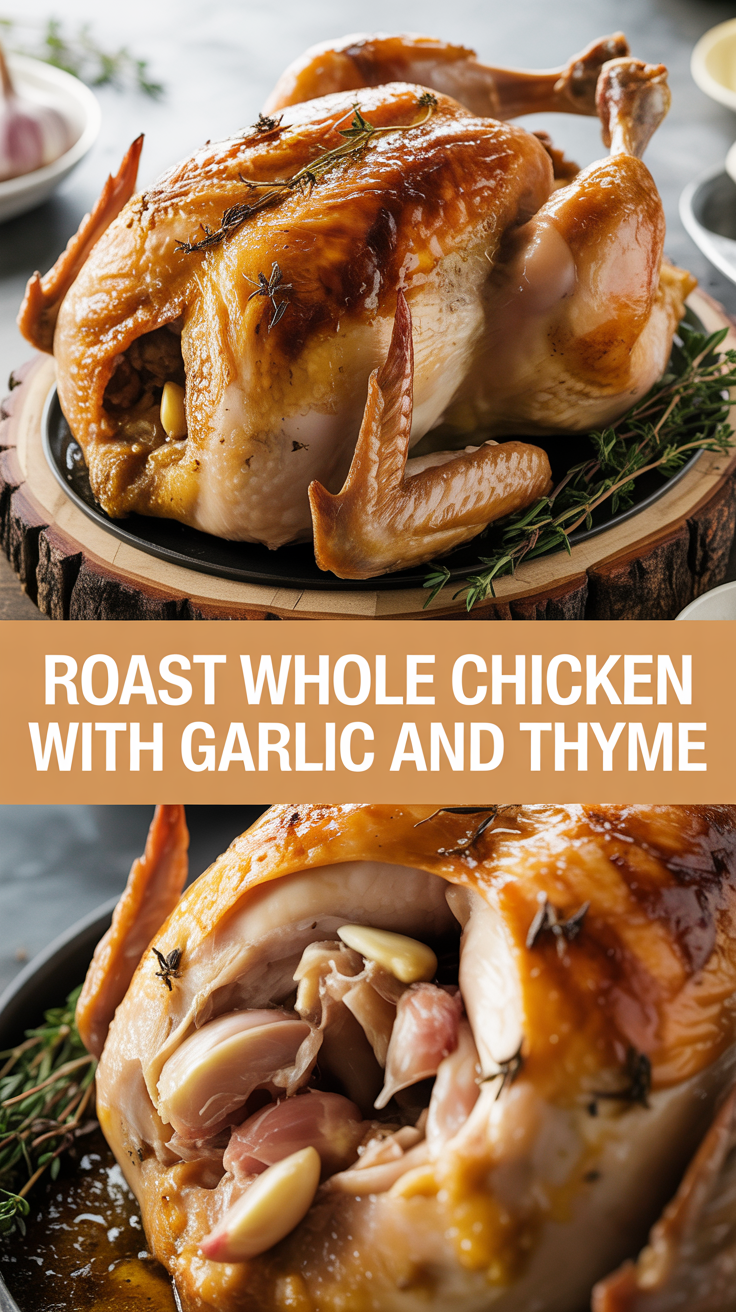
Preheat your oven to 425°F. Pat the chicken dry with paper towels—this step gives you that coveted crispy skin. Gently separate the skin from the breast with your fingers to create a little pocket; slide half the softened butter, half the smashed garlic, and half the thyme under the skin. Rub the rest of the butter all over the outside, then drizzle with olive oil, and season the cavity and exterior with salt and pepper. Tuck the lemon halves and onion into the cavity.
Step 2:
Arrange the chopped carrots and celery in a roasting pan or cast-iron skillet; they form a flavor bed and lift the chicken so air can circulate. Place the chicken breast-side up on the veggies and pour about ½ cup chicken broth into the pan to keep the drippings from sticking (and to make a deglazing base). Slide the pan into the oven. Tip: truss the legs with kitchen twine if you like a tidy roast, but I often skip it for easier carving.
Step 3:
Roast at 425°F for about 60–75 minutes, depending on size. After 35–40 minutes, spoon some pan juices over the breast to keep it glossy. You’ll hear the skin crackle and smell the garlic deepen to a nutty, roasted aroma. If the skin browns too quickly, tent loosely with foil for the last 10–15 minutes.
Step 4:
Check doneness by inserting an instant-read thermometer into the thickest part of the thigh without touching bone; you want 165°F. When the thermometer hits that number, pull the chicken and rest it on a cutting board for 15 minutes—this step locks juices in and makes carving tidy. The juices will settle; you’ll see them run clear and not pink.
Step 5:
While the chicken rests, make a quick pan sauce: place the roasting pan over medium heat on the stove, add 2 tbsp butter (or oil), deglaze with broth, scrape up browned bits, and finish with a squeeze of lemon juice. Strain if you prefer a smooth sauce. Carve the chicken, spoon sauce over slices, and scatter chopped parsley for color. Serve hot and listen for the satisfied “mmm” around the table.
Pro Tips
Dry the chicken thoroughly—wet skin steams and won’t crisp. Pat it until the paper towel comes away almost dry.
Slide flavor under the skin (butter, garlic, herbs) for intense, concentrated flavor right at the meat’s surface.
Use an instant-read thermometer and aim for 165°F in the thickest thigh—no guessing, no cut-and-hope.
Let it rest for 15 minutes. I promise: the wait rewards you with juicier slices and easier carving.
Common Mistakes to Avoid
Skipping preheating: Classic rookie move. It changes texture and bake time.
Overmixing: Leads to dense or chewy results. Mix until just combined.
Guessing cook time: Always use visual cues or a timer, not just vibes.
Overcrowding pans: Give your food some breathing room to crisp properly.
Alternatives & Substitutions
Swap butter for olive oil to make this dairy-free; the skin still crisps beautifully.
No fresh thyme? Use 2 tsp dried thyme or swap with rosemary; rosemary gives a piney punch.
Replace chicken with a whole-roasted small turkey (adjust cook time to weight) or roast hefty tofu steaks for a vegetarian-friendly centerpiece.
Use low-sodium broth or water if you watch salt—adjust seasoning after roasting.
Variations & Tips
Spicy: Mix 1 tsp smoked paprika and a pinch of cayenne into the butter under the skin for a warm kick.
Lemon-herb: Add extra lemon zest to the butter and finish with lemon slices roasted on top.
Kid-friendly: Swap thyme for a pinch of garlic powder and parsley for a milder, familiar flavor.
Crispy-skin hack: Start at 450°F for 10 minutes, then drop to 400°F for the remainder to tighten the skin.
Sous-chef twist: Add halved potatoes to the pan for an all-in-one roast dinner; they soak up the pan juices.
FAQ (Frequently Asked Questions)
Can I make this ahead of time?
Yes! Roast the chicken, cool to room temp, then refrigerate in an airtight container up to 3 days. Reheat slices gently in a 350°F oven for 15–20 minutes with a splash of broth to prevent drying.
Can I double the recipe?
Sure thing. Use two pans or a very large roasting pan and give each bird room to breathe. Cooking time stays similar per bird, but the oven may take longer to recover heat when you put in two pans—trust your thermometer.
Can I substitute butter with oil?
Technically yes, but you’ll miss that buttery magic. Use ¾ the amount of oil. Olive oil gives great flavor and crisping if needed.
How do I know it’s done?
Look for glossy, deeply golden skin and check the thigh with an instant-read thermometer for 165°F. The juices should run clear, not pink.
What if I don’t have ingredient X?
Swap fresh thyme for dried (use one-third the amount), use garlic powder if you lack fresh garlic, or skip the onion and add extra lemon for brightness.
How I Like to Serve It
I serve this chicken with buttery mashed potatoes and a simple green salad on weeknights, or roast root veggies and crusty bread for a weekend dinner guests rave about. It works for cozy Sunday suppers, date-night dinners, or when I want leftovers that turn into killer sandwiches. Pair with a crisp white wine or a cold beer, and you’ve got dinner covered.
Notes
Store leftovers in the fridge up to 3 days. Reheat gently to keep meat tender.
Safe cooking temp for chicken: 165°F measured in the thickest part of the thigh.
Final Thoughts
Closing: Now go impress someone — or just yourself — with your homemade roast chicken masterpiece!
Hi, I’m Lina, the creator of Lina Easy Recipes.Cooking has always been my passion, and I love sharing simple, homemade dishes that anyone can prepare.
Spread the love
Love What You See?
Join me on Pinterest and Facebook for daily cooking inspiration, new recipe ideas, and behind-the-scenes kitchen stories. Let’s cook something wonderful together!