Chef’s Secret: Okay, I’ll admit it — I guard this little trick like it’s a family heirloom. If you want perfectly crisp Korean fried chicken with a glossy, sticky soy-garlic glaze that snaps when you bite it, here’s the kitchen secret I picked up from a late-night food market vendor years ago: double-fry and finish the sauce hot and thick. You’ll smell sweet garlic and caramelized soy filling the room, and you’ll hear that satisfying crunch before the juicy inside gives way. Trust me, once you try this method, takeout won’t tempt you the same way again. Ready to get a little obsessed?
Quick Facts
Yield: Serves 4
Prep Time: 20 minutes
Cook Time: 30 minutes
Total Time: 50 minutes
Why This Recipe is Awesome
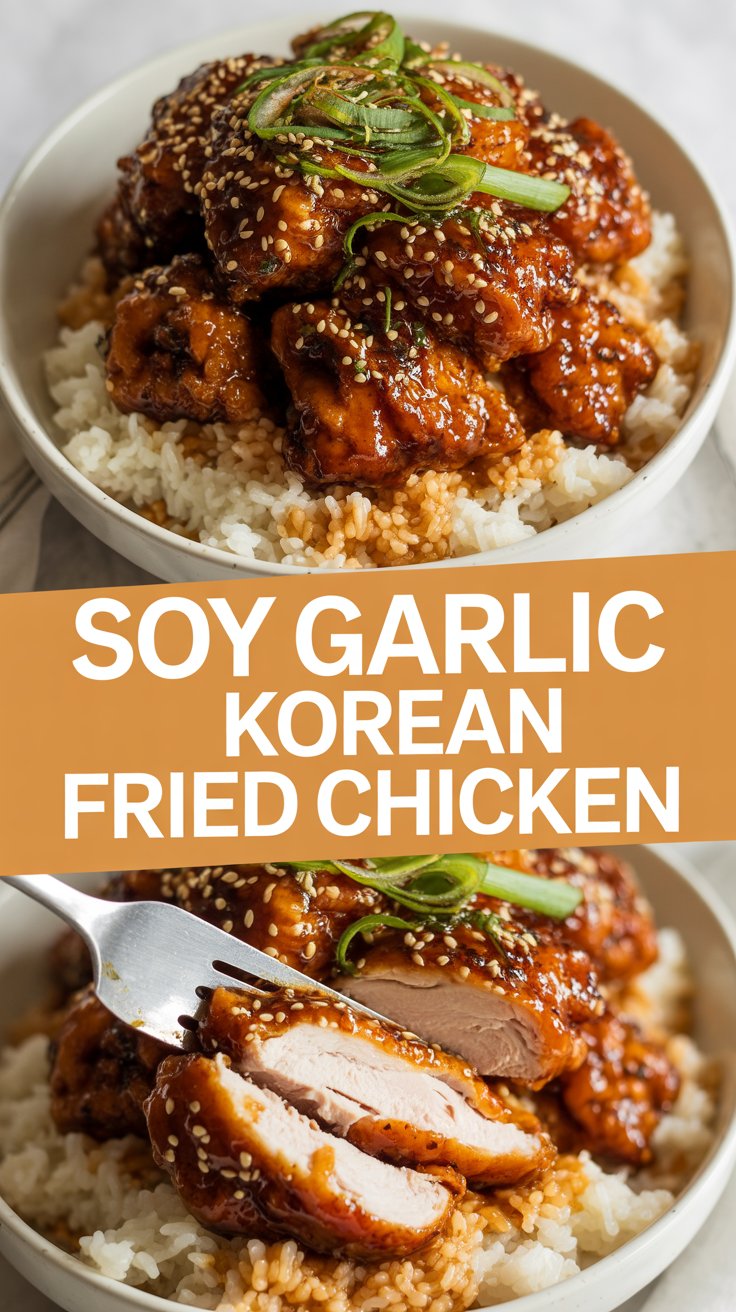
This soy-garlic Korean fried chicken delivers a crunchy, golden shell with a juicy center and a sticky-sweet-savory glaze that clings to every nook. It balances umami from **soy sauce**, brightness from **rice vinegar**, and sweetness from **brown sugar** (plus a kiss of toasted sesame). It’s crispy, glossy, and dangerously easy — even your late-night snack cravings will assemble themselves. Also: it crackles loudly when you bite it. Who doesn’t love crispy edges?
Ingredients
For the Main Dish:
2 lbs boneless, skin-on or skinless chicken thighs, cut into 1½-inch pieces (thighs stay juicier)
1 cup all-purpose flour
1 cup cornstarch (or potato starch for extra crisp)
1 tsp baking powder
1 tsp kosher salt
½ tsp black pepper
2 large eggs
½ cup cold water
Vegetable oil for frying (about 4 cups or enough for a 3–4 inch deep fryer)
For the Sauce / Garnish:
3 tbsp **soy sauce** (low-sodium works fine)
3 tbsp brown sugar, packed
2 tbsp honey
2 tbsp **rice vinegar**
3 tbsp water
4 cloves garlic, finely minced
1 tbsp freshly grated ginger (optional but lovely)
1 tsp sesame oil
1 tsp toasted sesame seeds
2 green onions, thinly sliced (for garnish)
Optional: 1 tsp gochujang for a spicy kick
How I Make It
Step 1:
Pat the chicken pieces dry with paper towels — moisture fights crispness. In a bowl, whisk **2 eggs** with **½ cup cold water** until frothy. In a separate large bowl, combine **1 cup flour**, **1 cup cornstarch**, **1 tsp baking powder**, **1 tsp kosher salt**, and **½ tsp black pepper**. Toss the chicken in the egg wash, then dredge in the flour mixture, shaking off excess. I like to let the coated pieces rest on a rack for 5 minutes so the coating adheres — this little wait pays off in crunch.
Step 2:
Heat oil in a deep pot or Dutch oven to 330°F (use a thermometer; guessing ruins the texture). Fry the chicken in batches — don’t overcrowd — for about 4–5 minutes until the exterior turns light golden. The oil will hiss and sputter; that’s the good sound of moisture leaving the chicken. Transfer pieces to a wire rack and let them rest for 5–7 minutes.
Step 3:
While the chicken rests, make the sauce. In a skillet over medium heat, combine **3 tbsp soy sauce**, **3 tbsp brown sugar**, **2 tbsp honey**, **2 tbsp rice vinegar**, **3 tbsp water**, **4 cloves minced garlic**, and **1 tbsp grated ginger** if using. Stir constantly and bring to a gentle simmer. Let the sauce bubble and reduce for about 3–4 minutes until glossy and slightly syrupy — you’ll smell deep garlic and caramel notes. Stir in **1 tsp sesame oil** and remove from heat.
Step 4:
Increase the oil temperature to 375°F. Give the chicken a second fry in batches for 1–2 minutes until deeply golden and ultra-crispy. This double-fry makes the coating shatteringly crispy while keeping the inside juicy. Drain briefly, then toss the hot pieces in the warm sauce — toss quickly so the glaze clings without turning soggy. You want a shiny, sticky coating that crackles when you bite.
Step 5:
Plate the chicken immediately, sprinkle with **toasted sesame seeds** and **sliced green onions**, and serve while hot. The contrast of the glossy dark brown sauce and bright green onions looks beautiful, and the aroma will pull everyone to the table. If any pieces sit too long, pop them back in the oven at 250°F on a wire rack for a few minutes to re-crisp.
Pro Tips
Use a thermometer: keeping oil at 330°F then 375°F makes the difference between soggy and legendary crunch.
Try half cornstarch, half rice flour for a lighter, super-crisp texture — rice flour gives a delicate, crackly bite.
Don’t let the sauce boil too aggressively; it can burn the sugar. Keep it at a lively simmer until slightly thick.
If you want extra garlic punch, lightly sauté the garlic first to mellow its raw bite before adding liquids.
Common Mistakes to Avoid
Skipping preheating: Classic rookie move. It changes texture and bake time.
Overmixing: Leads to dense or chewy results. Mix until just combined.
Guessing cook time: Always use visual cues or a timer, not just vibes.
Overcrowding pans: Give your food some breathing room to crisp properly.
Alternatives & Substitutions
Chicken ↔ Tofu: Use extra-firm tofu pressed and cut into cubes; double-fry the same way for a crunchy vegetarian version. Texture will be firmer and less juicy.
All-purpose flour ↔ Gluten-free: Swap flour for rice flour or a 1:1 gluten-free blend to make it gluten-free; the crust will be slightly more delicate.
Honey ↔ Maple syrup: Use maple for a different floral sweetness; sauce thins slightly so reduce the water by 1 tbsp.
Dairy-free: This recipe uses no dairy. For a buttery note, you can finish with a pat of butter (optional).
Variations & Tips
Spicy Soy-Garlic: Add 1 tbsp gochujang to the sauce for heat and color.
Sweet & Sticky: Double the honey and skip the vinegar for a candy-like glaze (watch the sugar when reducing).
Kid-Friendly: Omit gochujang and reduce garlic to 2 cloves for milder flavor.
Oven/air-fryer option: Coat the chicken and bake at 425°F for 20–25 min (flip halfway) or air-fry at 400°F for 10–12 min, then toss with sauce — crispness will differ from double-fry.
Creative twist: Finish with a drizzle of kewpie mayo mixed with a little gochujang for a creamy, tangy kick.
FAQ (Frequently Asked Questions)
Can I make this ahead of time?
Yes! Prep the chicken through the first fry and store in the fridge. Re-fry or reheat in a hot oven or air fryer to re-crisp, then toss with freshly made sauce. Sauce stores in the fridge up to 4 days; reheat gently.
Can I double the recipe?
Sure thing. Use larger pots and fry in more batches so you don’t overcrowd the oil. Double the sauce ingredients or make two batches if you like extra glaze.
Can I substitute butter with oil?
Technically yes, but you’ll miss that buttery magic. Use ¾ the amount of oil.
How do I know it’s done?
Look for a deep golden-brown crust and internal juiciness. Cooked chicken thighs reach 165°F internal temperature. The second fry should give a crisp, crackly texture and a rich color.
What if I don’t have ingredient X?
If you lack rice vinegar, use apple cider vinegar but cut it to 1½ tbsp to avoid overpowering brightness. No cornstarch? Use extra flour plus 1–2 tbsp potato starch or rice flour for crispness.
How I Like to Serve It
I serve this over a bed of steamed rice with quick cucumber pickles (thin cucumber, rice vinegar, pinch of sugar) and a cold beer or iced green tea. It shines at weeknight dinners and steals the show at casual parties — people pick at it like it’s party candy. In cooler months, I pair it with kimchi-jjigae for a cozy, spicy contrast.
Notes
Store leftovers in an airtight container for up to 3 days. Re-crisp in a hot oven (400°F) or air fryer for best texture.
Safe cooking temp for chicken: 165°F internal temperature.
Final Thoughts
Closing: Now go impress someone — or just yourself — with your homemade masterpiece!
Hi, I’m Lina, the creator of Lina Easy Recipes.Cooking has always been my passion, and I love sharing simple, homemade dishes that anyone can prepare.
Spread the love
Love What You See?
Join me on Pinterest and Facebook for daily cooking inspiration, new recipe ideas, and behind-the-scenes kitchen stories. Let’s cook something wonderful together!