Zombie Brain Red Velvet Cake – creepy Halloween party cake
Spread the love
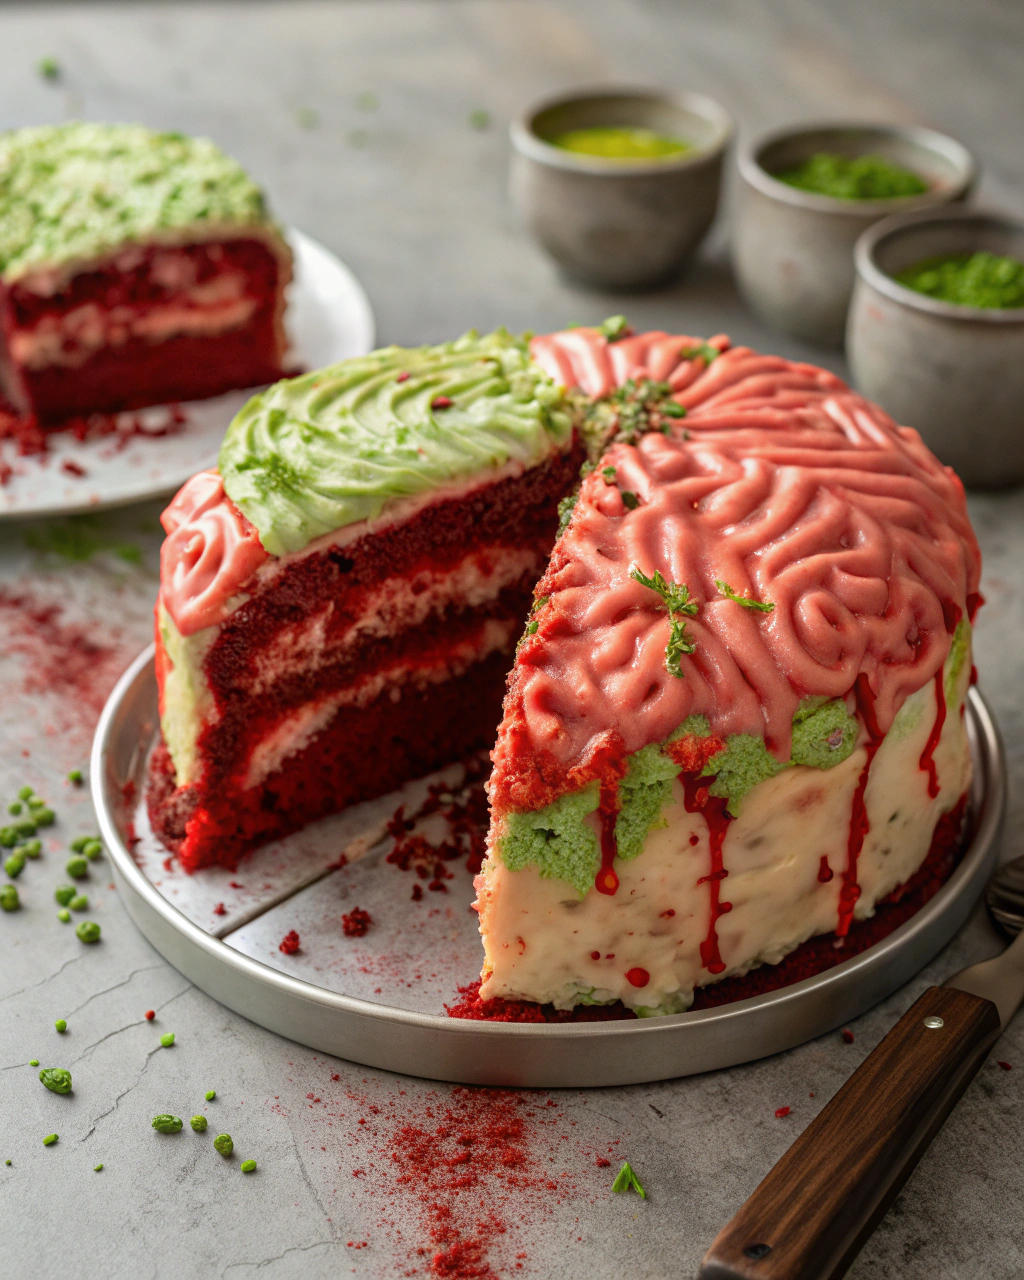
Zombie Brain Red Velvet Cake – creepy Halloween party cake
Alright, picture this: it’s Halloween night, and you want to impress your friends (or terrify them a little) with something totally unforgettable. This Zombie Brain Red Velvet Cake is exactly what you need—it’s spooky, it’s delicious, and honestly, a little bit fun to carve up and decorate. The deep red velvet layers are super moist, with that classic gentle cocoa flavor, and the creamy frosting turns into a “brainy” masterpiece with just a few simple, gooey twists. Plus, the sweet tang of cream cheese contrasts perfectly with the rich cake, giving you all the comfort and all the creepiness. Trust me, once you see that shiny, “bloody” raspberry sauce drizzled on, you’ll be grinning like a mad scientist ready for the ultimate Halloween bash!
Quick Facts
Yield: Serves 10-12
Prep Time: 25 minutes
Cook Time: 30 minutes
Total Time: 1 hour 15 minutes (including cooling and decorating)
Ingredients
For the Main Dish:
2 ½ cups all-purpose flour
1 ½ cups granulated sugar
1 tsp baking soda
1 tsp fine salt
1 tbsp unsweetened cocoa powder
1 ½ cups vegetable oil
1 cup buttermilk, room temperature
2 large eggs, room temperature
2 tbsp red food coloring
1 tsp vanilla extract
1 tsp white vinegar
For the Frosting & Decoration:
16 oz cream cheese, softened
½ cup unsalted butter, softened
4 cups powdered sugar, sifted
1 tsp vanilla extract
Raspberry jam or fresh raspberry sauce (for “blood” drips)
Optional: gummy worms, edible eyeballs, or candy bones for creepy effect
How I Make It
Step 1:
First up, preheat your oven to 350°F and grease two 9-inch round cake pans. In a big mixing bowl, whisk together flour, sugar, baking soda, salt, and cocoa powder until everything is evenly mixed. This dry mix sets the stage for that perfect crumb!
Step 2:
In another bowl, blend the vegetable oil with buttermilk, eggs, red food coloring, vanilla extract, and vinegar. Make sure the liquids are well combined, the red hue is bold, and everything feels silky smooth.
Step 3:
Pour the wet ingredients into the dry mix and gently fold with a spatula until just combined—no overmixing, or you’ll lose that tender crumb. Divide the batter evenly between your pans and pop them in the oven for about 28–32 minutes. A toothpick inserted in the center should come out clean.
Step 4:
Allow the cakes to cool in the pans for 10 minutes, then turn out onto wire racks to cool completely. While the cake chills out, whip up the frosting by beating the softened cream cheese and butter together until creamy. Slowly add the powdered sugar and vanilla, beating until fluffy and spreadable.
Step 5:
Once the cakes are fully cooled, level the tops if needed so they stack evenly. Spread a thick layer of frosting between the layers, then frost the top and sides smoothly. Now for the fun part: use a piping bag or a spoon to create “brain-like” folds and ridges on the top by swirling the frosting, mimicking those creepy crevices.
Step 6:
Finally, drizzle raspberry jam or sauce in thin streams over the frosting to look like fresh “blood” oozing. For an extra spooky touch, place some gummy worms or candy eyeballs for that eerie vibe. Refrigerate until party time, then watch your guests’ reactions when you slice into this delightfully gory masterpiece!
Variations & Tips
Use beet juice or natural food coloring for a more natural red hue.
Swap out raspberry sauce for strawberry or cherry jam for a different “bloody” effect.
Add a splash of coffee to the batter to intensify the cocoa flavor.
If you don’t have buttermilk, mix 1 cup milk with 1 tbsp lemon juice and let sit for 5 minutes.
Keep your cream cheese and butter at room temperature to avoid lumps in frosting.
Use a serrated knife to level cakes evenly for neater layers.
How I Like to Serve It
Slice this cake up at your Halloween party alongside spooky cocktails or hot apple cider for maximum cozy creepiness. It’s a real showstopper that’s perfect for sharing, wrapped in eerie decorations and accompanied by a side of giggles and gasps. Best served chilled but brought to room temp for that perfect bite.
Notes
Store any leftovers in the fridge, tightly covered, for up to 4 days.
Let refrigerated cake sit out for 20-30 minutes before serving for softer texture.
Closing: This Zombie Brain Red Velvet Cake never fails to steal the show—it’s spooky, sweet, and surprisingly easy to make, perfect for your next Halloween fright fest!
Hi, I’m Lina, the creator of Lina Easy Recipes.Cooking has always been my passion, and I love sharing simple, homemade dishes that anyone can prepare.
Spread the love
Love What You See?
Join me on Pinterest and Facebook for daily cooking inspiration, new recipe ideas, and behind-the-scenes kitchen stories. Let’s cook something wonderful together!


 - spooky Halloween cupcake idea")
